Prep time: 10 minutes
Cook time: 15 minutes
Total time: 25 minutes
Servings: 12 bars
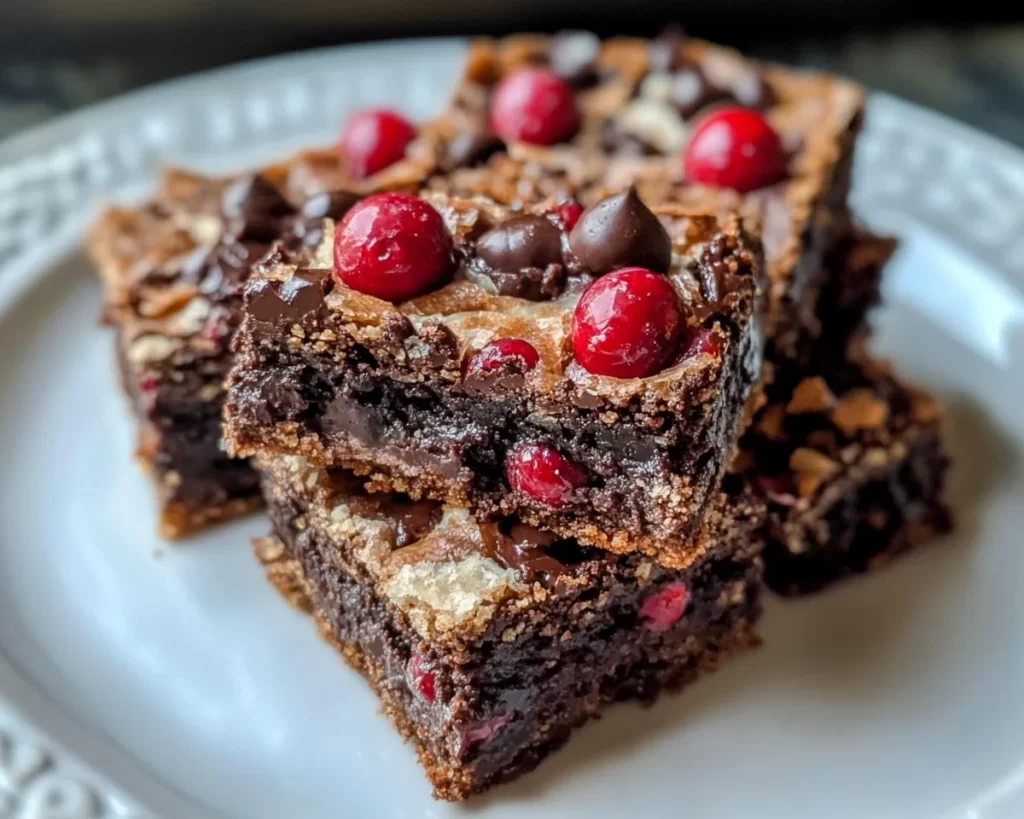
Black Forest Cookie: Fudge Topped Black Forest Cookie Bars in 25 Minutes is a delightful dessert that brings together the rich flavors of chocolate and cherries. These bars are named after the famous Black Forest cake, capturing the essence of its ingredients and taste in an easy-to-make cookie bar format. Whether you’re preparing for a family gathering, a bake sale, or simply treating yourself, this recipe is both quick and satisfying.
What Is Black Forest Cookie: Fudge Topped Black Forest Cookie Bars in 25 Minutes?
The Black Forest Cookie is a modern take on a classic dessert. It features a soft, fudgy base enhanced with chocolate chips and topped with a rich chocolate fudge layer. The integration of sour cherries not only adds a pop of color but also balances the sweetness, reminiscent of the traditional Black Forest cake. These bars are baked in a single tray and can be cooled and sliced into perfect squares, making them ideal for sharing.
Why You’ll Love This
There are many reasons to adore these Black Forest Cookie bars. First and foremost, the **combination of flavors** is unbeatable. The tartness of cherries pairs beautifully with the sweet chocolate fudge, creating a delightful contrast. Additionally, the recipe is incredibly **simple and quick**, making it perfect for busy parents or kitchen beginners who want an impressive dessert without spending hours in the kitchen. Finally, these bars are **perfect for meal prep**, as they store well, allowing you to enjoy them throughout the week or share them with friends and family.
Ingredients You’ll Need
- 1 cup unsalted butter (softened): This acts as the base for your cookie, providing richness and a chewy texture. Make sure to let it soften at room temperature before using.
- 1 cup granulated sugar: Sugar sweetens the bars and helps to achieve that perfect crust on the top.
- 1 cup brown sugar: Brown sugar adds moisture and a deeper flavor due to its molasses content.
- 2 large eggs: Eggs are essential for binding the ingredients together and adding structure.
- 2 teaspoons vanilla extract: Vanilla enhances the overall flavor profile, giving the bars a warm undertone.
- 2 cups all-purpose flour: Flour provides the foundation of the cookie bars. Be sure to measure it correctly for the best texture.
- 1 cup unsweetened cocoa powder: Cocoa powder adds the chocolate flavor that is central to the recipe.
- 1 teaspoon baking soda: This helps the bars rise slightly, creating a light and chewy texture.
- ½ teaspoon salt: Salt balances the sweetness and enhances the flavors.
- 1 cup chocolate chips: For a rich chocolate experience, add semi-sweet or dark chocolate chips into the batter.
- 1 cup sour cherries (pitted): Fresh or canned sour cherries give the bars their signature tartness; they make each bite delightful.
- 1 cup chocolate fudge sauce: This will be drizzled on top to create a decadent finish.
How to Make
- Preheat the oven: Start by preheating your oven to 350°F (175°C). This ensures that your cookie bars bake evenly from the start.
- Prepare the baking pan: Grease a 9×13 inch baking pan with cooking spray or line it with parchment paper for easy removal after baking.
- Cream the butter and sugars: In a large mixing bowl, beat the softened unsalted butter, granulated sugar, and brown sugar together until the mixture is light and fluffy. This step is crucial for incorporating air, which adds to the texture.
- Add the eggs and vanilla: Beat in the eggs one at a time, followed by the vanilla extract, mixing until fully combined.
- Combine dry ingredients: In a separate bowl, whisk together the all-purpose flour, cocoa powder, baking soda, and salt until well blended.
- Mix the wet and dry ingredients: Gradually incorporate the dry mixture into the wet mixture, stirring until just combined. Be careful not to overmix, as this can lead your bars to be tough.
- Add chocolate chips and cherries: Fold in the chocolate chips and sour cherries, ensuring they are evenly distributed throughout the batter.
- Pour into the pan: Spread the batter evenly in your prepared baking pan, smoothing the top with a spatula.
- Bake: Place the pan in the preheated oven and bake for 15 minutes or until a toothpick inserted in the center comes out with a few moist crumbs.
- Cool and drizzle: Allow the bars to cool in the pan for about 10 minutes, then drizzle with chocolate fudge sauce before cutting them into squares.
Variations & Substitutions
Nutty Add-In: If you want to add some crunch, consider mixing in 1 cup of chopped walnuts or pecans into the batter. The nutty flavor will complement the chocolate and cherry wonderfully, and it adds a delightful texture contrast.
Gluten-Free Option: For a gluten-free version, substitute all-purpose flour with a gluten-free flour blend. Ensure that the blend contains xanthan gum or follow the package instructions if it doesn’t. This allows everyone to enjoy these decadent bars without worries about gluten.
Fruit Swap: Don’t have sour cherries? You can use fresh or frozen raspberries, blueberries, or even diced strawberries as a substitute. Each fruit brings its own unique flavor and can take the bars in a different direction, offering a refreshing twist.
Common Mistakes to Avoid
When making Black Forest cookie bars, avoid **overmixing the batter**; this can result in tough bars instead of the desired chewy texture. Also, be cautious when measuring flour; using too much can lead to dry cookie bars. When adding the chocolate chips and cherries, ensure they are evenly distributed, as clumps can result in uneven texture. Finally, let the bars cool in the pan for at least a bit before cutting; this prevents crumbling and allows the fudge to set a bit.
Storage, Freezing & Reheating Tips
To maximize the freshness of your Black Forest cookie bars, store them in an airtight container at room temperature for up to 5 days. For longer storage, you can freeze the bars. Place them in a freezer-safe container separated by layers of parchment paper, and they can last for up to 3 months. When you’re ready to enjoy them, thaw the bars at room temperature or warm them up in the microwave for a quick treat. This ensures they retain their **fudgy texture** and delicious flavors.
Frequently Asked Questions
Can I make these bars ahead of time?
Absolutely! Black Forest cookie bars can be made ahead of time, making them perfect for meal prep or special occasions. Bake the bars, let them cool completely, then store them in an airtight container. You can also freeze them if needed, allowing for quick and easy desserts later on.
What is the best way to cut these bars?
For clean cuts, use a sharp knife that has been warmed slightly under hot water. After drying it off, make deliberate cuts, wiping the knife between slices to prevent sticking. This technique will help you achieve beautifully cut squares of your cookie bars.
Can I add other toppings?
Certainly! Aside from chocolate fudge, you might consider topping your bars with whipped cream, a drizzle of white chocolate, or even a dusting of powdered sugar. Each of these can elevate the presentation and flavor of your bars, making them even more appealing.
What to serve with these cookie bars?
These delicious cookie bars pair wonderfully with a scoop of vanilla ice cream or a dollop of whipped cream. Additionally, a warm cup of coffee or hot chocolate complements their rich flavors, making for a delightful dessert experience.
What if I don’t have sour cherries?
If sour cherries are unavailable, fresh or frozen alternatives such as raspberries or blueberries can be used instead. Each will lend a different, yet equally delightful, flavor to your cookie bars. Just ensure they’re well-drained if canned, and adjust sugar levels accordingly if using very sweet fruits.
Conclusion: The Black Forest Cookie: Fudge Topped Black Forest Cookie Bars in 25 Minutes is a delightful treat that captures the essence of the classic dessert in an easy-to-make format. From its rich flavors to its quick preparation time, it’s a recipe sure to please everyone. So gather your ingredients, follow the steps, and enjoy this chocolatey cherry goodness!