Prep time: 15 minutes
Cook time: 30 minutes
Total time: 45 minutes
Servings: 1 pie crust
Every time I think about baking, my thoughts wander back to my grandmother’s kitchen, where the air was always filled with the rich aroma of freshly baked pies. Her secret? It was all about her perfect pie crust recipe, which was simple yet extraordinary. This recipe is not just about making a pie crust; it’s about crafting a cornerstone of countless cherished memories. Imagine biting into a slice of warm apple pie, the crust flaky and golden, paired exquisitely with the sweet and tangy filling.
In this article, you’ll learn how to recreate that magic in your home kitchen. We’ll dive deep into the fascinating world of pie crust making, sharing tips and techniques that ensure your success. Whether you’re preparing for Thanksgiving or simply craving a slice of comfort, this guide will empower you to bring that beloved family tradition to life.
What Is Grandma’s Perfect Pie Crust Recipe?
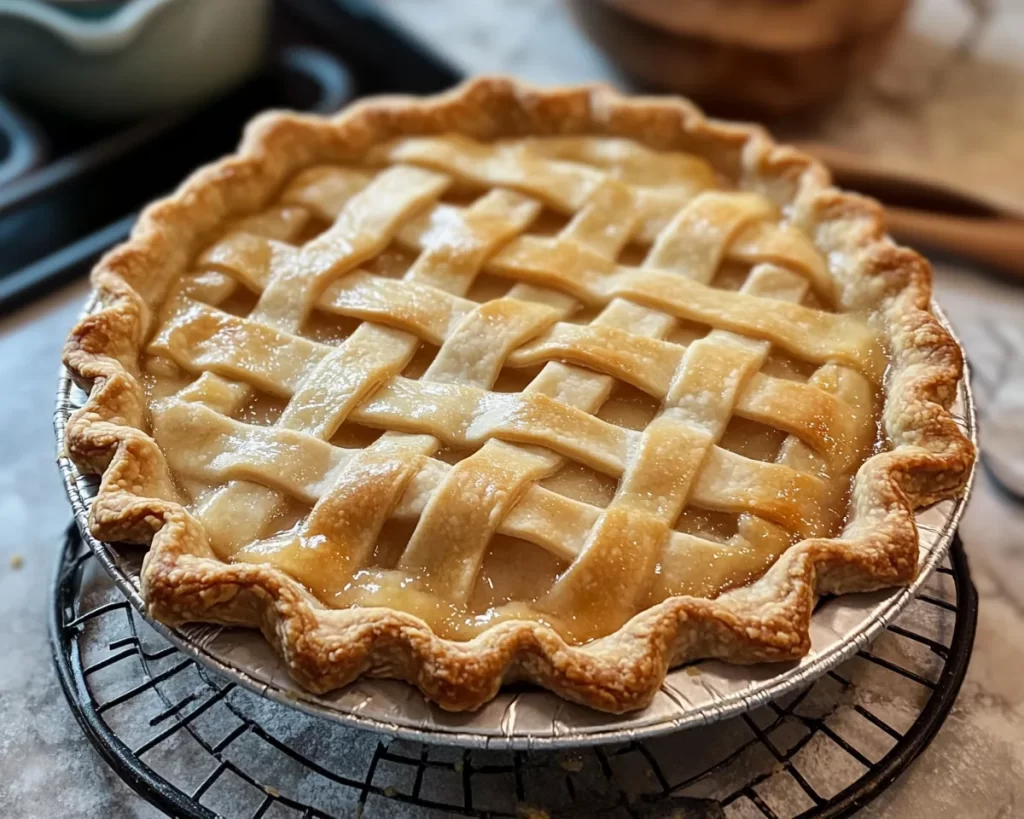
Grandma’s Perfect Pie Crust recipe is a cherished family heirloom and a staple in many households, renowned for its light and flaky texture. Originating from an era when food was made from scratch, this pie crust emphasizes using quality ingredients, such as **all-purpose flour**, **butter**, **salt**, and **water**. The dough comes together effortlessly, forming a cohesive mixture that achieves the ideal consistency for rolling out.
The key to this crust’s magic lies in the **butter**, which provides unmatched flavor and creates that desirable flakiness. As the crust bakes, the butter melts and forms steam, causing the layers to separate, resulting in a texture that melts in your mouth. This recipe yields a crust that’s not too thick, letting the filling shine while providing just the right amount of structural support. The flavor profile has a subtle richness that complements any filling you choose, from fruit to custard.
This pie crust can be a simple sidekick or the star of the show—it’s versatile enough for any occasion. With just a few ingredients and techniques, you can master Grandma’s Perfect Pie Crust recipe, filling your kitchen with warmth and nostalgia.
Why You’ll Love This
One of the primary reasons you’ll fall in love with Grandma’s Perfect Pie Crust recipe is its **complex flavor and texture**. Unlike store-bought varieties that are often laden with preservatives and chemicals, this homemade version bursts with fresh, natural flavors. You control what goes into it, ensuring a healthier option for you and your loved ones. Plus, using quality **butter** truly elevates the flavor, creating a beautiful contrast with sweet or savory fillings.
Another highlight of this recipe is its **ease of preparation**. Even if you’re new to baking, this recipe provides straightforward instructions that will have you feeling like a professional pastry chef in no time. The rolling and shaping process may seem daunting, but it’s part of the fun! With practice, you’ll find yourself effortlessly creating perfect circles of dough that can be fitted into any pie dish.
Many home cooks worry that making pie crust from scratch will result in a failed endeavor. Common pitfalls include too much water, overworking the dough, or not letting it rest. Fortunately, this article will guide you to overcome these challenges. By following the steps closely and using the recommended techniques, you’ll not only produce a beautiful crust but also gain the confidence to tackle more complex recipes.
Ingredients You’ll Need
To craft your own **perfect pie crust**, you will need the following ingredients:
- All-purpose flour: The foundation of your crust, it provides structure. You can substitute it with whole wheat flour for a nuttier flavor.
- Unsalted butter: This adds richness and the beloved flakiness. Ensure you keep it cold to prevent it from melting into the flour.
- Salt: Enhances flavor. Feel free to use sea salt for a more robust taste.
- Ice water: Helps to bind the dough without activating too much gluten and is essential for keeping everything cold.
Let’s explore each ingredient further to understand their roles better:
* **All-purpose flour**: This is your base and plays a critical role in the texture of the pie crust. It’s versatile and can be swapped for gluten-free flour blends if you have dietary restrictions. If you’re using gluten-free options, look for blends that include xanthan gum to help with elasticity.
* **Unsalted butter**: Using unsalted gives you control over the total sodium content. For a vegan version, you could use plant-based butter or coconut oil, though the texture may differ slightly. Ensure your butter is cold when cutting it into the flour to keep your crust flaky.
* **Salt**: The unsung hero of baking, this simple ingredient enhances the overall flavor of the crust. If you prefer a slightly sweet crust, you can reduce the salt or even add a teaspoon of sugar to the mix.
* **Ice water**: The temperature is essential; using ice-cold water helps keep the dough from becoming tough. You can make your ice water by adding a few ice cubes to cold tap water. This tiny detail can make a significant difference in the final product.
How to Make
Making the perfect pie crust may seem like a daunting task, but with the right approach, you can conquer it! Here are the step-by-step instructions to guide you through the process:
- Gather your ingredients: Begin by measuring out 2 and ½ cups of all-purpose flour and placing it in a large mixing bowl. You want to ensure that you have everything close at hand to streamline the process.
- Add the salt: Sprinkle in 1 teaspoon of salt over the flour and give it a quick whisk with a fork to ensure an even distribution. The salt will season the crust perfectly and enhance the delicious buttery flavor.
- Cut in the butter: Take 1 cup (2 sticks) of cold, unsalted butter and cut it into small cubes. Add this to your flour mixture. It’s crucial to work quickly to prevent the butter from warming up. Use a pastry cutter or your fingers to break down the butter into pea-sized pieces. This will create that much-desired flakiness in the crust.
- Incorporate the ice water: After the butter has been incorporated, begin adding ice-cold water, 1 tablespoon at a time. Mix with your hands or a spatula until the dough holds together but is not sticky. Aim for around 5 to 6 tablespoons total – more if necessary, but be cautious not to overwork the dough.
- Chill the dough: Form the dough into a ball and flatten it into a disc shape. Wrap it in plastic wrap and refrigerate for at least 30 minutes. This resting period allows the gluten to relax, making it easier to roll out later.
- Roll out the dough: Once chilled, lightly flour your countertop to prevent sticking. Using a rolling pin, roll the dough out into a circle about 12 inches in diameter. Aim for a thickness of about ⅛ inch. Feel free to use even more flour as needed to prevent sticking.
- Transfer to the pie dish: Carefully transfer the rolled-out dough to your pie dish. You can do this by rolling the dough around the rolling pin and gently unrolling it over the dish. Press it in gently without stretching. Trim off any excess dough hanging over the edges.
- Pierce the base: Use a fork to pierce several holes in the bottom and sides of your crust. This step prevents air pockets from forming as the pie bakes. It ensures a beautifully even crust.
- Pre-bake if necessary: If your pie requires a pre-baked crust, place it in a preheated oven at 375°F (190°C) for 10-15 minutes, or until lightly golden. Remove it and fill with your choice of filling.
- Cool and enjoy: Allow your pie crust to cool before adding your fillings. If it’s for a custard pie, ensure it cools completely. A perfectly baked crust paired with your favorite filling will be the highlight of any meal!
Variations & Substitutions
Sweet Pie Crust Variation: If you’re making a dessert pie, a sweet pie crust can elevate the overall taste. Simply add 2 tablespoons of granulated sugar to the dry ingredients when mixing. This minor adjustment enhances sweet fillings such as fruit and custard pies without overpowering them.
Whole Wheat Pie Crust Variation: If you’re looking for a nuttier flavor and added nutrition, consider swapping half or all of the all-purpose flour with whole wheat flour. Keep in mind that the texture may be slightly different; it can be a bit tougher but has a wonderful rustic appeal. You might also need to add a little more water, so monitor the dough as you mix.
Vegetarian/Vegan Pie Crust Variation: For a **vegan-friendly** version, replace the butter with a plant-based alternative, such as coconut oil or a dairy-free margarine. The texture will differ slightly, but it still produces a delicious crust. You can also try adding a tablespoon of ground flaxseed mixed with water as a binder.
No-Roll Pie Crust Variation: For those who find rolling dough cumbersome, a no-roll option exists! Combine the flour, melted butter, salt, and water, then press it directly into your pie pan. This method may yield a slightly different texture, but it’s a time-saver and works well for savory pies.
Herb-Infused Pie Crust Variation: To add a unique twist, consider incorporating fresh herbs, like rosemary or thyme, into your dough. Add about 1 tablespoon of finely chopped herbs to the dry ingredients for an aromatic crust that pairs beautifully with savory fillings like quiche or vegetable pies.
Common Mistakes to Avoid
When making Grandma’s Perfect Pie Crust, several common mistakes can lead to a subpar crust. One of the most critical errors is overworking the dough. As you mix and knead, you activate the gluten in the flour, leading to a tough crust rather than a flaky one. Remember, less is more! Mix until the ingredients are just combined, and you see small chunks of butter.
Another pitfall is using warm or melted butter. This can result in a dense and greasy pie crust. Always start with very cold butter and ensure your kitchen is cool during preparation. If you feel your kitchen is too warm, consider chilling your mixing bowl and utensils as well.
Using too much water is another common mistake. While hydration is essential to bind the flour and fat, excess water can make your crust tough. Always add ice water gradually and just enough for the dough to hold together. Your crust should feel tender and slightly tacky rather than wet.
Lastly, neglecting to let the dough rest can also compromise your crust. Chilling the dough allows the gluten to relax, making it more pliable for rolling. If you skip this critical step, you might find rolling out your dough difficult, and the final bake suffers as a result.
Storage, Freezing & Reheating Tips
Proper storage can make all the difference in preserving the quality of your pie crust. If you have leftover pie crust, wrap it tightly in plastic wrap and store it in the refrigerator for up to three days. Give it a quick knead and roll before using to restore its texture.
If you want to make your crust ahead of time, consider freezing it. Form the crust into a disc and wrap it well in plastic wrap and then aluminum foil. It can be stored in the freezer for up to three months. When you’re ready to use it, simply transfer the disc to the fridge overnight to thaw.
For completely baked pie crust, let it cool fully before wrapping it in plastic. Store it in the refrigerator if you plan to use it within a week; otherwise, it can also go in the freezer, though the texture may change slightly upon reheating.
When reheating a baked pie, pop it in a preheated oven at 350°F (175°C) for about 10–15 minutes. You want it warm without drying out. You can cover the edges with foil if they start to darken too quickly.
Always remember food safety practices: when freezing anything, label it with the contents and date to keep track of what’s inside.
Frequently Asked Questions
How do I know if my pie crust is overworked?
If your pie crust feels tough and very elastic rather than tender and flaky, you may have overworked it. Ideally, your crust should be crumbly with visible pockets of butter when you cut it in. To prevent this, mix just until combined, and avoid kneading it more than necessary.
Can this recipe be used for savory pies?
Absolutely! Grandma’s Perfect Pie Crust is incredibly versatile and can be used for both sweet and savory dishes. Just adjust the flavor by adding herbs, spices, or cheese, depending on the filling you plan to use. This makes it a great foundation for quiches or pot pies.
What if my dough is too crumbly?
If your dough is too crumbly and doesn’t hold together, it likely needs a bit more moisture. Add one tablespoon of ice water at a time, mixing briefly until you achieve the right texture. Be careful not to over-mix or add too much water, as this could toughen the crust.
Can I make the dough ahead of time and store it?
Yes! You can prepare the dough ahead of time and refrigerate it for up to three days or freeze it for up to three months. Just remember to wrap it tightly to prevent it from absorbing any odors and to ensure the best texture upon reheating.
What can I do with leftover pie crust?
Leftover pie crust can be creatively repurposed! Roll it out, cut it into shapes, and bake them for delicious crusty snacks. You can also fill any scraps with jam or chocolate to create mini tarts or simply bake them as is for a crunchy treat alongside coffee or tea.
Conclusion:
In summary, Grandma’s Perfect Pie Crust recipe stands as a testament to the magic of simple ingredients combined with great technique. It’s not merely about baking; it’s about crafting memories and enjoying the fruits of your labor. So, don’t hesitate to give this recipe a try—customize it with variations and make it your own. Embrace the joy of cooking and experience the warmth that comes from sharing a lovingly baked pie with friends and family. Get ready to savor the smiles around your table when you serve your homemade creations. Happy baking!