Prep time: 30 minutes
Cook time: 45 minutes
Total time: 1 hour 15 minutes
Servings: 8
There’s something incredibly heartwarming about the flavors and aromas that fill your home during the holiday season, especially when it comes to stuffing. Cozy Grandma Dot’s Stuffing Balls Recipe is not just a dish; it’s a comforting memory that many of us hold dear. Imagine the delightful anticipation as these golden balls of stuffing come out of the oven, their crispy exteriors giving way to a soft, flavorful interior. This recipe encapsulates all that is wonderful about **homemade** food—simple ingredients that create depth, warmth, and a nostalgic feeling.
This recipe stands apart due to its unique texture and flavor combinations. The crispy outer layer, made possible by a **perfect baking technique**, envelopes a perfectly seasoned mixture that is both filling and comforting. In this article, you will learn about the various aspects of making Cozy Grandma Dot’s Stuffing Balls, from the ingredients to the preparation process, variations you can try, and some common pitfalls to avoid. The goal is not just to recreate a dish but to evoke fond memories of family gatherings around the dinner table.
What Is Cozy Grandma Dot’s Stuffing Balls Recipe?
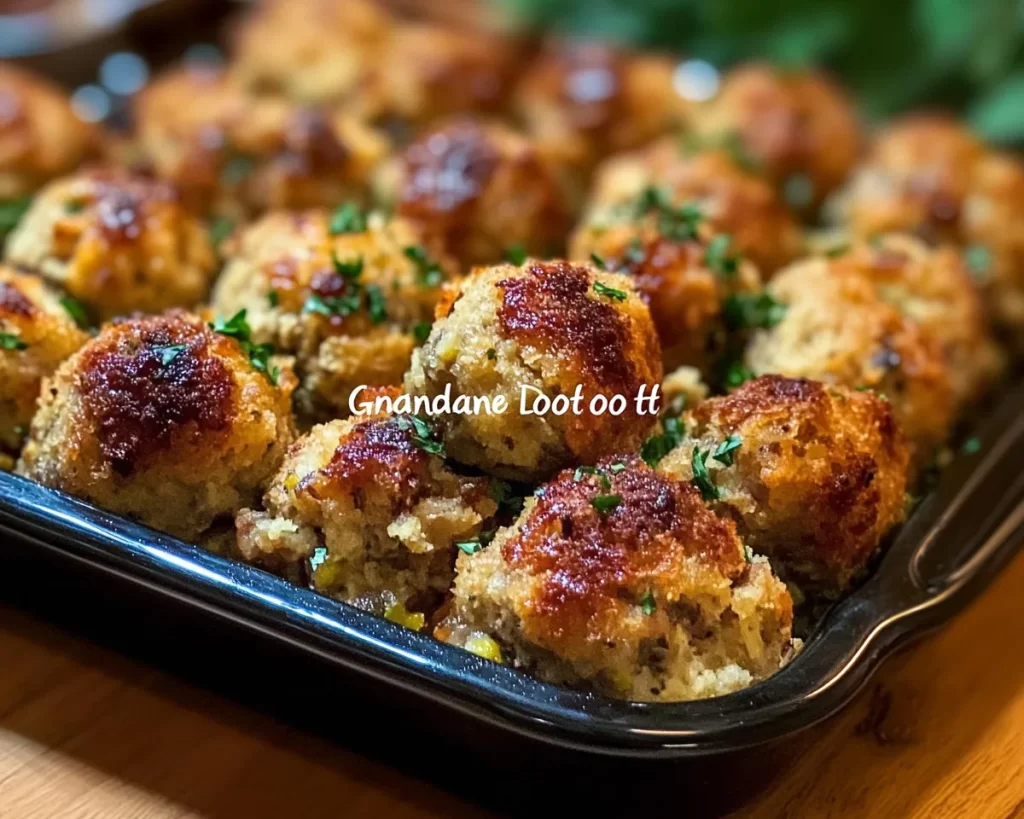
Cozy Grandma Dot’s Stuffing Balls are a beloved dish often served during the holidays but can certainly shine on any table throughout the year. This dish combines the foundational elements of traditional stuffing—**bread**, **herbs**, and **vegetables**—while shaping them into delightful balls that are easy to serve. The stuffing is often flavored with **sage**, a classic herb that enhances the overall taste, making it a perfect companion for roasted meats or a standalone dish.
The origins of this recipe trace back to family gatherings where Grandma Dot would whip up a batch that would disappear faster than anyone could get a second helping. The balls have a satisfying crunch on the outside, while maintaining a moist and flavorful filling on the inside. The interplay between the crispy crust and the soft center creates a texture sensation that will leave a lasting impression on anyone fortunate enough to partake.
Why You’ll Love This
This recipe is the epitome of comfort food; it’s not just about taste, but also about the memories it creates. For starters, you will enjoy the wonderful blend of flavors that come from using fresh herbs and quality ingredients. Unlike store-bought stuffing, which can often lack depth, Cozy Grandma Dot’s Stuffing Balls bring a homemade essence that’s both hearty and satisfying.
Another reason you’ll love this recipe is its **versatility**. You can easily adjust the ingredients based on your dietary preferences or what’s available in your pantry. Additionally, your budget will thank you—this dish uses affordable ingredients that yield plentiful servings, making it a great choice for meal prepping or feeding a crowd.
Many people mistakenly think that making stuffing balls requires advanced cooking skills or specialized equipment. However, this recipe is designed to be accessible for all skill levels. Even beginner cooks will find great success, especially when following the detailed instructions included in this article.
Ingredients You’ll Need
- Day-old Bread: The base of any stuffing, day-old bread provides the perfect texture. It’s important to dry it out a little to absorb flavors. You can substitute with gluten-free bread if needed for dietary preferences.
- Onion: A staple flavor enhancer that adds sweetness and depth. Yellow onions are the most common but feel free to use shallots for a milder taste.
- Celery: This adds a nice crunch and a slight earthiness. If you’re a fan of different textures, you can also use diced bell peppers.
- Herbs: Fresh sage, thyme, and parsley are essential for that classic stuffing flavor. If fresh herbs aren’t available, dried alternatives can also work.
- Vegetable Broth: Keeps the stuffing moist while adding richness. You can use chicken broth for added flavor or vegetable broth to keep it entirely vegetarian.
- Eggs: Acts as a binder and helps the stuffing hold its shape while baking. For a vegan alternative, consider using flaxseed meal mixed with water as a binding agent.
These ingredients come together to create a delightful dish that is simple yet bursting with flavor. Feel free to adapt them according to your needs or preferences; after all, cooking is about experimentation and finding what works for you.
How to Make
- Prepare the Bread: Start by cutting your day-old bread into cubes. If it’s too fresh, you may want to leave it out for a few hours to dry out. This process helps the bread absorb the broth later while maintaining its structure.
- Sauté the Vegetables: In a large skillet, melt 4 tablespoons of butter over medium heat. Add diced onions and celery, cooking until they become soft and translucent, about 5-7 minutes. This step enhances the flavors significantly, creating a delicious aromatic base.
- Mix the Ingredients: In a large mixing bowl, combine the bread cubes, sautéed vegetables, and chopped herbs. Next, pour in the vegetable broth gradually, allowing the bread to soak up the liquid. The mixture should be moist but not soggy, so adjust the broth amount as necessary.
- Bind the Mixture: Crack the eggs into the mixture and stir well to combine. The eggs help hold the stuffing together. If you prefer a vegan option, mix ground flaxseeds with water and allow it to sit for about 5 minutes before adding it to the mixture.
- Form the Balls: Using your hands, form the mixture into golf ball-sized balls. If they are crumbling, you might need to add more broth or beat another egg to bind it further. Place the formed balls onto a baking sheet lined with parchment paper.
- Bake the Stuffing Balls: Preheat your oven to 375°F (190°C). Bake the stuffing balls for 25-30 minutes or until they turn golden brown and crispy on the outside. This baking technique helps to lock in flavors while providing a satisfying crunch.
- Serve and Enjoy: Once baked, serve the stuffing balls warm. They pair wonderfully with gravy or cranberry sauce, adding a delightful contrast of flavors and textures on your dining table.
Each of these steps contains crucial elements in creating a mouthwatering dish. Take your time with the sautéing, as this adds tremendous depth of flavor, and remember that the binding agent is key to ensuring that your stuffing balls hold their shape during baking.
Variations & Substitutions
Herb-Infused Stuffing Balls: If you’re someone who loves a burst of flavor, try infusing the butter with additional herbs before sautéing the vegetables. Simply add sprigs of fresh herbs like rosemary or thyme to the melted butter, allowing them to steep for a few minutes before adding your onions and celery. This small change will significantly elevate the flavor of your stuffing balls, making them even more aromatic and delicious.
Cheesy Stuffing Balls: Cheese lovers will rejoice at this variation. Incorporate shredded cheese, such as cheddar or mozzarella, directly into the stuffing mixture. The cheese will melt during baking, creating a deliciously gooey texture inside. You might want to decrease the amount of broth slightly to accommodate the extra moisture the cheese brings to the dish.
Vegetable-Packed Stuffing Balls: For a healthier spin on the traditional recipe, consider adding finely chopped vegetables like carrots or zucchini. Not only will this add extra nutrition, but it will also introduce new flavors and textures. Ensure that any vegetables added are cooked first to ensure they are tender by the time the stuffing balls are ready to serve.
Gluten-Free Stuffing Balls: If you or your guests are gluten-sensitive, you can easily adapt this recipe. Use gluten-free bread and make sure all other ingredients are certified gluten-free. The texture may vary slightly, but the flavor will still shine through beautifully.
Spicy Stuffing Balls: For those who enjoy a kick, consider adding chopped jalapeños or a dash of cayenne pepper to the mixture. This infectiously spicy twist will set your stuffing balls apart and give them a unique flavor profile. Don’t overdo it; you can always start with a small amount and adjust according to taste.
Each variation allows for personal preferences to shine through, inviting creativity and ensuring that this recipe can fit into any cooking style or dietary requirement.
Common Mistakes to Avoid
When preparing stuffing balls, one common mistake is using stale bread that is too dry. This can happen if you don’t leave it out long enough or use fresh bread instead. Always aim for day-old bread that has had time to dry out, but is still somewhat soft. To fix bread that is too dry, consider adding a bit more broth to rejuvenate it.
Another pitfall is forgetting to season the mixture properly. Always taste your mixture before forming the balls to ensure that the flavors are balanced and flavorful. A dash of extra salt or herbs can make a world of difference.
If you’re finding it difficult to form the balls because the mixture is crumbling, it indicates that you may need additional binding. Adding another egg or some extra broth can help hold everything together better. Conversely, if the mixture is too wet, reduce the amount of broth in future batches to get that perfect consistency.
Storage, Freezing & Reheating Tips
Storing your Cozy Grandma Dot’s Stuffing Balls is straightforward. Once they are fully cooled, transfer them to an airtight container and store them in the refrigerator for up to 3-4 days. Ensure they are completely cooled to prevent moisture buildup in the container, which can lead to spoilage.
If you’re looking to store them for longer, consider freezing them. Place the cooled stuffing balls in a single layer on a baking sheet and freeze until solid. Then, transfer them to a freezer-safe bag or container, where they can be stored for up to 3 months. This method prevents the balls from sticking together, allowing you to grab as many or as few as needed later.
When you’re ready to indulge in your stuffing balls, you can reheat them directly from frozen. Preheat your oven to 350°F (175°C) and bake until warmed through, usually around 25-30 minutes. For a little extra crispness, finish them off under the broiler for a few minutes, but keep a close eye on them to prevent burning.
Frequently Asked Questions
Can I use other types of bread for this recipe?
Yes, you can definitely use various types of bread, including sourdough, whole wheat, or even cornbread. Each will impart a different flavor and texture, so feel free to experiment based on your preferences. Just make sure the bread is dried out enough to absorb the broth without turning mushy.
How can I make this recipe vegetarian or vegan?
You can easily adapt this recipe by using vegetable broth instead of chicken broth and switching egg with a flaxseed meal or chickpea flour mixture. This will still give you a deliciously cohesive stuffing ball that everyone can enjoy, regardless of dietary restrictions.
What can I serve with stuffing balls?
Cozy Grandma Dot’s Stuffing Balls pair wonderfully with roasted turkey, chicken, or even a hearty vegetable stew. They’re excellent alongside classic sides like mashed potatoes and gravy or crisp green beans, making them a versatile addition to any meal.
Can I prepare the stuffing balls ahead of time?
Absolutely! You can make the mixture a day in advance and keep it covered in the refrigerator. Form the balls just before baking, or assemble them entirely and store them until you’re ready to cook them.
Why do my stuffing balls fall apart?
If your stuffing balls are crumbling and falling apart, it may be due to using stale bread that is too dry or not enough binding ingredients. Always ensure that your mixture has enough moisture and eggs to hold everything together.
Conclusion:
Cozy Grandma Dot’s Stuffing Balls Recipe is a delightful dish that combines the warmth of home cooking with family tradition. With its straightforward steps and adaptable ingredients, it’s an accessible choice for both novice cooks and seasoned chefs. From its captivating flavor to the comforting aromas that fill your kitchen, this dish has a way of bringing people together. So why not give it a try? Customize it as you wish, and don’t forget to share your creation with friends and family. Cook with love, and enjoy the delightful memories that come with every bite.