Prep time: 20 minutes
Cook time: 30 minutes
Total time: 50 minutes
Servings: 16
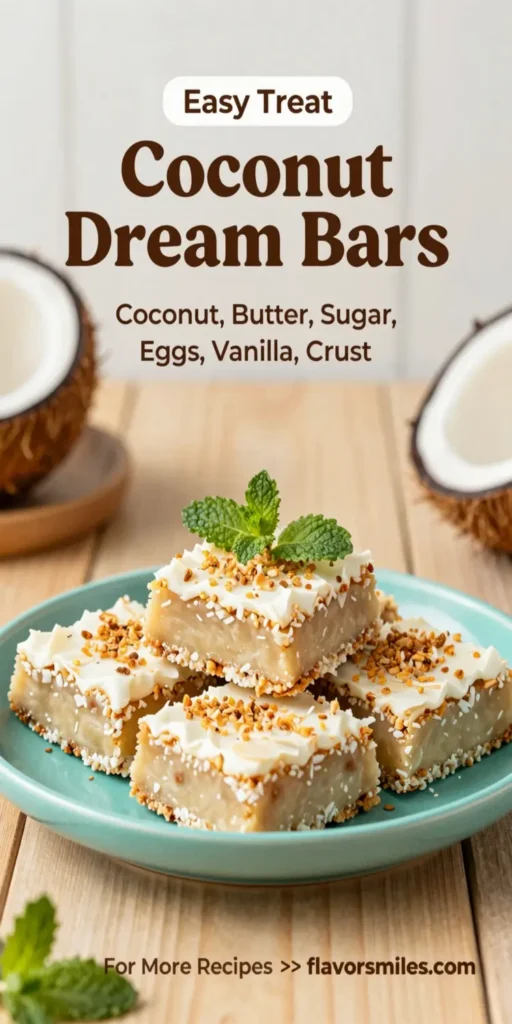
Coconut Dream Bars are an alluring dessert that transports you to sunny beaches with each bite. These bars are an irresistible combination of soft, chewy coconut and a rich, buttery crust that seems to melt in your mouth. Whether you’re hosting a gathering, looking for an easy treat to whip up on the weekend, or simply craving something sweet, these bars are the perfect solution. They are especially delightful for busy parents and novice bakers looking for a straightforward recipe that doesn’t compromise on flavor.
What Is Coconut Dream Bars?
Coconut Dream Bars are a decadent dessert bar made primarily with sweetened shredded coconut, condensed milk, and a buttery crust. The base is typically made of crushed graham crackers or shortbread cookies, providing a perfectly balanced crunch to the soft coconut filling. The bars are baked until golden and slightly crispy on the edges, while the coconut filling remains moist and chewy. Often topped with a drizzle of chocolate or a dusting of powdered sugar, these squares are a joyous treat that brings a taste of the tropics to your dessert table.
Why You’ll Love This
This Coconut Dream Bars recipe is simple and accessible, ideal for both seasoned bakers and kitchen beginners. You’ll love how easy it is to prepare, making it a go-to recipe after a long day. The delightful blend of flavors is sure to evoke feelings of warmth and comfort. They also offer versatility; you can switch up ingredients based on what you have on hand or to accommodate dietary preferences. Plus, the enchanting coconut aroma wafting through your kitchen is worth it alone.
Ingredients You’ll Need
- 1 ½ cups graham cracker crumbs: These form the base of the bars, providing a sweet and crunchy texture. You can also use crushed shortbread cookies as an alternative.
- ½ cup unsalted butter, melted: The butter binds the crumbs together and adds richness to the crust.
- 1 can (14 oz) sweetened condensed milk: This ingredient is essential for creating the gooey coconut filling, providing both sweetness and moisture.
- 3 cups sweetened shredded coconut: The star ingredient that gives the bars their signature flavor and texture, contributing to the chewy quality.
- 1 teaspoon vanilla extract: Adds a fragrant depth of flavor to the filling.
- Optional: Chocolate chips: For a decadent touch, you can sprinkle chocolate chips over the coconut layer before baking.
- Optional: Powdered sugar: For dusting upon serving, adding a lovely presentation.
How to Make
- Preheat the oven: Set your oven to 350°F (175°C) and allow it to heat while you prepare the ingredients. This ensures even baking.
- Prepare the crust: In a bowl, combine the graham cracker crumbs with the melted butter. Mix until the crumbs are fully coated and the mixture feels like wet sand. Press this mixture firmly into the bottom of a greased 9×9-inch baking dish. This creates a delicious and sturdy base for your coconut filling.
- Make the coconut filling: In another bowl, mix the sweetened condensed milk with the shredded coconut and vanilla extract. Stir until well combined. You should see a thick mixture with a nice balance of coconut flakes and creaminess.
- Assemble the bars: Evenly spread the coconut filling over the graham cracker crust in your baking dish. Use a spatula to smooth the top, ensuring it is evenly distributed. If you’re adding chocolate chips, now is the time to sprinkle them on top.
- Bake: Place the baking dish in the preheated oven and bake for around 25 to 30 minutes or until the edges are golden brown and the center is set. You’ll know it’s done when the top is lightly browned, and it releases a delightful coconut aroma throughout your kitchen.
- Cool: Once removed from the oven, allow the bars to cool in the dish for at least 10 minutes, then transfer to a wire rack to cool completely before cutting into squares. This ensures they hold their shape and texture when served.
Variations & Substitutions
Chocolate Coconut Dream Bars: For a richer flavor, you can add semi-sweet or dark chocolate chips into the coconut filling. This brings a lovely contrast to the sweet coconut and makes it even more indulgent. You might also drizzle melted chocolate across the top after baking for an extra touch of sweetness.
Gluten-Free Option: To make this recipe gluten-free, substitute the graham cracker crumbs with certified gluten-free crumbs. You can also use almond flour combined with melted butter for the crust instead.
Nutty Twist: Add in 1/2 cup of chopped nuts, like walnuts or pecans, into the coconut mixture for added crunch and flavor. This variation gives an earthy balance to the sweetness of the bars.
Dairy-Free Version: For a dairy-free alternative, use coconut oil in place of the butter and sweetened condensed coconut milk instead of regular sweetened condensed milk. You’ll still achieve the creamy texture and flavor with a different twist.
Common Mistakes to Avoid
One common mistake is not allowing the bars to cool sufficiently before cutting. Not letting them cool completely might result in them falling apart when you go to cut them. Equally, do not rush the baking process; underbaking can lead to a gooey texture that’s unappealing to many. Another issue could arise from pressing the graham cracker base too loosely; if the crust isn’t compacted enough, it may crumble when you slice the bars.
Storage, Freezing & Reheating Tips
For storage, keep any leftover Coconut Dream Bars in an airtight container at room temperature for up to three days. If you want to keep them longer, freezing is a great option. Wrap the bars tightly in plastic wrap or aluminum foil and place them in an airtight container; they can last in the freezer for up to three months. When you’re ready to enjoy them again, allow them to thaw in the fridge overnight, then bring them to room temperature before serving. For reheating, place them in a preheated oven at 350°F for about 10 minutes, allowing the bars to regain their delightful texture. Always ensure you check for proper storage guidelines to keep food safe.
Frequently Asked Questions
Can I use unsweetened coconut for this recipe? Yes, while sweetened shredded coconut is the traditional choice because it adds a delightful sweetness, unsweetened coconut can certainly be used for a less sweet alternative. You may need to adjust sweetness by adding a little extra sugar to the filling mixture to achieve the desired taste.
How can I tell when the bars are done baking? The bars are ready when they have a golden-brown top and the center feels set when gently shaken. If a toothpick is inserted, it should come out mostly clean, signaling the filling is properly baked without a gooey texture.
Can I make these ahead of time? Definitely! Coconut Dream Bars are perfect for making ahead. They actually taste even better after a day as the flavors meld together. Just make sure to store them in an airtight container to keep them fresh.
Is there a vegan version of these bars? Yes! You can make a vegan version by switching out the butter for coconut oil, and using vegan sweetened condensed milk available in stores, or making your own. This way, you can enjoy the same delightful taste with a plant-based twist.
What can I pair with Coconut Dream Bars for a dessert spread? These bars go beautifully alongside fresh fruit like strawberries or raspberries that provide a tart contrast to the sweetness. You could also serve them with a scoop of coconut ice cream or a drizzle of chocolate sauce to elevate the dessert experience.
Conclusion: Coconut Dream Bars are a delectable treat that anyone can enjoy making and sharing. With a few simple ingredients and steps, you’ll have a dessert that garners compliments and is sure to remind you of sun-kissed days. This recipe offers versatility, allowing for modifications depending on your preferences or dietary needs. So gather your ingredients and make these delightful bars—the taste will truly be a “dream”!