Let’s Get Real
Okay, can we take a second to talk about chocolate? Like, how amazing is it? If chocolate were a person, I’d probably marry it. And don’t even get me started on chocolate bark. It’s like the kid-friendly cousin of gourmet chocolate, the kind that says, “I’m a little fancy, but I also have a fun side.”
I remember the first time I attempted to make chocolate bark. It was one of those situations where I thought, “How hard could it be? It’s just melting chocolate and tossing in some toppings.” Spoiler alert: I melted more than just the chocolate. Let’s just say a rogue tablespoon of salt wandered its way into the mix, and by the time my bark was set in the fridge, it was basically a chocolate salt lick. But we live, we learn, and boy did that teach me to pay attention while baking.
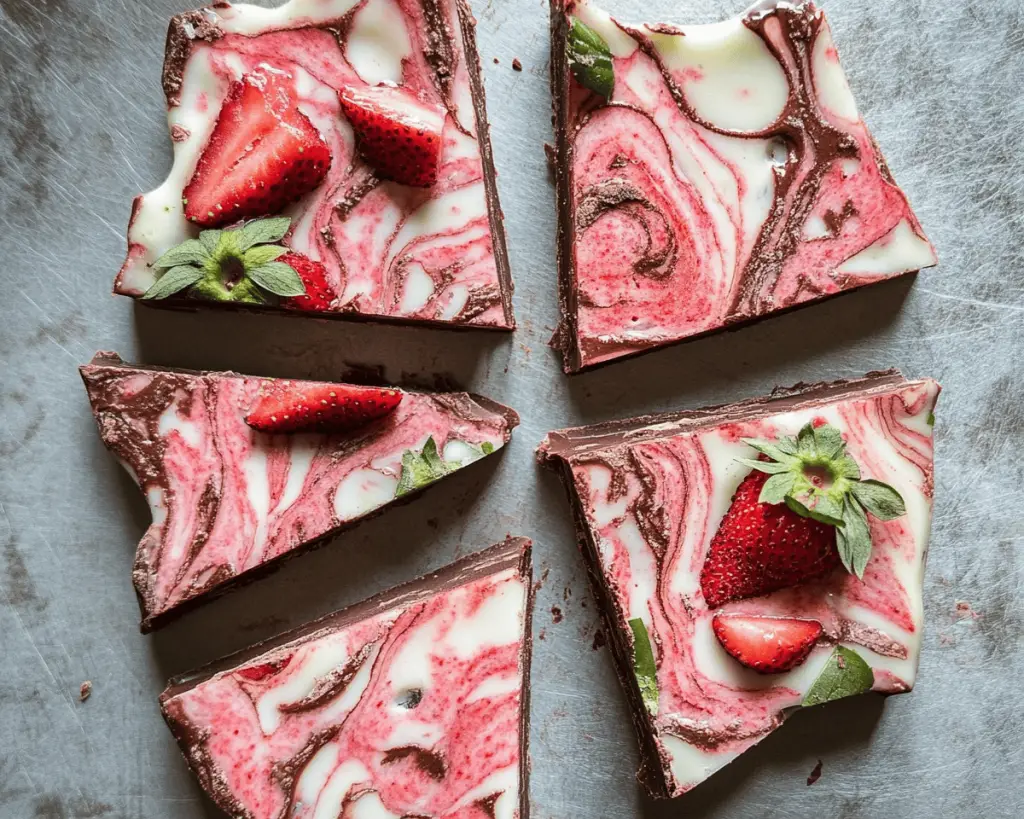
Now, you’d think after a disaster like that, I’d never touch chocolate bark again, but instead, I lived to tell the tale and changed my ways! Fast forward to my current obsession with this deliciously sweet and slightly tangy Chocolate Bark with Strawberry Swirls. Seriously, it’s a game changer. It’s sweet, it’s festive, it makes my kitchen smell heavenly, and let’s face it, stripes of strawberry swirls just look so darn enticing. It’s like art, but edible!
Ingredients, Unfiltered
What’s Really in Chocolate Bark with Strawberry Swirls
Let’s get into the ingredients because, trust me, this is where the magic starts happening! And yes, you can totally feel my excitement through your screen right now.
Chocolate: Ah, the star of the show. I typically go for high-quality dark chocolate; because let’s be honest, if we’re indulging, let’s do it right! But if you prefer milk chocolate (I won’t judge – much), that works too. Just make sure it’s something you genuinely like to eat on its own.
Strawberry Puree: So here’s where I go off-script. You could buy a fancy strawberry puree, but let’s not pretend we’re made of money, okay? Just blend up some fresh strawberries, and voila! If you’re feeling extra lazy (and I get it, we all have those days), you can snag some store-bought puree. No shame here; we all have busy lives!
Coconut Oil: Why coconut oil, you ask? Because it keeps the chocolate glossy and oh-so-smooth. Plus, it adds this lovely tropical flair that makes me dream of sun-soaked beaches and piña coladas.
Salt: I know, I know. “But doesn’t chocolate already have sugar?” Yes, my friend, and that’s why the salt is crucial. It balances the sweetness and makes flavors pop. Just a pinch will do; don’t go overboard like I did that one time!
Optional Toppings: So, this is where you get to channel your inner artist—sprinkle on some crushed nuts, dried fruits, or even more strawberries if you want to show off. Go wild! But remember, balance is key, much like in life!
Let’s Talk Health (or Not)
Is This Even Healthy? Let’s Discuss
Okay, let’s break this down. On the one hand, you’ve got chocolate, and let’s be real, it’s not exactly a health food. But it’s also a source of antioxidants. So we’re going to give it a slight pass, right?
Then there’s strawberry puree, which is practically a fruit, and we all *know* fruit is healthy. I mean, it’s practically a rainbow on your plate! And the coconut oil? Well, let’s just say it has its benefits, too, although you won’t want to drink a whole jar of it.
So, overall, is it healthy? Not exactly, but it’s not a total guilt trip either. Moderation is key here. I sleep just fine at night knowing I indulged a little. Plus, indulging makes you happy, so that should count for something, right?
Your Grocery List
Here’s What You’ll Need
If you’re planning to whip up my Chocolate Bark with Strawberry Swirls, here’s your to-do list:
– 2 cups of high-quality dark chocolate (or milk chocolate, because I won’t judge)
– ½ cup of fresh strawberries (or ½ cup of store-bought strawberry puree, no shame!)
– 2 tablespoons of coconut oil
– ¼ teaspoon of salt
– Optional toppings: 1/3 cup of crushed nuts (I recommend almonds or pistachios), more strawberries, or any other favorite toppings!
This recipe will comfortably feed about 8-12 people unless you’re planning to eat it all yourself (I won’t tell if you don’t!).
The Actual Cooking Part
Okay, Let’s Make This
Are you ready? This is where the fun begins. Just remember: don’t panic if this looks messy — it’s supposed to!
1. **Prep Like a Pro:** Start by lining a baking sheet with parchment paper. This is your safety net! It keeps everything non-stick and way easier to clean up later. You don’t want to be chiseling chocolate off your counter come clean-up time.
2. **Melt the Chocolate:** In a microwave-safe bowl (I like using glass because it’s less likely to melt), combine the chocolate and coconut oil. Microwave it in short bursts (about 30 seconds each time), stirring in between until it’s lump-free and perfectly melted. Seriously, don’t walk away and get distracted by cat videos—I learned the hard way.
3. **Add Salt:** Once melted, stir in that lovely pinch of salt, and give it a taste. Trust me, that little bit of salt *makes* the chocolate sing. I’m practically talking about chocolate karaoke over here!
4. **Spread It Out:** Pour that melted chocolate onto your lined baking sheet (get in that zen mode and spread it out evenly). This is where your artistic flair can shine. Use a spatula to create a rectangle or any shape that speaks to your heart.
5. **Prepare the Strawberry Swirl:** If you’re using fresh strawberries, pop them in the blender and pulse until smooth. If you’re using pre-made puree, just give it a good stir. Quickly drop spoonfuls of the strawberry puree over your chocolate. Don’t worry about perfection; it’s all about that beautiful, messy swirl.
6. **Swirl it Up:** Now for the fun part! Take a toothpick or a skewer and drag it through the chocolate and strawberry puree, creating pretty swirls. Channel your inner Picasso here. It doesn’t need to look perfect; just embrace the delicious chaos!
7. **Add Toppings:** Here’s where you can layer on your optional toppings if you want it to be a bit fancier. Go nuts (literally)!
8. **Chill Out:** Place the baking sheet in the fridge and let it chill for about 1-2 hours or until it’s completely set. If you’re anything like me, you’ll be checking every 20 minutes like a kid waiting for Christmas morning.
9. **Break it Up:** Once it’s set, take it out, peel it off the parchment paper, and break it into pieces. Just don’t use a hammer—chocolate shards are more fun than crumbles!
Side Notes & Sassy Hacks
Bonus Tips You Didn’t Ask For
Okay, so you’ve made it this far, which means you’re ready to unleash your inner chocolate artist! Here are some tips and tricks that nobody asked for, but I’m spilling the beans anyway:
– **Substitutions:** Feel free to swap out the dark chocolate for white chocolate or even a mix of both! Just keep in mind that different chocolates melt differently, so keep an eye on them while they’re in the microwave.
– **Fruit Options:** Not a strawberry fan? That’s cool! You can use raspberries, blueberries, or even mango puree. Just know that the world is your oyster (or berry).
– **Nuts, Nuts, Nuts:** If you’re nut-free, don’t sweat it! This bark is just as fabulous without nuts. Just pile on the fruit or go for sprinkles—because why not?
– **Storing Tips:** Keep your bark in an airtight container in the fridge, and it’ll stay lovely for about a week. I’d say it’s pretty hard to resist devouring it all within a few days, though.
– **Plating Ideas:** Serve it up on a nice platter, and feel free to sprinkle some flakey sea salt on top for a luxe finish.
– **Gift Idea:** Wrap up pieces of bark in cute cellophane bags tied with twine for a sweet homemade gift. Seriously, your friends and family will love you for it!
Final Words of (Culinary) Wisdom
So, there you have it—the absolute goodness of Chocolate Bark with Strawberry Swirls. You get to satisfy your chocolate cravings and feel like a total rockstar while doing it. If you’ve made it this far, I hope you’re about to toss on an apron and whip this up in your own kitchen.
If you try it out, tag me on social media! Or just send me a mental high-five because, honestly, sharing food and cooking experiences makes the whole process more fun. Thanks for hanging out with me in my kitchen chaos; until next time, keep it tasty!