Prep time: 30 minutes
Cook time: 60 minutes
Total time: 90 minutes
Servings: 12
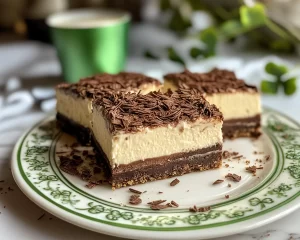
The aroma of freshly baked cheesecake wafting through your kitchen can make the extra effort of preparing a dessert worthwhile. Imagine tall layers of creamy, luscious cheesecake glistening with a rich Irish cream liqueur, enticing you to take that first bite. This recipe for St. Patrick’s Day Irish Cream Cheesecake Bars not only captures the essence of the holiday but it brings a decadent touch to any gathering. Perfect for busy parents or those who want a festive dessert without the fuss, you’re about to discover how to create a treat that’s both simple and impressive.
These cheesecake bars are not just delicious; they embody the spirit and essence of St. Patrick’s Day. With a creamy filling enhanced by the flavors of Irish cream and a buttery graham cracker crust, every square promises a party in your mouth with each creamy bite. While the bars may look elegant, they are surprisingly easy to prepare, allowing you to whip them up for gatherings or simply to satisfy a sweet tooth. You’ll learn step-by-step how to make these irresistible bars, along with unique variations that cater to dietary needs or personal preferences.
What Is St Patrick’s Day Irish Cream Cheesecake Bars?
St. Patrick’s Day Irish Cream Cheesecake Bars are an indulgent dessert that combines the classic flavor of cheesecake with the distinct notes of Irish cream liqueur. Originating from a blend of traditional desserts and modern twists, this treat provides a comforting, creamy texture that defines a well-made cheesecake. The bars are subtly sweet, with a hint of richness from the Irish cream, creating layers of flavor that develop beautifully when baked.
These bars consist of a crisp graham cracker crust, providing the perfect contrast to the smooth, silky cheesecake filling. The use of Irish cream liqueur adds a unique flavor profile, giving you a dessert that speaks of celebration and warmth. This dish is particularly favored during the festivities of St. Patrick’s Day, but its magnificent taste makes it a delightful option for any occasion. Combining flavors of vanilla and chocolate from the liqueur, each bite creates an unforgettable experience, reminiscent of traditional Irish celebrations.
Why You’ll Love This
There are several reasons you’ll adore this recipe. First and foremost, the mouthwatering combination of flavors—rich cheesecake, buttery crust, and Irish cream—creates a dessert that is hard to resist. If you have a sweet tooth, you’ll find that these cheesecake bars deliver an exquisite taste sensation that perfectly balances sweetness with a touch of creaminess.
One of the greatest advantages of this recipe is its simplicity. Even if you’re a beginner in the kitchen, you can confidently follow the step-by-step instructions to achieve a successful result. It requires minimal effort with amazing rewards, making it an ideal choice for busy parents or anyone short on time. Furthermore, while these bars lean toward indulgence, they can also be tailored to meet dietary needs, as you will learn in the variations section.
Additionally, the ingredients involved are often budget-friendly, ensuring you can whip up these bars without breaking the bank. The opportunity for customization is another strong point; whether you want to go for a lighter option or introduce different flavors, this recipe provides plenty of room for creativity.
Ingredients You’ll Need
- Graham cracker crumbs: The base of the crust provides a sweet, crunchy texture that balances the creaminess of the cheesecake. You can substitute with gluten-free graham crackers for a gluten-free version.
- Butter: This binds the cracker crumbs together, adding richness to the crust. Ensure it’s melted for easy mixing.
- Granulated sugar: Adds sweetness; it’s essential for both the crust and the filling. You may use coconut sugar as a healthier alternative.
- Cream cheese: The star ingredient! Use full-fat cream cheese for a richer texture. Soften it to room temperature to ensure a smooth filling.
- Irish cream liqueur: This is the key ingredient, offering flavor and a touch of luxury to the dessert. If you prefer alcohol-free options, look for Irish cream flavored coffee creamers.
- Eggs: Eggs help set the cheesecake through the baking process, creating a silky texture. Ensure they’re at room temperature for even mixing.
- Vanilla extract: It amplifies the overall flavor and fragrance of the cheesecake. Use high-quality vanilla extract for the best results.
- Powdered sugar: This lends sweetness to the filling while giving it a smoother texture than granulated sugar.
With these ingredients at hand, you can create an unforgettable dessert that will leave everyone asking for seconds. Each element plays an important role, from the texture of the crust to the creaminess of the filling.
How to Make
- Preheat your oven: Start by preheating your oven to 325°F (160°C). A properly heated oven is crucial for the right texture, as it ensures an even bake.
- Prepare the crust: In a medium-sized bowl, mix the graham cracker crumbs and melted butter until combined. The mixture should hold together when pressed. Press this mixture firmly into the bottom of an 8×8-inch baking pan lined with parchment paper to create an even layer. Make sure to use the back of a measuring cup to press it down tightly; this helps prevent it from crumbling when you cut the bars.
- Bake the crust: Place the pan in the preheated oven and bake for approximately 10 minutes. The crust should be a light golden brown; this step helps lock in its crunchiness.
- Make the filling: In a large mixing bowl, beat the softened cream cheese and granulated sugar together until smooth and fluffy. This should take about 3-5 minutes on medium speed. Scrape the sides of the bowl as needed.
- Add eggs and Irish cream: Mix in the eggs, one at a time, ensuring each egg is fully incorporated before adding the next. Pour in the Irish cream and vanilla extract, then mix on low speed until smooth and creamy. Avoid overmixing to prevent cracks in your cheesecake.
- Combine with powdered sugar: Gradually add the powdered sugar, mixing until fully blended. This sweetens and lightens the filling, creating a velvety texture. Mix just until combined.
- Pour filling over crust: Once the crust is baked, remove it from the oven and pour the cheesecake filling evenly over the warm crust. Use a spatula to smooth the top.
- Bake the cheesecake: Return the pan to the oven and bake for 45-50 minutes. The bars should be set at the edges but still slightly jiggly in the center. Remember, they will continue to firm up as they cool.
- Cool and chill: After baking, allow the bars to cool at room temperature for about one hour, then cover and refrigerate for at least two hours or overnight. Chilling is essential for cutting clean bars and developing a firmer texture.
- Cut and serve: Once chilled, carefully lift the cheesecake out of the pan using the parchment paper. Use a sharp knife to cut into squares, wiping the blade with a damp cloth between cuts for cleaner edges.
Congratulations! You’ve made a beautiful batch of St. Patrick’s Day Irish Cream Cheesecake Bars that are sure to impress your family and friends.
Variations & Substitutions
Chocolate Chip Variation: Enhance your bars with mini chocolate chips for an extra layer of sweetness. Simply fold in about a half-cup of semi-sweet or dark chocolate chips into the cheesecake filling before pouring it on top of the crust. This adds a delightful chocolatey flavor and pairs wonderfully with the Irish cream, making these bars even more decadent.
Gluten-Free Variation: To make this dessert gluten-free, swap regular graham crackers with gluten-free alternatives. Look for cookie crumbs from brands that use gluten-free ingredients. Double-check all other packaged ingredients, such as powdered sugar, to ensure they conform to a gluten-free diet. These slight adjustments allow everyone to indulge without worry.
Lower Sugar Variation: If you’re watching your sugar intake, consider using a sugar substitute that measures cup-for-cup like erythritol or monk fruit sweetener. Keep in mind that the taste may vary slightly, but it’s a great way to reduce calories without sacrificing flavor. Adjust your sweeteners according to your personal preference.
Vegan Variation: To create a dairy-free version of these sumptuous bars, opt for vegan cream cheese and use aquafaba (the liquid from canned chickpeas) as a substitute for eggs. Whip the aquafaba until fluffy, then slowly mix it into your cream cheese mixture. To further enhance the cheesecake’s flavor, add a splash of lemon juice, which can elevate the taste profile.
Each variation brings a new twist to the party, ensuring that there’s something for everyone.
Common Mistakes to Avoid
One common mistake is overmixing the cheesecake filling, which can lead to cracks in the final product. Overmixing incorporates too much air, affecting the texture and stability. To avoid this, mix just until the ingredients are combined. Remember to scrape down the bowl’s sides regularly to ensure everything is evenly mixed without excessive beating.
Another common issue is not letting the cheesecake bars cool properly before refrigerating. Failing to cool them thoroughly can result in soggy bottoms and loss of texture. Make sure the bars are at room temperature before placing them in the fridge to set accurately.
Also, remember that baking time may vary depending on your oven. Keep an eye on the cheesecake bars as they bake. Using a toothpick or knife to check for doneness can help you gauge when they’re ready. The bars should be set around the edges and a bit jiggly in the center.
Storage, Freezing & Reheating Tips
To store leftover cheesecake bars, keep them in an airtight container in the refrigerator. They will remain fresh for up to five days. Ensure they are completely cooled to prevent moisture buildup, which can affect the texture.
If you’d like to freeze them, cut the bars into squares and place them on a baking sheet lined with parchment paper in a single layer. Freeze them for about an hour, then transfer the squares to a freezer-safe container or zip-top bag. This method keeps the bars from sticking together. They can be stored in the freezer for up to three months.
When you’re ready to enjoy them again, thaw the bars in the refrigerator overnight, or let them sit at room temperature for about 30 minutes before serving. Avoid reheating in the microwave as it can change the creamy texture and affect the flavor.
Frequently Asked Questions
Can I use low-fat cream cheese instead of regular cream cheese? Yes, low-fat cream cheese can be used for this recipe, but keep in mind that it may slightly alter the texture and richness of the cheesecake. Using full-fat cream cheese usually results in a creamier filling, which is characteristic of traditional cheesecakes.
How do I prevent my cheesecake bars from cracking? To prevent cracks, avoid overmixing your filling and ensure that you are baking the cheesecake at the right temperature. A water bath can also help in preventing cracks by providing a more even baking environment.
Can I use a different flavored liqueur? Absolutely! While Irish cream is traditional, you can experiment with other flavors like coffee liqueur or caramel liqueur. Each variation will lend its unique taste and character to the cheesecake, so feel free to get creative!
Is it necessary to refrigerate cheesecake bars before serving? Yes, chill the cheesecake bars for at least two hours after baking to allow them to set properly. Chilling enhances the flavor and texture, making them easier to cut and enjoy.
Can I make these bars in advance? Certainly! They are a fantastic make-ahead dessert. You can prepare them a day or two ahead of time, allowing the flavors to develop while stored in the refrigerator.
Conclusion:
St. Patrick’s Day Irish Cream Cheesecake Bars are a delightful fusion of flavors that are sure to impress. Not only do they offer a creamy, rich texture and delicious taste, but they also allow for plenty of personalization through variations and substitutions. Whether you are hosting a St. Patrick’s Day celebration or simply craving dessert, this recipe is perfect for anyone wanting to bring smiles to the table.
Try this recipe out, make it your own, and don’t hesitate to share it with your friends and family. You’ll be amazed at how quickly these bars will become a favorite in your dessert rotation. Happy baking!