Prep time: 20 minutes
Cook time: 0 minutes
Total time: 20 minutes
Servings: 4 servings
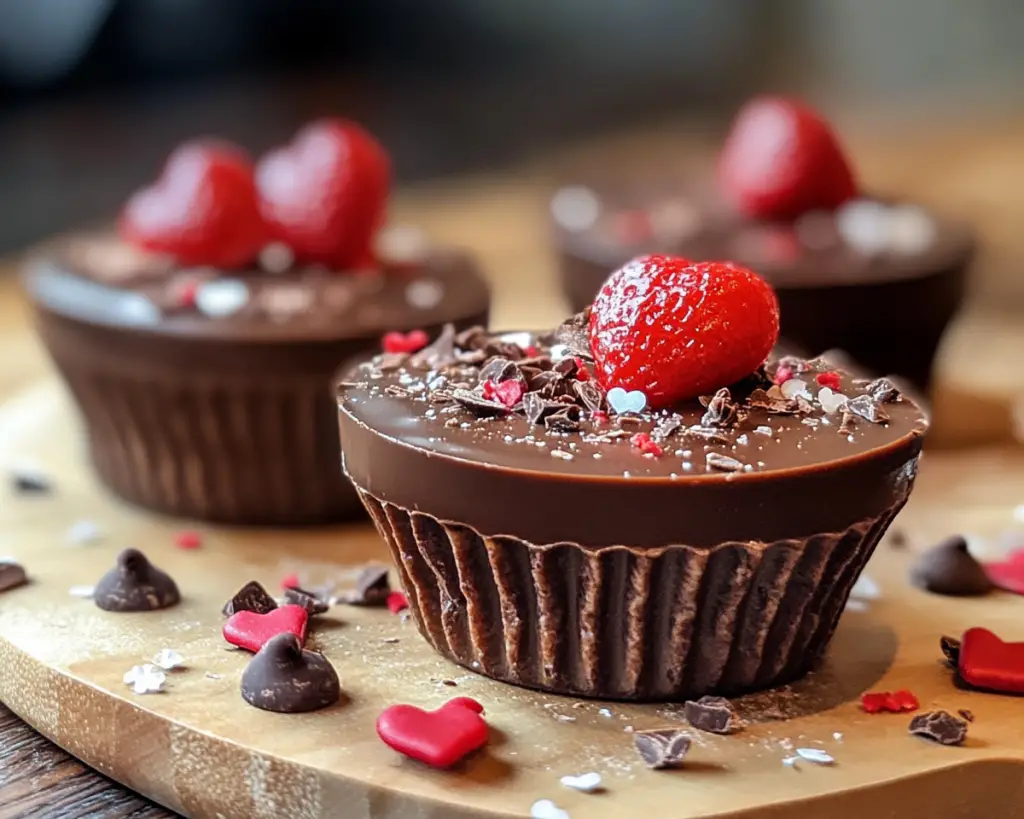
Valentine’s Day is a time for love, joy, and sweet treats. If you’re searching for something special to satisfy your chocolate cravings without turning on the oven, these No-Bake Valentine’s Chocolate Dessert Cups are the ultimate solution. They come together in just twenty minutes and require minimal effort, making them perfect for busy parents, last-minute planners, or those who just want to indulge in a delightful chocolate treat without too much fuss.
These dessert cups are not only adorable but also incredibly rich and decadent. Picture a creamy chocolate mousse nestled within a crunchy cookie crust, topped with whipped cream and garnished with fresh strawberries or raspberries. This recipe balances the sweetness of chocolate with the tartness of berries, creating a flavor explosion that is perfect for Valentine’s Day or any special occasion. What’s more, this dessert can be easily customized to suit your and your loved one’s tastes.
Let’s dive deeper into this no-bake creation and explore why it’s a showstopper for any dinner party or romantic evening in.
What Are No-Bake Valentine’s Chocolate Dessert Cups?
No-Bake Valentine’s Chocolate Dessert Cups are a delightful fusion of textures and flavors that give you the essence of a sophisticated dessert without the need for baking. This treat typically comprises a base of crushed cookies, which offers a delightful crunch and complements the smooth chocolate filling. The filling is made from a mixture of cream cheese, whipped cream, and melted chocolate, which results in a rich yet airy mousse-like consistency that melts in your mouth.
Originating as a popular method for creating quick and easy desserts, no-bake recipes have made a notable impact in the world of dessert-making. They are particularly cherished by those who may not have the time or the desire to bake but still want to impress with a dessert that tastes like it came from a gourmet kitchen. The versatility of these dessert cups is what makes them so special—you can easily tailor your ingredients and decorations based on the season, occasion, or even dietary restrictions while ensuring that every bite is heavenly.
Why You’ll Love These No-Bake Valentine’s Chocolate Dessert Cups
You’ll love these dessert cups for several reasons. First and foremost, they are incredibly easy to make. With minimal ingredients and no baking required, you can whip up these treats in under thirty minutes. They are also visually stunning, making them the perfect centerpiece for a romantic dinner or a gathering with friends and family. Their beauty, coupled with delicious flavors, will leave a lasting impression on anyone who takes a bite.
Cost-effective is another major benefit. You won’t have to spend a fortune at a fancy restaurant to enjoy a lavish dessert. Creating this beauty at home means you control the costs while still indulging in luxurious flavors. Plus, they are made with ingredients that are often readily available, which means you won’t have to run around town searching for special items.
Finally, these dessert cups are versatile. Feel free to customize the chocolate filling and toppings according to your preferences. You can add flavors like espresso or vanilla for an unexpected twist or swap out the chocolate mousse for fruit-flavored fillings for a lighter option. With such flexibility, you can make these dessert cups your own for every occasion.
Ingredients You’ll Need
To create these luscious no-bake chocolate dessert cups, you will need the following ingredients:
- Chocolate Sandwich Cookies: About 1 ½ cups, crushed. These form the base of your dessert cups, adding a sweet and crunchy texture. For substitution, you could use graham crackers or even gluten-free cookies if desired.
- Unsalted Butter: ½ cup, melted. The butter helps bind the crust while adding richness.
- Semisweet Chocolate Chips: 1 cup. This will be melted and mixed into the filling to provide that deep chocolate flavor.
- Cream Cheese: 8 oz, softened. Cream cheese adds creaminess and stability to the mousse.
- Powdered Sugar: ½ cup. This sweetens the filling without making it overly sugary. You can adjust the quantity based on taste.
- Heavy Whipping Cream: 1 cup, chilled. This is whipped to airy perfection and folded into the chocolate mixture for a lighter texture.
- Vanilla Extract: 1 teaspoon. Vanilla enhances the flavor of the chocolate.
- Fresh Berries: For garnish. Strawberries, raspberries, or glossy cherries make for eye-catching, fresh toppings.
How to Make No-Bake Valentine’s Chocolate Dessert Cups
Follow these step-by-step instructions to create your No-Bake Valentine’s Chocolate Dessert Cups:
- Prepare the Crust: First, crush your chocolate sandwich cookies into fine crumbs. You can do this by placing them in a ziplock bag and using a rolling pin or by pulsing them in a food processor until they reach a sand-like consistency. Once crushed, pour the crumbs into a mixing bowl and add the melted butter. Mix until the crumbs are well-coated and resemble wet sand.
- Form the Crust: Divide the crumb mixture evenly among your serving cups or small bowls, pressing the crumbs down firmly to form a solid base. Use the back of a spoon to help compact the mixture. Place the cups in the refrigerator while you prepare the filling to ensure they set slightly.
- Melt the Chocolate: In a microwave-safe bowl, add the semisweet chocolate chips. Microwave in 30-second intervals, stirring in between, until the chocolate is completely melted and smooth. Allow it to cool slightly while you prepare the next steps.
- Make the Filling: In a mixing bowl, beat the softened cream cheese with an electric mixer until smooth. Gradually add the powdered sugar while mixing until it is fully incorporated. Then, add the melted chocolate and vanilla extract to the mixture and beat until well combined.
- Whip the Cream: In a separate bowl, use a clean mixer to whip the heavy cream until stiff peaks form. This step is important for creating a light and airy texture in your mousse.
- Combine the Mixtures: Gently fold the whipped cream into the chocolate-cream cheese mixture. Use a spatula to combine them, taking care not to deflate the whipped cream too much. The final mixture should be light and fluffy.
- Fill the Cups: Spoon the mousse filling into each cookie crust cup, filling to just below the rim. Smooth the tops if desired and return the cups to the refrigerator to set for at least 30 minutes. This allows the flavors to meld and enhances the texture.
- Garnish: Once the dessert cups have set, it’s time to get creative with toppings. Add a dollop of whipped cream on top of each cup and finish with fresh berries. You can also sprinkle chocolate shavings or a dusting of powdered sugar for an extra special touch.
- Serve: Enjoy these indulgent dessert cups chilled. The combination of creamy chocolate filling with the crunchy crust makes for an unforgettable treat that will have everyone coming back for seconds!
3 Variations & Substitutions
Peanut Butter Chocolate Cups: Transform the basic recipe by incorporating creamy peanut butter into the filling. Simply replace half of the cream cheese with peanut butter, which adds a nutty flavor that beautifully complements the chocolate. Top your cups with crushed peanuts and a drizzle of melted chocolate for an extra special touch. These are perfect for peanut butter lovers!
Mint Chocolate Dessert Cups: If you enjoy the fresh taste of mint, consider adding mint extract to your chocolate mixture. About ¼ teaspoon of peppermint extract can elevate these dessert cups to an exciting new level. You can also use mint-flavored cookies for the crust and garnish with fresh mint leaves for a beautiful presentation.
Vegan Chocolate Cups: To create a vegan version, use dairy-free chocolate chips and replace the cream cheese with a vegan cream cheese alternative. You can make a whipped coconut cream by chilling a can of coconut milk, scooping out the solidified cream, and whipping it until it gets fluffy. Make sure to also use vegan-friendly cookies for the crust. This adaptation means everyone can enjoy this delicious dessert.
Common Mistakes to Avoid
Making no-bake desserts can feel foolproof, but there are still some common mistakes you can avoid. One critical warning is not fully allowing your chocolate to cool before mixing with cream cheese; doing so can cause the cream cheese to clump and result in a less smooth filling. Always wait for the melted chocolate to cool slightly but not harden.
Another mistake is overmixing the whipped cream. It’s essential to whip it until stiff peaks form but be careful not to overbeat, or it can turn grainy, compromising the light texture of your mousse. Also, ensure your heavy cream is cold; this helps achieve better volume and stability.
Lastly, if your crust doesn’t hold together well, you may not have added enough melted butter or didn’t press the crumbs firmly enough into the cups. Make sure to double-check your texture when preparing your crust for best results.
Storage, Freezing & Reheating Tips
These No-Bake Valentine’s Chocolate Dessert Cups can be stored in the refrigerator for up to three days. Ensure they are sealed with plastic wrap or stored in an airtight container to maintain freshness.
For longer storage, you can freeze the dessert cups, but keep in mind that the whipped cream topping may not hold up as well when thawed. To freeze, cover the cups tightly and keep them frozen for up to a month. When you’re ready to enjoy, transfer them to the fridge to thaw overnight.
For optimal taste and texture, it’s best to add toppings like fresh berries or whipped cream just before serving rather than freezing them together. This way, your beautiful dessert will look fresh and inviting.
Frequently Asked Questions
Can I use other types of cookies for the crust? Absolutely! While chocolate sandwich cookies provide great flavor, you can easily use graham crackers, Oreos, or even gluten-free cookies. Just be sure they are finely crushed to create a solid base.
Can I make these dessert cups ahead of time? Yes! These dessert cups are perfect for making ahead of time as they need to set in the refrigerator anyway. You can prepare them up to two days in advance and store them in the fridge until you’re ready to serve.
What can I do if my chocolate mousse filling is too thick? If you find your filling is thicker than you’d like, try gently folding in a bit more whipped cream until you reach the desired consistency. The colder your ingredients, particularly the whipped cream, remain, the fluffier your mousse will be.
How do I serve these dessert cups? You can serve them directly in the cups they are made in or gracefully transfer them onto dessert plates for a more elegant presentation. Don’t forget to garnish each with a delightful topping right before serving for the best look and taste.
Are these dessert cups suitable for dietary restrictions? Yes, with a few easy modifications, you can accommodate different dietary needs. You can create gluten-free, vegan, or even nut-free versions. Make sure to read the labels on your ingredients to ensure they align with dietary requirements.
Conclusion:
These No-Bake Valentine’s Chocolate Dessert Cups are the perfect blend of ease, flavor, and visual appeal. Whether you’re celebrating with a loved one, family, or indulging solo, they deliver a rich chocolate experience without the hassle of baking. I encourage you to give this recipe a try, adapt it to your liking, and share the joy with those you love. Remember, no occasion is too small to enjoy a delightful dessert—so whip up these delightful cups and celebrate every moment!