Prep time: 20 minutes
Cook time: 30 minutes
Total time: 50 minutes
Servings: 12
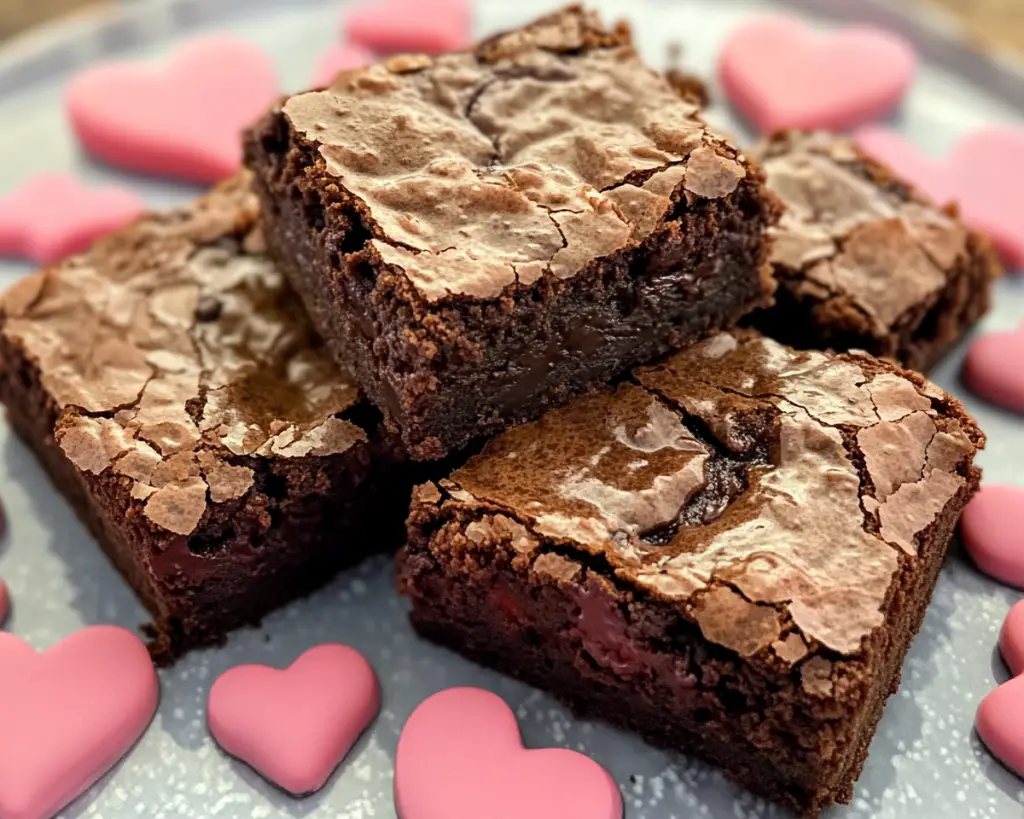
Valentine’s Day is a time for love, connection, and, most importantly, delicious desserts! Imagine presenting a plate of warm, decadent brownies to your loved ones, each slice revealing a gooey chocolate center that just oozes rich, velvety goodness. These Valentine’s Day Brownies with a Gooey Chocolate Center are not just a treat; they’re an experience to savor. With their fudgy exterior and warm, molten filling, they are sure to impress anyone you decide to share them with — or even if you keep them all for yourself!
In this recipe, not only will you learn how to make the most indulgent brownies, but you’ll also discover tips on achieving that perfect gooey center, variations to customize your brownies, and the importance of using quality ingredients. Whether you’re baking for your significant other, planning a fun family activity, or simply treating yourself, these brownies will quickly become a cherished recipe in your dessert repertoire.
What Are Valentine’s Day Brownies?
Valentine’s Day Brownies are a delightful twist on classic brownies, combining the rich flavors of chocolate with a special gooey center that melts in your mouth. Originating from the traditional brownie recipe, these transformative treats are designed for the occasion of love and affection, symbolizing warmth and sweetness. The allure of these brownies lies not only in their taste but also in their texture. As you indulge in each bite, the slightly crisp outer layer gives way to a moist, chewy interior, leading you to the surprise of the molten chocolate at the center.
The *gooey chocolate center* is what truly sets these brownies apart. Using high-quality chocolate contributes to a rich, deep flavor, while allowing for that impressive melting effect. You can imagine how delightful it is to watch as the warm chocolate flows out when you take your first bite. Decorated with a sprinkle of powdered sugar or perhaps heart-shaped sprinkles, these brownies are a beautiful representation of love, perfect for sharing with your sweetheart, friends, or family.
Why You’ll Love These Valentine’s Day Brownies
One of the primary reasons you will absolutely adore these Valentine’s Day Brownies is their spectacular taste. The combination of sweet and dark chocolate creates a luscious dessert that balances perfectly between rich and sweet. The gooey center adds an extra layer of excitement, making every bite unique. You can also enjoy the flexibility of the recipe; it’s easy enough for beginners, yet it impresses even the most experienced bakers.
A common misconception about brownies is that they should be cake-like and dry. However, this recipe defies that notion by ensuring a fudgy, *moist texture* that stays fresh for days. Moreover, by using simple and accessible ingredients — most of which you probably already have in your kitchen — these brownies are not only indulgent but also budget-friendly. This means you can treat yourselves or your loved ones without breaking the bank.
Finally, the *versatility* of these brownies adds to their charm. Whether you want to make them gluten-free, incorporate an array of mix-ins, or adjust the sweetness to your liking, this recipe provides you with the foundation to create something truly special that suits varied tastes.
Ingredients You’ll Need
- Unsalted butter: 1 cup (2 sticks) – The butter lends richness and moisture to the brownies.
- Granulated sugar: 2 cups – This sweetener provides essential sweetness and helps achieve that chewy texture.
- Brown sugar: 1 cup – Using brown sugar enhances the flavor with a hint of caramel notes.
- Large eggs: 4 – Eggs act as binders, contributing to the brownies’ structure and creating a gooey center.
- Vanilla extract: 2 teaspoons – A splash of vanilla rounds out the flavor profile beautifully.
- All-purpose flour: 1 cup – Flour is crucial for structure but should be measured correctly to avoid denseness.
- Cocoa powder: ¾ cup – Use high-quality unsweetened cocoa for a rich chocolate flavor.
- Salt: ½ teaspoon – A little salt enhances sweetness and balances the flavor.
- Chocolate chips or chunks: 1 cup – Melting chocolate in the center adds that beloved gooey texture.
- Powdered sugar (optional): for dusting – Adds a beautiful presentation, perfect for Valentine’s Day.
Each ingredient plays a pivotal role in crafting brownies that are not only visually appealing but also bursting with flavor. If you’re looking for alternatives or have dietary restrictions, consider these options:
– For a non-dairy version, substitute with coconut oil or a vegan butter alternative.
– To lessen the sugar intake, reduce the quantity slightly or use coconut sugar in place of granulated sugar.
– For gluten-free brownies, simply swap out all-purpose flour for almond flour or a gluten-free blend.
How to Make Valentine’s Day Brownies
Step 1: Preheat your oven to 350°F (175°C). This step is crucial as it ensures even baking. Grease a 9×13 inch baking pan, making sure to cover the bottom and corners well to prevent the brownies from sticking.
Step 2: In a medium saucepan, melt the unsalted butter over low heat. Stir frequently to ensure that it melts evenly without browning. Once melted, remove from heat and let it cool slightly. This helps maintain a smooth texture in your brownie batter.
Step 3: In a large mixing bowl, combine the melted butter, granulated sugar, and brown sugar. Mix well using a whisk until fully combined. The sugars should blend with the butter creating a glossy mixture.
Step 4: Add in the large eggs one at a time, whisking well after each addition. Incorporate the vanilla extract at this point as well. The mixture should become thicker and more homogenous, establishing that classic brownie batter feel.
Step 5: In another bowl, sift together the all-purpose flour, cocoa powder, and salt. Sifting helps prevent lumps and results in a smoother batter. Gradually fold the dry ingredients into the wet mixture using a spatula, being careful not to overmix; you want a fudgy texture.
Step 6: Finally, fold in the chocolate chips or chunks. This step not only introduces additional chocolate flavor but also adds to that gooey, decadent texture. The brownie batter will be thick, which is ideal.
Step 7: Pour half of the brownie batter into the bottom of the prepared pan, spreading it evenly. Gently press the batter down with a spatula, making sure it reaches all corners. You can even use your hands to ensure an even layer.
Step 8: Now, carefully scoop dollops of the remaining brownie batter into the pan, but don’t spread it out. This will create pockets of gooey chocolate in the final product. You can swirl this layer a little bit with a knife for a marbled effect, but take care not to mix too much.
Step 9: Bake for 30-35 minutes or until the edges look set but the center still slightly jiggles when gently shaken. Check with a toothpick; it should come out with moist crumbs, but not completely clean, indicating that the center is gooey.
Step 10: Once done, remove the brownies from the oven and allow them to cool in the pan for at least 20 minutes. This waiting period allows the center to set a bit more while still retaining its lusciousness.
3 Variations & Substitutions
Nutty Delight Variation:
For those who love a little crunch, consider adding chopped nuts such as walnuts or pecans to the batter. Nuts complement the chocolate beautifully, providing a contrasting texture. You can fold in about a cup of your favorite nuts, which not only add flavor but also some extra nutritional benefits.
Mint Chocolate Variation:
If you are a fan of mint, you can replace part of the vanilla extract with peppermint extract (approximately 1 teaspoon) to give your brownies an exciting twist. Additionally, consider adding mint chocolate chips for a refreshing flavor burst, easy to make and sure to wow anyone who takes a bite.
Gluten-Free Option:
To make these brownies gluten-free, substitute the all-purpose flour with a gluten-free flour blend. Make sure to choose a blend that includes xanthan gum to mimic the texture of regular flour. Follow the same process for mixing; the taste and texture will still be luscious and gooey without the gluten.
Common Mistakes to Avoid
One common mistake when making brownies is *overmixing* the batter. Mixing too vigorously can incorporate excess air, which leads to drier brownies. Aim for just enough mixing to combine the ingredients, maintaining that rich and fudgy texture.
Another point to consider is the baking time; it’s vital to not overbake the brownies. They should still have a slight jiggle in the center when you check for doneness. Following these instructions helps maintain the desired gooey center that we all love.
Make sure to let them cool in the pan for the recommended time; cutting them too early can result in a messy presentation. Lastly, don’t forget to use quality ingredients — especially chocolate — as it plays a significant role in flavor.
Storage, Freezing & Reheating Tips
These delicious brownies can be stored in an airtight container at room temperature for up to **5 days**, if they manage to last that long! For longer storage, you can freeze them. Wrap them well in plastic wrap and then place them in a freezer-safe container. They can be frozen for up to **three months** and can be enjoyed later by simply placing them in the refrigerator to thaw overnight.
When you’re ready to indulge in your frozen brownies, you can reheat them in the microwave for about 15-20 seconds. This method brings back their gooey texture and warmth, making them feel freshly baked again. Just be careful not to overheat them, as that can lead to a rubbery texture instead of the desired gooeyness.
Food safety tip: Always ensure that your brownies have fully cooled before wrapping or storing to prevent moisture buildup, which can lead to sogginess.
Frequently Asked Questions
Can I make these brownies ahead of time for a special occasion?
Absolutely! These brownies can be made ahead and stored either at room temperature or in the freezer. If you decide to freeze them, just be sure to let them completely cool before wrapping them well and placing them in a freezer-safe container. They’ll be perfect for a delicious treat when you’re ready to indulge.
Is there a dairy-free option for this recipe?
Yes, you can easily make these brownies dairy-free by substituting unsalted butter for a vegan butter product or coconut oil. You also want to make sure that the chocolate chips you choose are dairy-free to keep the entire dish free from any animal products.
What should I serve with the brownies?
These brownies can be enjoyed by themselves, but they’re also divine when served warm with a scoop of vanilla ice cream, whipped cream, or drizzled with caramel sauce. Fresh berries or a drizzle of raspberry sauce can also create a beautiful contrast of flavors that is perfect for the occasion.
How can I tell when the brownies are done baking?
The key to perfectly baked brownies is to check for doneness as soon as the edges look firm but the center still jiggles slightly when you shake the pan. A toothpick inserted into the center should come out with a few moist crumbs but not wet batter, indicating that the gooey center is intact.
Can I customize the flavors in the brownies?
Definitely! Beyond the flavor variations mentioned, you can incorporate other mix-ins such as caramel, peanut butter swirls, or espresso powder to enhance the chocolate flavor. The possibilities are endless, so feel free to experiment and create your personal version of these delightful brownies!
Conclusion:
These Valentine’s Day Brownies with a Gooey Chocolate Center encapsulate the essence of love through the delightful experience of chocolate indulgence. With their delectable flavor, ease of preparation, and the ability to customize to your liking, they are sure to be a hit with anyone lucky enough to enjoy them. Bake up a batch, share the love, and enjoy the rich, buttery decadence with those you cherish. Don’t forget to remove a little time to make them uniquely yours, as every good recipe should reflect the baker’s heart and soul!