Prep time: 15 minutes
Cook time: 30 minutes
Total time: 45 minutes
Servings: 4
If you’re looking for a dish that combines deliciousness, simplicity, and a bit of comfort, then let me introduce you to the Cheesy Chicken Roll Up. This easy-to-make recipe will change your life in the kitchen! Imagine layers of tender chicken wrapped in gooey cheese and fresh spinach, all rolled up and baked to golden perfection. It’s the kind of dish that makes you feel good, whether you’re treating yourself after a long day or preparing a nourishing meal for your family.
In this article, you’ll discover everything you need to know about making these delightful roll-ups. You’ll learn about the key ingredients that give them that irresistible flavor, step-by-step instructions that break down the cooking process into manageable chunks, and tips for amazing variations so you can customize it however you like. Plus, I’ll share some answers to common questions and mistakes to avoid, making this recipe as foolproof as possible.
What Is This Cheesy Chicken Roll Up Will Change Your Life!?
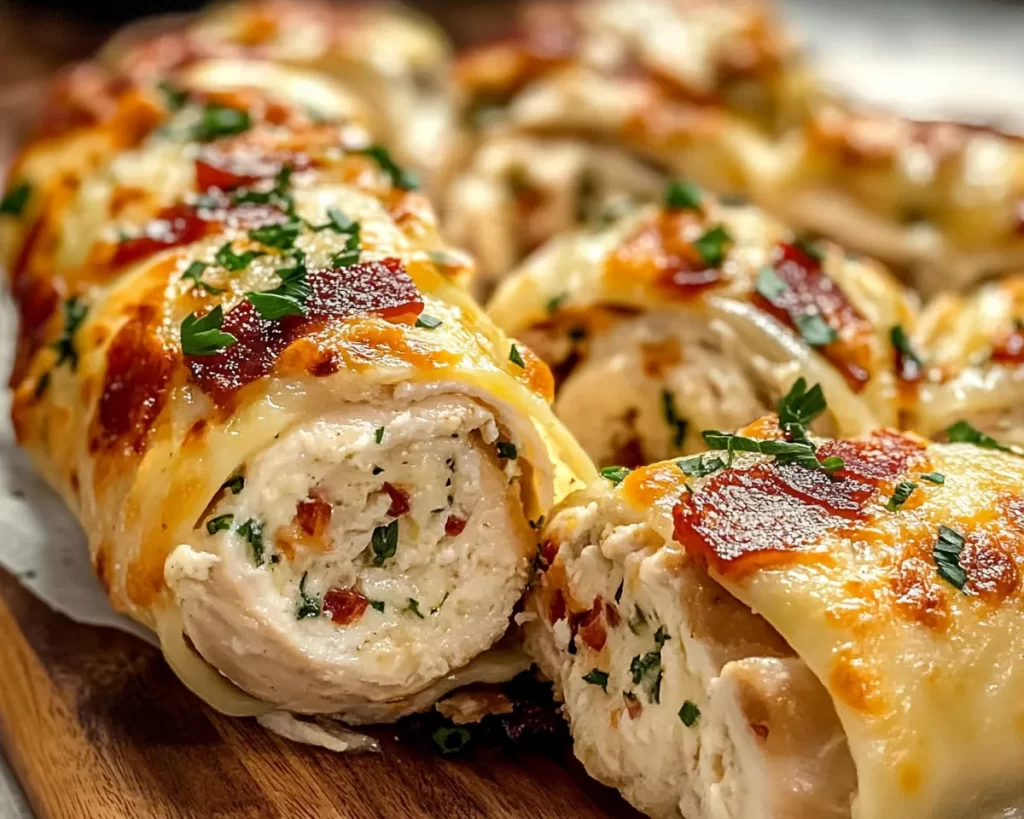
The Cheesy Chicken Roll Up is essentially a comforting, delicious dish that brings together tender chicken, vibrant spices, and rich cheese, all enveloped in a crispy, golden crust. Originating from various baked chicken roll-up recipes, this dish has gained popularity thanks to its versatility and the ease with which it can be tailored to individual tastes. The texture is a wonderful balance of tender, juicy chicken complemented by the gooey, stringy deliciousness of melted cheese, finished off with a crispy exterior. It’s comfort food at its finest!
Flavors meld together beautifully in this dish, with underlying notes of spices and herbs that elevate each bite. The chicken absorbs the flavors of the spices and the creamy cheese adds a rich depth, while the spinach provides a fresh, earthy undertone that cuts through the richness of the cheese. It’s great for a cozy family dinner or even a casual get-together, sure to impress anyone lucky enough to have a taste.
Why You’ll Love This
There are so many reasons to love these Cheesy Chicken Roll Ups. First and foremost, they are incredibly tasty, with a blend of flavors that make your taste buds sing. They are a breeze to prepare, meaning you won’t have to spend hours in the kitchen to enjoy a delicious meal. Plus, they are relatively budget-friendly, allowing you to create a satisfying dish without breaking the bank.
This dish also shines in versatility. Whether you are looking for a low-carb option or a gluten-free meal, you can easily modify the ingredients to suit your dietary needs. One common misconception is that chicken roll-ups must be complicated; however, this recipe proves otherwise. With just a few simple steps, you can produce a gourmet-like meal that looks as stunning as it tastes.
Ingredients You’ll Need
- Chicken breasts: About 1 pound, boneless, skinless. These will form the primary protein of this dish. You can substitute with turkey or even plant-based chicken alternatives for a healthier, leaner option.
- Cheese: Use about 1 cup of shredded mozzarella or cheddar cheese. Feel free to experiment with flavored cheeses like pepper jack for an extra kick.
- Fresh spinach: 2 cups, washed and chopped. Adds freshness and nutrients; you can substitute with kale if needed.
- Garlic: 2 cloves, minced. Provides robust flavor. Garlic powder can also be used in a pinch.
- Seasonings: Salt, pepper, and paprika to taste. They elevate the flavors; adjust according to your preference.
- Butter or olive oil: For greasing the baking dish and adding richness to the roll-ups.
- Optional fillings: Chopped bell peppers or onions for extra flavor and texture. You can customize your roll-ups with whatever you like or have on hand.
Each ingredient plays a role in making this dish not just palatable but a delight. For instance, the chicken provides the protein base, while the cheese adds creaminess and decadence. Spinach brings a pop of color and nutritional benefits, making these rolls feel a little healthier.
How to Make
- Preheat the oven: First, set your oven to 375°F (190°C) to ensure that it’s fully heated when you place your roll-ups in. A preheated oven is important as it helps create that golden, crispy texture.
- Prepare the chicken: Begin by butterfly cutting the chicken breasts. This helps them cook evenly and allows for easier rolling. If you’re unsure how to butterfly, simply slice the breast almost in half but not completely through. Use a meat mallet to gently pound the breasts to an even thickness, about half an inch.
- Season the chicken: Sprinkle salt, pepper, and paprika over the chicken breasts. Don’t skimp here; the seasoning enhances the flavors of everything else. Make sure to massage the spices into the chicken for maximum flavor.
- Make the filling: In a bowl, combine chopped spinach, minced garlic, and shredded cheese. Mix it all together until well-coated. This will be your filling, so take a moment to taste it and see if any extra seasoning is needed. If you are adding optional ingredients like bell peppers, mix them in at this stage.
- Fill and roll: Place a generous amount of the filling onto one half of each chicken breast. Carefully roll it up, starting at the filling side. Secure with toothpicks if necessary, ensuring the filling doesn’t escape during cooking. The tight roll ensures all the flavors are locked in.
- Grease the baking dish: Lightly grease a baking dish with butter or olive oil. Lay the chicken roll-ups seam-side down in the dish, ensuring they’re not crowded, which helps them crisp up nicely.
- Bake: Place the baking dish in the preheated oven and bake for about 25-30 minutes. The chicken should reach an internal temperature of 165°F (74°C) and be golden-brown on the outside. You might want to broil for the last couple of minutes to get extra color.
- Serve: Once done, let the roll-ups rest for a few minutes before slicing. This resting stage allows juices to redistribute, ensuring each bite remains juicy. Serve them with your favorite dipping sauce or a side salad.
Cooking can sometimes feel overwhelming for beginners, but remember: patience is key. As you follow these steps, take your time to enjoy the process. You’ll find that the more you engage with your food, the more it will shine on your plate.
Variations & Substitutions
Vegetarian Roll-Ups: Swap out the chicken for large portobello mushrooms or zucchini slices. These ingredients will absorb the flavors from the cheese and spices beautifully. A vegetarian version is not only friendlier on the wallet, but it’s also packed with nutrients and suitable for various diets.
Buffalo Chicken Roll-Ups: For a bit of heat, add buffalo sauce to your chicken filling. This variation adds a spicy kick and pairs well with ranch or blue cheese dressing for dipping. This option is great for those who enjoy a little zest in their meals!
Mexican-Inspired Roll-Ups: Incorporate black beans, corn, and a blend of Mexican spices like cumin and chili powder into your filling. The flavors meld beautifully, and a sprinkle of queso fresco on top before baking will elevate this to a whole new level. Perfect for taco lovers!
Low-Carb Option: For a low-carb alternative, use thinly sliced eggplant or chicken thighs instead of chicken breasts. By utilizing eggplant as a base, the dish remains delicious while cutting carbohydrates significantly. Pair with low-carb dipping sauces for a complete experience.
Deep-Fried Version: If you prefer a crispier texture, consider deep-frying the roll-ups after preparing them. Drench them in breadcrumbs for added crunch before frying to golden perfection. This method provides a delightful crunch that fans of fried foods will love.
Each variation allows you to customize the dish to suit different dietary restrictions or flavor preferences. This flexibility transforms a basic recipe into countless culinary adventures!
Common Mistakes to Avoid
One common mistake is using chicken that isn’t evenly cut. This will lead to uneven cooking, which may result in dry edges while leaving the center undercooked. Always aim for even thickness when butterflying the chicken.
Another mistake is overstuffing the roll-ups. While it may be tempting to add a lot of filling, doing so can make it difficult to roll and may cause the filling to burst out while baking. Less is often more in this case—ensure just the right amount is used.
Lastly, not allowing the roll-ups to rest post-cooking can lead to a mess when slicing. Resting helps the juices settle, ensuring a moist and flavorful bite. It’s really critical to let the roll-ups sit for a few minutes on a cutting board before diving in!
Storage, Freezing & Reheating Tips
Storing your Cheesy Chicken Roll Ups properly will ensure they stay fresh and delicious. If you have leftovers, allow them to cool before transferring them to an airtight container. They can be refrigerated for up to 3 days.
If you want to make these in advance, consider freezing before baking. Simply prepare the roll-ups, place them in a single layer in an airtight container or freezer bag, and freeze them. They can last for up to 3 months. When ready to cook, there’s no need to thaw; just bake directly from the freezer, adding about 10-15 minutes to the cooking time.
When reheating, you can use the oven to maintain that crispiness. Preheat the oven to 350°F (175°C), place the roll-ups on a baking sheet, and heat for about 15-20 minutes, or until warmed through. For microwave reheating, use a microwave-safe dish and cover it to avoid drying out; however, keep in mind the texture will be different.
Frequently Asked Questions
Can I use frozen chicken for this recipe? Yes, you can use frozen chicken, but it’s crucial to thaw it completely before preparing the roll-ups. Thawing ensures even cooking and helps prevent any health risks. Make sure you always cook the chicken to 165°F (74°C) for food safety.
What can I serve with Cheesy Chicken Roll Ups? These roll-ups pair wonderfully with a fresh salad, steamed vegetables, or a side of mashed potatoes. You might also consider serving them with a variety of dipping sauces such as ranch dressing or barbecue sauce, enhancing the flavor further.
Can I prepare these roll-ups ahead of time? Absolutely! You can prepare the roll-ups and store them in the fridge for up to a day before baking. Just make sure to cover the baking dish to keep them from drying out, and you can pop them in the oven just before serving.
How do I know when the chicken is fully cooked? The safest way to determine if your chicken is done is to check its internal temperature. It should reach 165°F (74°C) when measured at the thickest part of the chicken. Using a meat thermometer is the most reliable method to ensure food safety.
Can I make these roll-ups in an air fryer? Yes! Air frying is an excellent alternative and can give your roll-ups a lovely, crispy exterior. Preheat the air fryer to 375°F (190°C), and cook them for approximately 15-20 minutes, flipping halfway through. They should reach the same cooked temperature as in the oven.
Conclusion:
The Cheesy Chicken Roll Up is not only a delightful dish bursting with flavor but also an easy recipe that will simplify your cooking routine. Its flexibility allows for numerous variations and customization to suit your palate, making every meal an adventure. Embrace this recipe as your go-to for busy weeknights or when you’re simply looking to impress your loved ones. I encourage you to try it out, explore your own variations, and share your experience! You won’t be disappointed, and your kitchen will smell fantastic!


