Prep time: 20 minutes
Cook time: 12 minutes
Total time: 32 minutes
Servings: 24 cookies
When the holiday season comes around, or even just a cozy weekend at home, nothing hits the spot quite like a freshly baked cookie. The aroma wafting through the kitchen, the molten chocolate in the center, and a satisfyingly crunchy exterior; truly, cookies can bring everyone together. One such delightful creation is the Sweet Red Velvet Crinkle Cookies. These cookies are not just visually appealing with their vibrant color, but they also come packed with a rich, chocolatey flavor that can tempt even the most loyal chocolate lover.
The uniqueness of these cookies lies in their beautiful appearance, sporting a stunning crinkle effect thanks to a dusting of powdered sugar. When you bite into one, you’re greeted with a soft, chewy texture that melts in your mouth, making them the perfect treat to share with friends and family. In this article, you will learn everything you need to know about making these cookies, including prep tips, ingredients, common mistakes to avoid, and variations to suit various dietary preferences. Whether you are a seasoned baker or a beginner looking to impress, these cookies are sure to become a favorite!
What Is Sweet Red Velvet Crinkle Cookies?
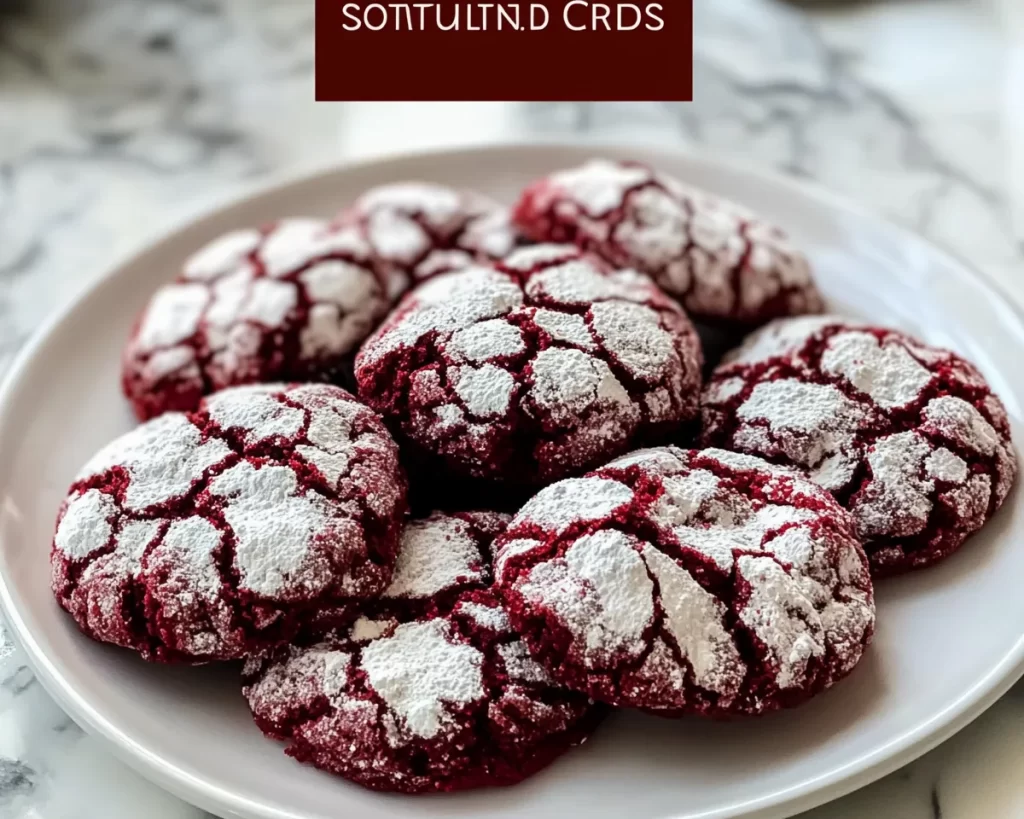
Sweet Red Velvet Crinkle Cookies are a delightful twist on the classic red velvet cake. Originating from a Southern American tradition, red velvet cake is known for its rich flavor and striking red color, often accentuated with cream cheese frosting. Transforming this beloved cake into cookie form results in a chewy, cake-like texture, and crinkle effect that not only looks fabulous but also delivers the familiar flavor profile.
The main flavor components of these cookies are derived from cocoa powder and buttermilk, giving them a subtle chocolate taste complemented by a slight tang, which is characteristic of red velvet treats. The vibrant red hue, accentuated by the dusting of powdered sugar, makes these cookies an impressive addition to any dessert platter. Their soft, chewy texture and slightly crispy exterior create a wonderful lightness, making it easy to enjoy more than one!
Making these cookies is straightforward, and they require no special baking skills. The ingredient list is simple, and they come together quickly. If you’ve been looking for a special cookie recipe to add to your collection, Sweet Red Velvet Crinkle Cookies may just become your go-to treat. This recipe is perfect not only for festive occasions like Christmas or Valentine’s Day but also for everyday baking when you want something that looks and tastes extraordinary.
Why You’ll Love This
There are many reasons to love Sweet Red Velvet Crinkle Cookies! For starters, the flavor is divine—rich chocolatey goodness paired with that signature red velvet tang makes each bite utterly irresistible. The cookies are also visually striking, creating an eye-catching presentation on any dessert table. Imagine serving these cookies at a gathering and watching your friends and family delight in their beauty as much as their flavor!
Another important benefit is their simplicity. These cookies are remarkably easy to make and do not require advanced baking techniques or specialty equipment. Even if you’re new to baking, you’ll be able to whip these up with confidence. Plus, they don’t require chilling time—ideal for busy parents or anyone short on time.
Additionally, from a budget standpoint, the ingredients used for these cookies are typically affordable and readily available in most grocery stores. You might already have many of them in your pantry! So, whether you’re on a budget or just looking for a quick and delightful treat to make, you’re covered with this recipe.
While most people might associate red velvet desserts solely with winter holidays, these cookies can be enjoyed year-round. They are perfect for *birthday parties, potlucks,* or simply to savor with your afternoon coffee or tea. Finally, it’s easy to customize them to suit different tastes, making this treat suitable for various dietary needs and preferences.
Ingredients You’ll Need
- All-purpose flour: This forms the base of your cookies. It provides structure. You can substitute it with a gluten-free blend if needed.
- Cocoa powder: This gives the cookies their chocolatey flavor. Using high-quality cocoa will enhance the richness of the cookie.
- Baking powder: This is crucial for leavening. It helps the cookies rise and become fluffy. Ensure it’s fresh for the best results.
- Salt: A small amount enhances the flavors and balances the sweetness.
- Granulated sugar: This adds sweetness. You can replace some of it with brown sugar for deeper flavor.
- Vegetable oil: This keeps the cookies moist and tender. Alternatively, melted butter works well for added flavor.
- Eggs: They act as a binder, giving the cookies structure. Use a flax egg for a vegan alternative.
- Buttermilk: This adds moisture and acidity, which gives the cookies their signature tang. If you don’t have buttermilk, you can make a quick substitute with milk and vinegar.
- Red food coloring: Essential for that vibrant red hue, it’s what makes these cookies visually captivating. Use gel food coloring for the best results.
- Powdered sugar: This is used for rolling the cookies, giving them their crinkled surface and extra sweetness.
Choosing quality ingredients will not only elevate the taste but also enhance the visual appeal of your Sweet Red Velvet Crinkle Cookies.
How to Make
To ensure your Sweet Red Velvet Crinkle Cookies turn out perfectly, follow these step-by-step instructions:
- Preheat your oven. Start by preheating your oven to 350°F (175°C). This ensures that your cookies bake evenly and rise properly. It’s essential to preheat your oven before mixing your cookie dough so that it’s ready once you finish preparing the dough.
- Prepare your baking sheet. Line baking sheets with parchment paper. This prevents the cookies from sticking and allows for easy cleanup. If you don’t have parchment paper, greasing the sheets with a little oil is an acceptable alternative, but parchment paper is recommended for best results.
- Mix the dry ingredients. In a large bowl, whisk together the all-purpose flour, cocoa powder, baking powder, and salt until well combined. This step is crucial as it ensures that the leavening agents and cocoa are evenly distributed throughout the flour. Set this mixture aside while you prepare the wet ingredients.
- Combine wet ingredients. In a separate bowl, whisk together the granulated sugar, vegetable oil, eggs, buttermilk, and red food coloring. Ensure that the mixture is smooth and well blended. The oil will keep the cookies nice and tender, while the buttermilk will add moisture and flavor. Make sure the red food coloring is mixed thoroughly to achieve an even color.
- Combine wet and dry mixtures. Gradually add the dry ingredients to the wet mixture, mixing until just combined. Be careful not to overmix, as this can result in tough cookies. The dough at this point will be thick and sticky, which is exactly what you want for that delightful chewy texture.
- Chill the dough (optional). While not strictly necessary, chilling the dough for about 30 minutes can enhance the flavors and firm up the dough, making it easier to handle. If you’re short on time, don’t worry—rolling directly after mixing works too!
- Shape the cookies. Using a tablespoon or cookie scoop, portion out the dough and roll into balls. The cookies will spread as they bake, so make sure to leave plenty of space between them on your prepared baking sheets.
- Roll in powdered sugar. Roll each dough ball in powdered sugar until fully coated. This is what gives the cookies their signature crinkly appearance. The sugar will crack as it bakes, creating that beautiful texture.
- Bake. Place the baking sheets in the oven and bake for approximately 10 to 12 minutes. Keep an eye on them; you want the edges to be set while the centers remain soft. The cookies will continue to cook slightly after being removed from the oven, resulting in a perfect chewy center.
- Cool. Allow the cookies to cool on the baking sheets for a few minutes before transferring them to wire racks to cool completely. This cooling process helps the cookies firm up a bit while still maintaining their soft texture. If you try to move them too soon, they may fall apart.
And there you have it! Your Sweet Red Velvet Crinkle Cookies are ready to be enjoyed. This recipe yields 24 delectable cookies, perfect for sharing—though you might not want to.
Variations & Substitutions
Chocolate Chip Variation: If you want to add an extra textural element, consider folding in semi-sweet or white chocolate chips into the dough before baking. This variation adds sweetness and a delightful creaminess that pairs perfectly with the chewy cookie base. For a fun twist, try using mini chocolate chips for a subtle surprise in every bite!
Vegan Variation: To make these delightful cookies vegan, simply substitute the eggs with a flax egg (1 tablespoon ground flaxseed mixed with 2.5 tablespoons water). Use non-dairy milk in place of buttermilk and consider using coconut oil instead of vegetable oil for a hint of tropical flavor. These adjustments ensure you still enjoy the rich flavor and soft texture of the cookies without any animal products.
Gluten-Free Variation: If gluten is a concern, use a gluten-free flour blend that measures cup-for-cup with regular all-purpose flour. This substitution works well and allows those with gluten sensitivities to indulge in these delicious cookies without worry. Be sure to check the label of your gluten-free flour to ensure it includes a binding agent, which will help the texture hold up.
Mint Chocolate Chip Variation: For a refreshing twist, consider adding a few drops of peppermint extract along with dark chocolate chips. This creates a delightful minty flavor that makes these cookies perfect for holiday gatherings. The combination of chocolate and mint is always a hit, so don’t be shy!
Common Mistakes to Avoid
When making Sweet Red Velvet Crinkle Cookies, there are a few common pitfalls that can lead to less-than-stellar results. One significant mistake many bakers make is overmixing the cookie dough. Overmixing can lead to tough cookies instead of the desired chewy texture. Remember that mixing should only be done until just combined—don’t worry if there are a few small flour streaks remaining; they will disappear during baking.
Another common error is baking at an incorrect temperature. Always check that your oven is calibrated accurately. Undercooked cookies can be a disappointment, leading to a doughy center, while overbaking can dry them out. If you have an oven thermometer, you can ensure that the correct temperature is maintained for optimum baking.
Additionally, be mindful of the amount of red food coloring you use. Adding too much can result in an artificial taste or an overpowering color, while too little may make the cookies look dull. A little goes a long way, so start with less and increase gradually until you achieve your desired color.
Lastly, not allowing the cookies to cool properly can lead to uneven texture. When cookies first come out of the oven, they need those first few minutes on the baking sheet to set and firm up. If you try to transfer them too soon, they may fall apart, so patience is key during this final step.
Storage, Freezing & Reheating Tips
To keep your Sweet Red Velvet Crinkle Cookies as fresh as possible, store them in an airtight container at room temperature. This method keeps them chewy for up to a week. For best results, alternate layers of cookies with parchment paper to prevent sticking, especially if you choose not to roll them in powdered sugar.
If you want to prepare ahead, these cookies freeze exceptionally well. After baking, allow them to cool completely before placing them in a single layer on a baking sheet. Freeze for 1 to 2 hours until solid, then transfer them to a freezer-safe bag or container. This way, you can grab a few whenever a sweet craving strikes!
When you’re ready to enjoy some cookies, you can either thaw them at room temperature or pop them in the microwave for about 10-15 seconds. This will bring back their gooey, soft texture, making them taste as fresh as if they just came out of the oven.
Keep in mind that you should always follow food safety best practices. If you notice any unusual smells or textures after storage, it’s best to err on the side of caution and discard them.
Frequently Asked Questions
Can I use whole wheat flour instead of all-purpose flour? Yes, you can use whole wheat flour, but be aware that this may alter the texture slightly. Whole wheat flour can make the cookies denser. For best results, consider using a mixture of all-purpose and whole wheat flour or a light whole wheat pastry flour for a fluffier texture.
What can I use instead of eggs in this recipe? If you’re looking for an egg substitute, a flax egg or chia seed egg works well. Mix 1 tablespoon of ground flaxseed or chia seeds with 2.5 tablespoons of water and let it sit for about 5 minutes to thicken. This works well in binding the cookies and maintaining the overall texture.
Why did my cookies spread too much? Excessive spreading can occur if the dough is too warm when placed in the oven. Make sure to chill your dough for at least 30 minutes if it seems soft. Additionally, using more liquid ingredients can cause spreading, so be careful when measuring.
Can I use natural cocoa instead of Dutch-processed cocoa? Yes, you can absolutely use natural cocoa powder, but keep in mind that it will have a slightly different flavor profile and may create a lighter color than Dutch-processed cocoa. The crinkle effect may also look different depending on the type of cocoa used.
How can I make the cookies less sweet? To reduce the sweetness of the cookies, you can decrease the amount of granulated sugar slightly. Keep in mind that this will also affect the texture, as sugar helps retain moisture. Another option is to roll the cookies in less powdered sugar before baking for a less sweet exterior.
Conclusion:
Your Sweet Red Velvet Crinkle Cookies are not just treats; they’re a delightful way to brighten your days and bring loved ones together. With their vibrant color, rich flavors, and chewy texture, these cookies are destined to become a favorite among your family and friends. I encourage you to customize them based on your preferences, making this recipe truly your own. Don’t forget to share, because the joy of baking is best enjoyed together. Happy baking!


