Prep time: 15 minutes
Cook time: 30 minutes
Total time: 45 minutes
Servings: 12 servings
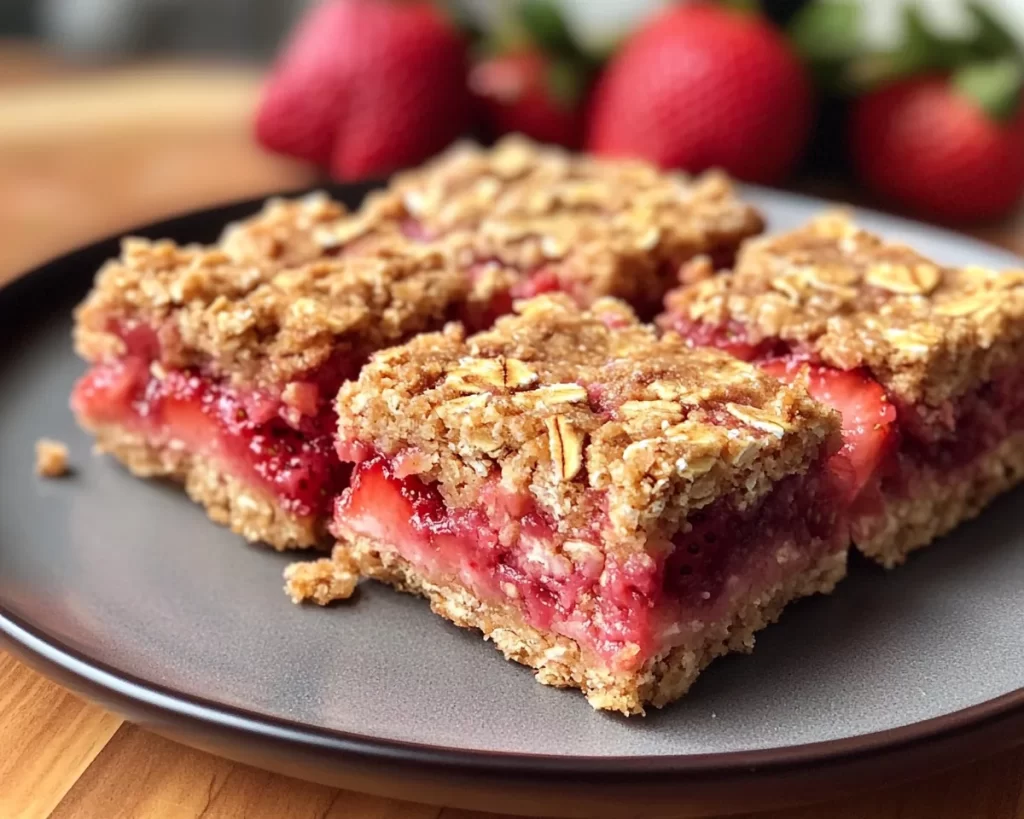
Whether you’re a busy parent juggling multiple tasks or someone just starting their culinary journey, the art of baking can bring joy and satisfaction. Imagine a plate full of warm, soft, and delectable Strawberry Oat Bars freshly out of the oven, filling your kitchen with a sweet aroma. Not only do these bars deliver on flavor, but they are also easy to whip up and can serve as a delightful snack or a healthy breakfast option.
In this article, you will discover everything about making these wonderful strawberry oat bars. You’ll learn about the ingredients, methods, and variations that will make this recipe a staple in your household. So grab your apron, and let’s dive into the world of these irresistible bars!
What Is Strawberry Recipes Easy: Strawberry Oat Bars (Easy)?
The Strawberry Oat Bars are a delicious treat that blends the sweetness of ripe strawberries with the wholesome goodness of oats. Originating from various traditional baked goods, oat bars have evolved over time to become a popular snack among health-conscious individuals and families. The bars are characterized by a chewy texture complemented by a fruity filling that bursts with flavor.
These bars are not only versatile; they can be enjoyed for breakfast, as a midday snack, or even as a wholesome dessert. The warm flavors of vanilla and strawberries paired with the nutty taste of oats create a satisfying flavor profile that both children and adults will love. The process of making them is straightforward, ensuring that even novice bakers can achieve delectable results.
To make these bars, you’ll use accessible ingredients with minimal preparation time, making them a perfect choice for everyday cooking. You can expect to learn valuable tips and techniques that will elevate your baking skills while ensuring a delightful experience for all.
Why You’ll Love This
The Strawberry Oat Bars will quickly become a favorite for several reasons. First and foremost, they are delicious! The combination of oats and strawberries creates a perfect balance between crunchy and chewy textures. You’ll appreciate every bite as it melts in your mouth, making it hard to resist going back for seconds.
The ease of preparation is another significant advantage. These bars can be made from scratch with just a few easy steps, allowing you to get them ready even on the busiest of mornings. They also shine in their versatility; for instance, you can adjust the sweetness to your liking, and they can be served warm or cold.
Cost is another key benefit. Compared to store-bought snacks packed with preservatives, making your own strawberry oat bars is much cheaper and much healthier. Once you make this recipe a few times, you’ll find it easy to experiment with various ingredients, making sure you always have something unique on hand.
One common misconception is that oat bars are dry or bland. When prepared correctly, they are anything but! Additionally, a common mistake is using overripe or underripe strawberries. Choosing the right fruit will dramatically influence the flavor and overall experience of your bars.
Ingredients You’ll Need
To create your very own Strawberry Oat Bars, you will need the following ingredients:
- 2 cups rolled oats: Will provide the base and texture.
- ½ cup almond flour: Adds nuttiness and moisture.
- ½ cup brown sugar: Sweetens the mixture and gives a caramel-like flavor.
- ½ teaspoon salt: Enhances the overall flavors.
- 1 teaspoon baking powder: Helps the bars rise slightly.
- 1 teaspoon vanilla extract: Adds warmth and depth of flavor.
- ½ cup butter, melted: Binds the ingredients and adds richness.
- 2 cups strawberries, hulled and sliced: The star ingredient that adds sweetness and moisture.
- 1 tablespoon lemon juice: Enhances strawberry flavor and keeps them fresh.
- ¼ cup honey or maple syrup (optional): To adjust sweetness to your preference.
Each of these ingredients plays a vital role in the success of your bars. For instance, the rolled oats provide a chewy texture, while almond flour contributes to the moisture and adds a subtle nutty flavor. If you have dietary restrictions, almond flour can be substituted with all-purpose flour or whole wheat flour. Using fresh strawberries is crucial as they have the best flavor, but you can substitute frozen strawberries in a pinch—just make sure to thaw them out and drain any excess liquid.
How to Make
Creating your Strawberry Oat Bars is straightforward and enjoyable. Follow these step-by-step instructions for optimal results:
- Preheat your oven: Begin by preheating your oven to 350°F (175°C). This allows the bars to bake evenly. While the oven is heating, you can prepare your baking dish by greasing it lightly or lining it with parchment paper for easy removal.
- Prepare the strawberries: In a medium bowl, combine the sliced strawberries with the lemon juice. Let them sit for about 10 minutes to release their juices. You can also add honey or maple syrup here if you prefer a sweeter filling. Set aside the mixture to allow the flavors to meld together.
- Mix the dry ingredients: In a large mixing bowl, combine the rolled oats, almond flour, brown sugar, salt, and baking powder. Stir these dry ingredients until well-combined, ensuring even distribution of the baking powder and salt.
- Add the wet ingredients: Pour in the melted butter and vanilla extract. Mix everything thoroughly until the ingredients are fully incorporated, and the mixture holds together when pressed. You might want to use your hands for this step; it’s the perfect way to feel the texture of your mixture.
- Assemble the bars: Take half of the oat mixture and press it firmly into the bottom of the prepared baking dish. This will be your base. Next, spoon the strawberry mixture over the base, spreading it evenly. Finally, crumble the remaining oat mixture on top of the strawberries to create a crumbly topping that will bake beautifully.
- Bake: Place the dish into your preheated oven and bake for approximately 30–35 minutes, or until the top is golden brown. You’ll notice a delicious aroma wafting through your kitchen as the bars bake. The texture should be firm but slightly soft in the center—an indicator that they are perfectly cooked.
- Cool before serving: Once baked, remove the dish from the oven and let it cool in the pan for about 10 minutes. Then, carefully lift the bars out using the parchment paper and allow them to cool completely on a wire rack. This cooling process is essential, as it helps to set the bars and makes them easier to cut.
Cut the bars into squares or rectangles, and they’re ready to enjoy! The best part? You can store any leftovers in an airtight container, where they’ll remain fresh for several days.
Variations & Substitutions
Gluten-Free Option: If you or your loved ones are gluten-sensitive, you can easily make these bars gluten-free by substituting regular rolled oats with certified gluten-free oats. Additionally, using gluten-free flour instead of almond flour can make these friendly to gluten-aware diets while keeping the texture delicious.
Nut-Free Version: To cater to those with nut allergies, you can replace almond flour with an equal amount of all-purpose flour. You can also substitute the melted butter with coconut oil or use a dairy-free margarine for a completely nut-free recipe.
Fruit Variations: While strawberries are undeniably delicious, you can also play around with different fruits. Consider incorporating raspberries, blueberries, or even diced apples for a different fruity experience. Each fruit will impart its unique flavor, adding a twist to the classic recipe.
Chocolate Chip Addition: For a decadent twist, sprinkle a handful of dark chocolate chips into the mixture before baking. The combo of strawberries and chocolate creates an indulgent treat that will elevate your oat bars to the next level. This option is perfect for those days when you’re in need of a sweet pick-me-up.
No Sugar Option: If you’re trying to cut additional sugar from your diet, consider using mashed bananas or unsweetened applesauce in place of the brown sugar. This substitution not only sweetens naturally but also adds moisture to the bars, ensuring they remain wonderfully chewy.
Common Mistakes to Avoid
When making Strawberry Oat Bars, a few pitfalls can lead to less-than-ideal results. One common mistake is overmixing the wet and dry ingredients. While it’s essential to combine everything well, overmixing can lead to tough bars. Aim for just enough mixing to integrate the ingredients without overworking the dough.
Another issue arises when choosing the strawberries. Using overly ripe or underripe strawberries can greatly impact flavor. Select strawberries that are bright red and firm, as they will offer the best taste and consistency.
Make sure to let the bars cool completely before slicing them. If you cut them too quickly, they can crumble and fall apart, making for a less appealing presentation. Allowing them to set will make them hold together nicely, resulting in perfect bars.
Lastly, be mindful of the baking time. Every oven is different, so keep a close eye on the bars in the last few minutes of baking. The visual cue of a golden-brown top is a reliable indicator that they are ready, but if they look too pale, they may need a few extra minutes.
Storage, Freezing & Reheating Tips
To ensure your Strawberry Oat Bars remain fresh and delicious, store them in an airtight container at room temperature for up to five days. If you live in a warm, humid environment, it’s better to refrigerate them to prolong freshness.
For longer storage, consider freezing them. Once the bars are completely cooled, cut them into individual squares and wrap each bar tightly in plastic wrap. Then place the wrapped bars in a freezer-safe bag or container, and label them with the date. These can last in the freezer for up to three months.
To reheat the bars, simply take out the desired portion and let them sit at room temperature for a few minutes. For added warmth, you can microwave the bar for about 10-15 seconds. This will revive the flavors and make them taste freshly baked once again.
Frequently Asked Questions
Can I use frozen strawberries for this recipe?
Yes, you can substitute fresh strawberries with frozen ones; however, they should be thawed and drained of excess moisture before use. This will prevent the bars from becoming too soggy.
Are these bars suitable for kids?
Absolutely! Strawberry Oat Bars are nutritious and packed with wholesome ingredients, making them a great snack for kids. You can even involve them in the preparation process for added fun.
How can I adjust the sweetness in the bars?
If you prefer less sweetness, you can reduce the amount of brown sugar or honey in the recipe. Remember, the natural sweetness from the strawberries also contributes to the overall taste, so adjust accordingly to fit your preferences.
How do I know if the bars are cooked through?
The best indicator is a light golden-brown color on top. Additionally, if you gently press the center of the bars and it springs back, they are likely done.
Can I add nuts to the oat bars?
Yes, adding nuts can provide additional texture and flavor. Consider chopping up some walnuts, pecans, or even almonds before folding them into the oat mixture.
Conclusion:
In conclusion, the Strawberry Oat Bars recipe excels because it combines deliciousness, ease of preparation, and healthy ingredients all in one delectable package. By making these bars, you’re not just treating yourself; you’re nourishing your body with wholesome flavors and textures.
I encourage you to try this recipe, customize it to your liking, and enjoy the fun of baking. Whether you’re whipping them up for a family gathering, a casual brunch, or merely stocking the pantry, they are sure to impress. So go ahead, take that leap into the world of homemade snacks, and don’t forget to share your creations with friends and family!