Prep time: 30 minutes
Cook time: 0 minutes
Total time: 30 minutes
Servings: 6
There’s something magical about St. Patrick’s Day that brings comfort and cheer, evoking memories of family gatherings, vibrant parades, and delicious food. And nothing satisfies quite like a dessert that combines the richness of Irish cream with the delicate, coffee-soaked layers of tiramisu. Introducing St. Patrick’s Day Irish Cream Tiramisu Cups – a delightful twist on a classic Italian dessert that is sure to steal the spotlight at any celebration. This recipe is not only incredibly easy to prepare, with its no-bake nature, it also allows you to impress your friends and family without spending hours in the kitchen.
In this article, you’ll learn how to recreate this indulgent dessert that features fluffy mascarpone cream layered with sweet and slightly boozy flavors. You will also discover tips to customize the recipe to suit your taste preferences and any dietary requirements. No matter if you’re a kitchen novice or a seasoned baker, you’ll find that this dish is as delightful to make as it is to taste.
What Is St Patrick’s Day Irish Cream Tiramisu Cups?
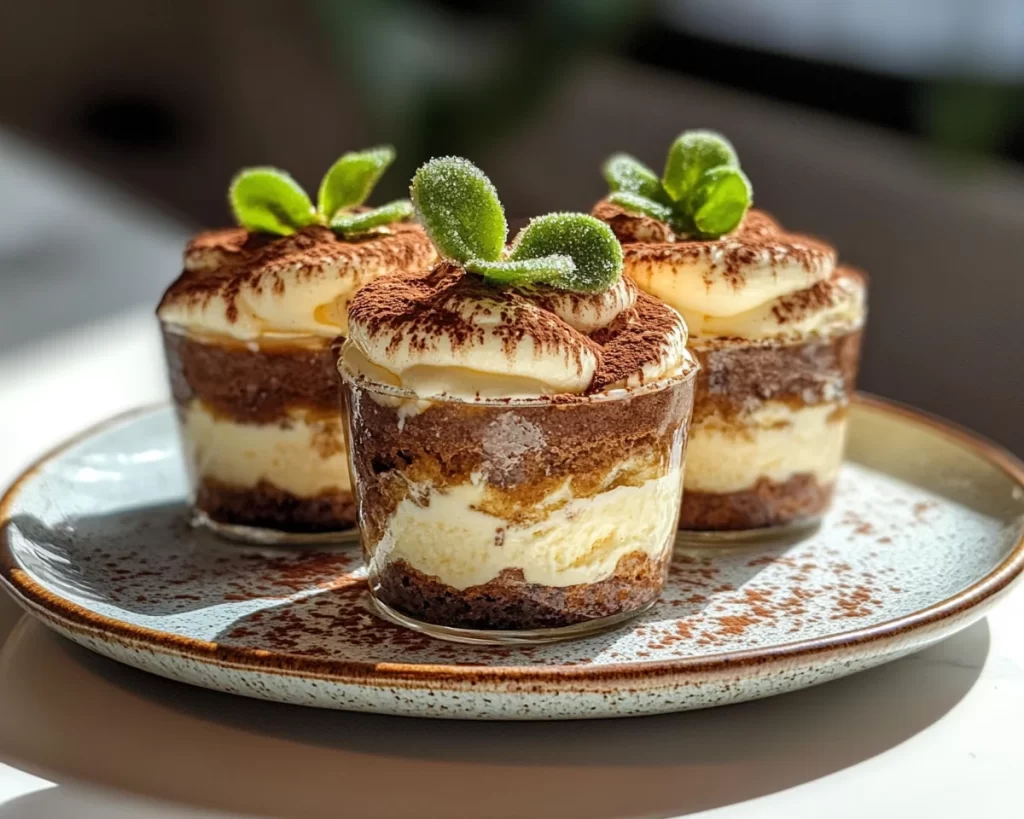
St. Patrick’s Day Irish Cream Tiramisu Cups are a celebration of flavors that blends traditional Italian recipes with Irish culinary flair. The term “tiramisu” translates to “pick me up” in Italian, and this dessert does just that. Traditionally, tiramisu consists of layers of coffee-soaked ladyfingers and a luscious cream made primarily of mascarpone cheese. In this variation, we incorporate Irish cream liqueur, which adds a rich, creamy depth to the mascarpone filling, while introducing a warm, comforting flavor profile that perfectly mirrors the spirit of St. Patrick’s Day.
This iteration of tiramisu is served in charming individual cups, perfect for sharing with friends during festive gatherings. Each spoonful delivers an irresistible blend of textures: the softness of the mascarpone cream envelops the coffee-soaked ladyfingers, creating a moist and creamy experience that dances on your taste buds. The added touch of cocoa powder on top adds a slight bitterness that beautifully balances the sweetness and richness of the liqueur, making every layer a delightful surprise.
Why You’ll Love This
You will adore this recipe for its remarkable taste and ease of preparation. With minimal cooking required, this dessert can be whipped up in about 30 minutes, allowing you to focus on other festivities while still impressing your guests. This recipe is versatile; you can modify it to accommodate varying tastes, such as reducing the amount of sugar for those who prefer less sweetness.
Additionally, it is a budget-friendly dessert, utilizing simple, readily available ingredients. Unlike other complex desserts, this one provides an elegant outcome that won’t financial strain. A common misconception about making tiramisu is that it is labor-intensive – however, this recipe proves otherwise! With straightforward steps, you’ll see just how manageable this dessert is, even for those who claim they’re not bakers.
Ingredients You’ll Need
- Mascarpone cheese: This creamy cheese is essential for the rich filling. It has a smooth texture that blends seamlessly with other ingredients. If you’re looking for a lighter option, consider using cream cheese mixed with heavy cream as a substitute.
- Heavy cream: Whipping cream is essential for achieving that light and airy texture. It’s literally what’ll give the filling a cloud-like quality. If you’re looking for a lower-fat alternative, a whipped topping could work, although it may slightly change the taste and texture.
- Irish cream liqueur: As the star ingredient, it adds a sweet, velvety flavor to the dessert. If you need an alcohol-free option, consider using a mix of milk with vanilla extract to mimic its sweet creaminess.
- Ladyfingers: These delicate cookies, also known as savoiardi, absorb coffee beautifully. If unavailable, you can use sponge cake cut into strips, but the texture will differ slightly.
- Espresso or strong brewed coffee: This provides the classic coffee flavor that tiramisu is known for. If you are avoiding caffeine, you can opt for decaffeinated coffee or even a strong herbal tea.
- Cocoa powder: Used for dusting on top, it offers a slight bitterness that counterbalances the sweetness. For a twist, consider using grated chocolate or carob powder.
- Granulated sugar: This sweetens the cream mixture but can be adjusted if you prefer a less sweet dessert. Organic cane sugar or a sugar substitute can work if you’re looking for healthier options.
How to Make
- Prepare your ingredients: Start by gathering all your ingredients to create a smooth workflow. Measure out the mascarpone cheese, heavy cream, sugar, and Irish cream liqueur. This not only makes the preparation process easier but also ensures that you won’t forget any ingredients.
- Whip the heavy cream: In a mixing bowl, pour in the heavy cream and whip it using an electric mixer on medium-high speed until soft peaks form. This usually takes about 2 to 3 minutes. The texture should be light and airy, similar to clouds. Be careful not to over-whip, as this can lead to a butter-like consistency—definitely not what you want for this recipe!
- Combine the mascarpone and sugar: In another bowl, blend the mascarpone cheese with the granulated sugar. Use a spatula or a whisk to gently combine them until smooth and creamy. The sugar helps to balance the richness of the mascarpone. Once mixed, fold in the heavy cream slowly to maintain the airy texture you achieved in the previous step.
- Add the Irish cream liqueur: Once your cheese mixture is well combined, gradually fold in the Irish cream liqueur. This will enhance the flavors exponentially, bringing that signature boozy richness to the dessert. Make sure to fold gently to keep the mixture light and fluffy.
- Prepare the coffee mixture: Brew a strong cup of espresso or coffee and let it cool slightly. Add a splash of Irish cream liqueur to the coffee for an extra flavor boost! Dip each ladyfinger quickly into this coffee mixture—don’t soak them; otherwise, they will become too soggy and alter the texture.
- Layer the cups: Begin assembling your tiramisu cups by placing a layer of the dipped ladyfingers at the bottom. Spread a generous dollop of the mascarpone cream over the ladyfingers. Repeat this process with another layer of dipped ladyfingers followed by more mascarpone cream, finishing with the cream on top.
- Chill: Cover the cups with plastic wrap and refrigerate for at least 4 hours, or overnight if possible. Chilling allows the flavors to meld beautifully and sets the cream, making it easier to serve.
- Serve: Just before serving, dust the tops of the cups with cocoa powder for that classic tiramisu finish. If you’re feeling fancy, add a few chocolate shavings on top for an extra touch of elegance.
Variations & Substitutions
Alcohol-Free Variation: If you’re hosting a party where some guests prefer not to have alcohol, you can easily make a delightful alcohol-free version of these cups. Replace the Irish cream liqueur with a combination of milk and vanilla extract. This will maintain the creamy richness that the liqueur offers, allowing everyone to enjoy a slice of this deliciousness. Remember to also skip the added coffee liqueur—opt for soothing herbal tea infused with a bit of vanilla for a unique twist.
Vegan Variation: For those following a vegan diet, this recipe can easily be customized! Instead of mascarpone, opt for a blend of silken tofu and coconut cream whipped together, which mimics the creaminess of traditional tiramisu. Use plant-based ladyfingers or make your own sponge cake using flour and almond milk. For the coffee layer, coconut milk can work wonderfully. Combining these substitutions will yield a scrumptious dessert that everyone will love.
Flavor Variations: Feeling more adventurous? You can add different flavor profiles to your tiramisu cups! Try adding a hint of orange zest or some finely grated chocolate to the mascarpone mixture for an aromatic twist. Alternatively, you could swirl in some caramel sauce between the layers for a rich caramel and coffee experience that will fascinate your guests. Each of these variations not only enhances the flavor but also adds a distinct personality to the dessert.
Common Mistakes to Avoid
One prevalent mistake when making tiramisu is using overly soggy ladyfingers. When dipping the ladyfingers in coffee, do it quickly and do not let them soak entirely. If you leave them in for too long, they will lose their structure and compromise the texture of the dessert. You want them to absorb just enough coffee to enhance the flavor without becoming a mushy mess.
Another common pitfall is over-whipping the heavy cream. Doing so can lead to a grainy texture or, worse, whipped butter. Always keep an eye on your mixer as it shouldn’t take long to achieve the soft peaks required. Monitor closely and stop as soon as they form to retain that delicate texture throughout your dessert.
Lastly, not allowing the tiramisu to chill properly can also be a major mistake. Giving the dessert enough time to set ensures that all the flavors meld beautifully. Ideally, you should aim for a chilling time of at least 4 hours, but if you can, let it sit overnight. The wait will be worth it when you finally serve this delicious treat; after all, patience is crucial in making the perfect tiramisu.
Storage, Freezing & Reheating Tips
These St. Patrick’s Day Irish Cream Tiramisu Cups can be stored in the refrigerator for up to four days. Always ensure they are covered properly with plastic wrap or stored in an airtight container to prevent absorption of odors from the fridge. The beauty of this dessert is that it actually tastes even better the longer it sits, allowing the flavors to continue to meld.
Regarding freezing, you can freeze the individual cups; however, it’s best to do so before adding the cocoa powder topping. Wrap each cup tightly in plastic wrap and modify them to freeze for up to two months. When you’re ready to enjoy, simply thaw them overnight in the refrigerator, and then add the cocoa powder just before serving.
Due to the nature of the ingredients, reheating is not applicable for this dish. Tiramisu is best enjoyed chilled straight from the fridge, allowing the creamy layers to shine.
Frequently Asked Questions
Can I make tiramisu cups ahead of time?
Absolutely! Tiramisu cups can be prepared a day in advance. In fact, letting them sit overnight enhances the flavors. Make sure to cover the cups well to prevent them from absorbing any refrigerator odors.
Can I use different types of alcohol in this recipe?
Yes, you can experiment with different liqueurs! While Irish cream is traditional, feel free to substitute with other flavored liqueurs like coffee liqueur or even Amaretto for an almond taste. Each alteration will give a unique flavor profile to your dessert.
How do I know when my tiramisu is ready to serve?
Tiramisu is best when it has been chilled long enough for the layers to set, typically around 4 hours. The cream will firm up, making it easier to serve while still maintaining that delightful soft texture. You want it to be firm but not frozen, so avoid putting it in the freezer.
Can I decorate my tiramisu differently?
Absolutely! While cocoa powder is traditional, you can get creative with your toppings. Consider drizzling chocolate sauce, adding fresh berries, or dusting it with powdered sugar. Unique toppings give it a personal touch and elevate the presentation.
Is there a low-sugar version of this recipe?
Certainly! You can easily substitute granulated sugar with a low-calorie sweetener like erythritol or stevia. Just keep in mind that the ratios may vary, and taste as you mix to ensure it meets your preferred level of sweetness.
Conclusion:
This St. Patrick’s Day Irish Cream Tiramisu Cups recipe offers a delightful blend of flavors, textures, and festive spirit that captures the essence of the holiday while being easy to prepare. As you indulge in the creamy layers and the rich coffee-soaked ladyfingers, you’ll find yourself transported to a cozy gathering, celebrating with loved ones. I encourage you to try this recipe, customize it to your taste, and share the joy it brings. Remember, whether you’re enjoying it yourself or with friends, food has an unparalleled way of creating beautiful moments. So roll up your sleeves, and enjoy creating your own delicious memories!


