Prep time: 30 minutes
Cook time: 35 minutes
Total time: 1 hour 5 minutes
Servings: 12 servings
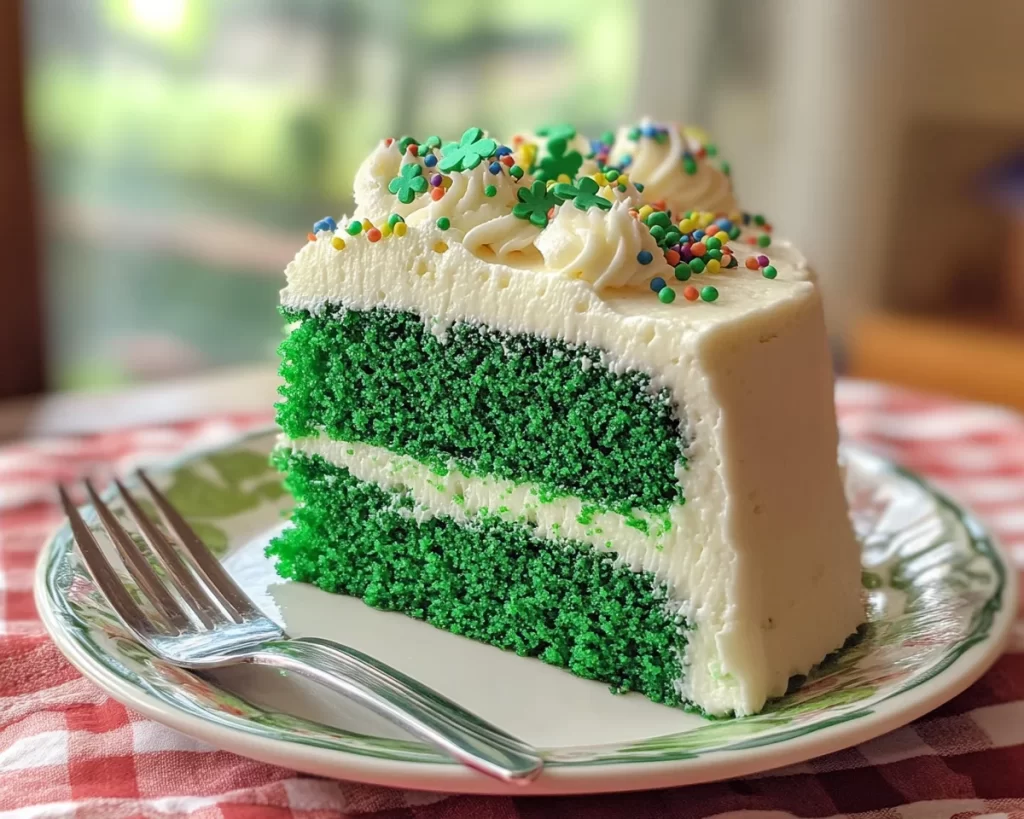
Nothing quite captures the spirit of St. Patrick’s Day like a vibrant slice of Green Velvet Sheet Cake. The first time I had this delightful twist on the classic red velvet cake, I was captivated by its rich flavor and striking color. Whether you’re celebrating with friends or simply tackling the post-winter blues, this cake is guaranteed to evoke joy and indulgence. With its soft and moist crumb, paired with creamy icing, every bite feels festive and fresh. More importantly, this recipe is not just about celebrating a holiday; it embodies tradition while offering a delicious dessert that’s incredibly easy to make. Let’s dive into the marvelous world of this green-hued treat!
In this article, you will learn about the origins of the St. Patrick’s Day Green Velvet Sheet Cake, find a detailed list of ingredients, and gain insight into the step-by-step process of making this show-stopping dessert. Plus, I’ll share valuable tips, variations, and troubleshooting advice to ensure your baking experience is a success.
What Is St Patrick’s Day Green Velvet Sheet Cake?
St. Patrick’s Day Green Velvet Sheet Cake is a festive variation of the traditional red velvet cake that has been whimsically adapted to celebrate the beloved Irish holiday. The cake’s vibrant green color primarily comes from its key ingredients, specifically using food coloring paired with cocoa powder, creating a rich texture and irresistible taste. While red velvet cake typically contains buttermilk and vanilla, this green counterpart holds onto the same principle, creating that delightful, slightly tangy moistness that many adore.
The flavor profile of this cake is nuanced; it’s not overly sweet, allowing the buttermilk and cocoa to shine through, and the cream cheese frosting enhances that flavor with its silky and creamy texture. The aroma wafting through your kitchen while this cake bakes is divine, reminiscent of home and family gatherings. Its soft, velvety crumb makes it not just visually stunning but also a pleasure to eat. And the best part? You can whip it up in just about an hour!
Why You’ll Love This
This St. Patrick’s Day Green Velvet Sheet Cake is every bit lovable for numerous reasons. First and foremost, the taste is simply divine. Rich, velvety, and slightly tangy, this cake satisfies a sweet tooth without being cloyingly sugary. Its lovely green hue makes it perfect for celebrating St. Patrick’s Day, and it’s an excellent conversation starter at any gathering.
Next, the ease of this recipe is a significant plus. Unlike typical layer cakes that require careful assembly, a sheet cake is as simple as pouring batter into a pan and baking it. If you’re a beginner in the kitchen or a busy parent, this should easily fit into your schedule. Just make sure to give it enough time to cool before frosting!
Cost-effectiveness is another galore here; many of the ingredients are staples you might already have in your pantry, making it budget-friendly for anyone looking to whip up something special without breaking the bank. Lastly, this cake is incredibly versatile. You can experiment with toppings, add sprinkles, or serve it with a scoop of your favorite ice cream. The possibilities are endless!
Ingredients You’ll Need
- All-purpose flour: This is the backbone of your cake. It gives structure while keeping the cake tender. You can substitute half with whole wheat flour for a healthier option.
- Cocoa powder: A little cocoa powder gives the cake its richness and a faint chocolate flavor. Make sure to use unsweetened cocoa powder for the best results.
- sugar: Granulated sugar sweetens your cake naturally and helps create a soft crumb. Consider using less sugar if you enjoy a less sweet cake.
- Buttermilk: Essential for both moisture and that signature tang. If you don’t have buttermilk, regular milk with a splash of vinegar or lemon juice can be used as a substitute.
- Vegetable oil: This keeps the cake moist and contributes to that tender texture. You can swap it with melted butter for a richer flavor.
- Eggs: Eggs provide moisture and help bind the ingredients together for a cohesive texture.
- Green food coloring: This is what makes the cake festive! Use gel food coloring for a bolder hue.
- Baking soda: An essential leavening agent that ensures your cake rises beautifully.
- Salt: Just a pinch enhances and balances all flavors.
- Cream cheese: For the frosting, this adds a tangy creaminess. Full-fat cream cheese is preferable for a rich, smooth frosting.
- Powdered sugar: This gives the frosting structure and sweetness. You can adjust the quantity to taste.
- Vanilla extract: A key flavor enhancer that brightens both the cake and frosting.
Knowing these ingredients and their roles will help you better understand the recipe and how to adapt it according to your preferences.
How to Make
- Preheat your oven to 350°F (175°C). Ensure that your oven racks are in the middle position to allow even heat distribution. While the oven is heating, prepare a sheet pan (typically 9×13 inches) by greasing it with butter or a cooking spray. You can also line it with parchment paper for easier removal when serving.
- In a medium bowl, sift together the all-purpose flour, cocoa powder, baking soda, and salt. Sifting helps aerate the mixture, ensuring no clumps form, and provides a lighter texture in your final cake. Whisk these ingredients together quickly and set aside.
- In a separate large mixing bowl, add the vegetable oil and sugar. Using a hand mixer or stand mixer, beat these ingredients together until well combined. This should take about 2-3 minutes on medium speed until the mixture is slightly fluffy. Then, mix in the eggs, one at a time, ensuring each is fully incorporated before adding the next.
- Gradually pour in the buttermilk and mix until combined. Now comes the fun part: add several drops of green food coloring. Stir until you reach your desired shade; feel free to add more if you want a bolder green. Do remember that the color may lighten slightly as it bakes.
- Slowly fold in the dry ingredients from earlier into the wet mixture. It’s crucial to do this gently to preserve air bubbles, as they will create a light and fluffy cake. Mix just until you no longer see flour; over-mixing can lead to a dense cake.
- Pour the batter into your prepared sheet pan and smooth the top with a spatula. Bake in the preheated oven for about 30-35 minutes or until a toothpick inserted in the center comes out clean. Begin checking at the 30-minute mark to avoid over-baking, which can dry out the cake.
- Once baked, remove the cake from the oven and let it cool in the pan for about 10-15 minutes. After that, you can transfer it to a wire rack to cool completely before frosting. This step is crucial; frosting a warm cake can result in melt and a gooey mess.
- To make the frosting, beat together the cream cheese and powdered sugar until smooth and creamy. Add in the vanilla extract next. The frosting should be fluffy and easy to spread. If it’s too thick, a splash of milk can help achieve the desired consistency.
- Once the cake has completely cooled, spread the frosting evenly across the top using an offset spatula. You can swirl it or smooth it out, depending on your preference. For a festive touch, consider sprinkling with colored sprinkles or additional cocoa powder.
Making St. Patrick’s Day Green Velvet Sheet Cake is as delightful as it sounds! Don’t forget to sneak a taste of the batter; it’s hypoallergenic bliss!
Variations & Substitutions
Gluten-Free Variation: You can easily make this cake gluten-free by substituting all-purpose flour with a gluten-free flour blend. Just ensure that the blend contains xanthan gum for proper binding; this will keep your cake from crumbling. The flavors will remain intact while ensuring that everyone can enjoy a delicious slice!
Dairy-Free Variation: Making this cake dairy-free is a breeze; just swap the buttermilk with almond milk or soy milk and add a tablespoon of vinegar to approximate the tanginess. For the frosting, use vegan cream cheese and powdered sugar for a dairy-free delight. Not only is it friendly to those who are lactose intolerant, but it also opens this recipe up to a broader audience.
Mint Chocolate Chip Variation: To introduce an exciting flavor twist, you can incorporate chocolate chips or mint extract into the batter. The addition of mini chocolate chips creates a lovely surprise in each slice, while the mint extract can make it reminiscent of a mint chocolate chip treat. Just add about 1 teaspoon of mint extract for that fresh twist!
Layered Cake Variation: If you want a more extravagant dessert, consider converting this sheet cake into a layered cake. Double the recipe and bake it in two round pans instead. Once baked and cooled, stack them with frosting in between each layer for height and drama. This variation will make it a showstopper at any gathering!
Common Mistakes to Avoid
One common issue is over-mixing the batter. When you whisk the flour and wet ingredients too vigorously, you can develop gluten, resulting in a dense cake rather than a light and fluffy one. Remember to mix only until combined.
Additionally, be cautious with your oven settings. If your oven runs hot, your cake might bake too quickly on the outside while remaining undercooked in the center. Always use an oven thermometer for accuracy. Lastly, don’t skip the cooling process; frosting a warm cake can cause your cream cheese frosting to melt, making a messy, unattractive presentation.
Storage, Freezing & Reheating Tips
To store the cake, cover it well in plastic wrap or aluminum foil, or place it in an airtight container. It can last in the fridge for up to five days, but you’ll want it out for about 30 minutes before serving to reach room temperature for optimal flavor.
For longer storage, you can freeze the unfrosted cake. Wrap it tightly in plastic wrap, then in aluminum foil. It will keep in the freezer for about three months. When you’re ready to enjoy it, thaw it overnight in the refrigerator before frosting and serving.
If you have leftover frosted cake, it’s best to store it in the refrigerator, covered, for up to five days. Just be aware that the frosting may lose some of its texture over time in the fridge.
Frequently Asked Questions
Can I use natural food coloring instead of traditional food coloring?
Absolutely! Natural food coloring can sometimes yield a lighter hue, but it’s an excellent way to incorporate less artificial ingredients into your baking. Just be sure to experiment to get the desired color since natural food coloring could behave differently in terms of intensity.
Can I make this cake in advance?
Yes, this cake can easily be made a day or two in advance, especially if you’re preparing for a festive gathering. Just ensure it’s well-wrapped or stored properly to maintain its freshness. Frost it closer to serving time to keep it looking its best!
How do I prevent my cake from sinking in the middle?
A sinking cake is often due to insufficient baking time or an overbeat batter. Always check your cake using a toothpick; once it comes out clean, take it out immediately. Keep an eye on the timing and rely on the doneness test rather than just the clock.
What’s the best way to slice a sheet cake?
To slice a rectangular sheet cake, use a sharp knife that is heated in hot water. This will help create smooth, clean cuts without tearing the cake. Allow it to cool completely before slicing to keep the integrity of the cake.
Can I add nuts or fruits to the batter?
Certainly! Chopped nuts such as walnuts or pecans, or even fruits like cherries or raspberries, can elevate your cake. Just ensure they are evenly distributed in the batter, and remember it may slightly affect the overall baking time, so keep an eye on it!
Conclusion:
The St. Patrick’s Day Green Velvet Sheet Cake offers an elegant and delicious way to celebrate while satisfying sweet cravings. Its soft and moist texture combined with the rich flavor makes it a must-try, and with the variations provided, you can customize it further to suit your palate. Don’t hesitate; gather your ingredients and let this stunning cake bring people together. Be bold in your creativity and share the delightful results with friends and family! Enjoy the process, and happy baking!


