Prep time: 15 minutes
Cook time: 25 minutes
Total time: 40 minutes
Servings: 12 servings
There’s something truly enchanting about dessert, especially when it comes to vibrant spring flavors. One dessert that captures the essence of springtime effortlessly is the beloved lemon bar. The refreshing tartness paired with a buttery, crumbly crust creates a flavor profile that tantalizes the taste buds. Think of bright sunny days, light picnics, and gatherings with friends and family. Lemon bars evoke memories of spring afternoons where laughter and joy fill the air, making them a perfect treat for any occasion.
What makes this recipe for lemon bars truly **special** is not just its delightful flavor but also its simplicity. You don’t need to be a professional chef to whip up this dessert; it’s approachable for both beginners and seasoned cooks alike. This article will guide you through the process of making lemon bars, sharing tips and variations along the way to customize this sweet treat to your liking.
What Is Spring Dessert: Lemon Bars?
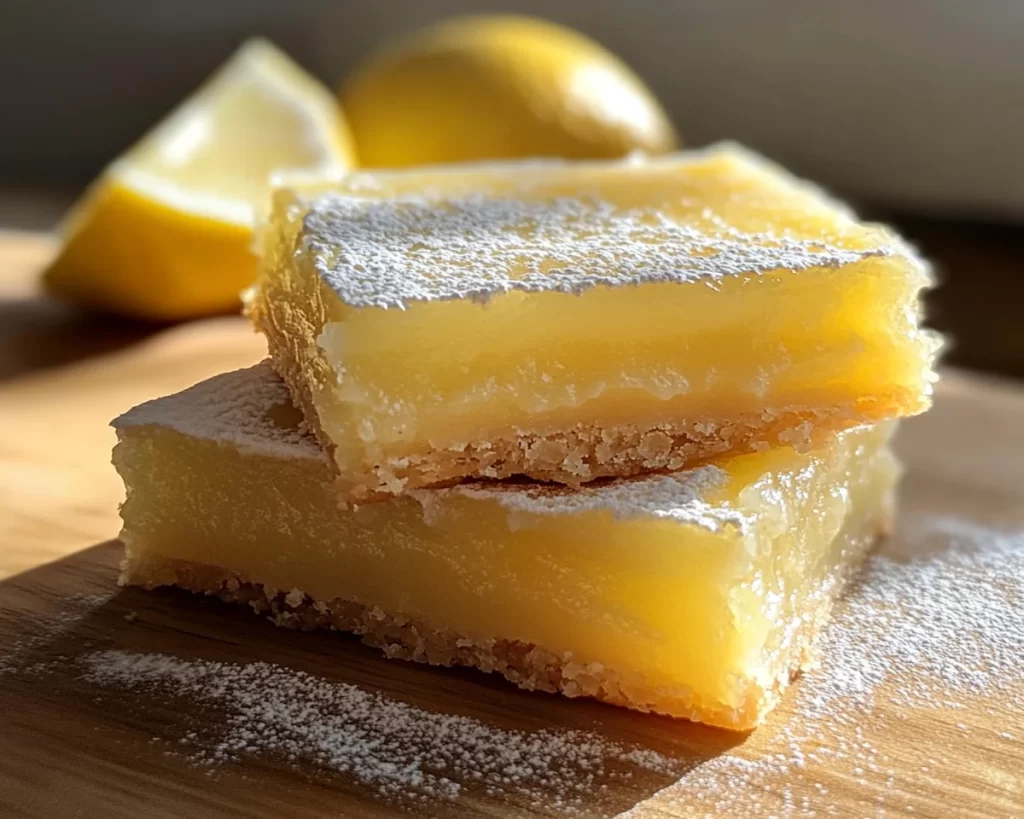
Lemon bars are a classic dessert that features a **tangy lemon curd filling** set atop a buttery shortbread crust. Originating from America, these bars have become a staple dessert at potlucks, bake sales, and family gatherings. The base—a mixture of flour, butter, and sugar—provides a delicate crunch while the lemon curd filling adds a bright, zesty contrast.
The texture of lemon bars is a beautiful balance; the crust is slightly crumbly yet holds together well, while the filling is smooth and creamy. Each bite offers a burst of refreshing citrus flavor that leaves you wanting more. With a hint of sweetness and a touch of tartness, lemon bars are perfect for those who enjoy desserts that don’t weigh heavily on the palate. The vibrant yellow color also makes them visually appealing, often becoming the centerpiece of dessert tables during spring and summer gatherings.
Why You’ll Love This
There are countless reasons to fall in love with lemon bars. First and foremost, their **taste** is a celebration of spring; the balance of sweet and tart is simply irresistible. Additionally, they are easy to make, requiring minimal ingredients and time. In a world where many desserts seem overly complicated, lemon bars stand out for their simplicity, making them accessible for beginners.
Cost-effectiveness is another highlight—most of the ingredients are staples often found in your pantry. No need for exotic or expensive items. Lemon bars are also incredibly versatile; you can serve them chilled, dusted with powdered sugar, or topped with whipped cream for a more decadent treat. As a bonus, they can be enjoyed year-round, but their refreshing flavor shines brightest during warmer months.
Many people might shy away from making lemon bars due to the common misconception that they require advanced techniques or tools. Rest assured, you can achieve perfect lemon bars without a kitchen full of gadgets. Just follow the simple steps in this recipe, and you’ll impress friends and family with your baking prowess.
Ingredients You’ll Need
To make this delicious spring dessert, you will need the following ingredients:
- 1 ¾ cups all-purpose flour – This serves as the base of your crust, providing structure and support.
- 1 cup granulated sugar – Adds sweetness both to the crust and the lemon filling.
- ½ cup unsalted butter – Essential for richness and helps form a flaky crust.
- ¼ teaspoon salt – Enhances the flavor by balancing the sweetness of the sugar.
- 4 large eggs – Provides structure and stability to the filling, while also enhancing richness.
- 1 cup freshly squeezed lemon juice – The key ingredient that infuses the dish with its characteristically vibrant flavor.
- 2 teaspoons lemon zest – Adds depth and an intensified lemon flavor to the filling.
- ¼ teaspoon baking powder – Helps to set the filling for a satisfying texture.
- Powdered sugar for dusting – A lovely finishing touch that adds a decorative element to your lemon bars.
Make sure to use freshly squeezed lemon juice rather than bottled for the best flavor. The zest also plays an important role; don’t skip it as it enhances the overall lemony taste. If you’re looking for substitutes, lime juice works well for a different citrus twist or you can make a gluten-free version using almond flour for the crust.
How to Make
Creating mouthwatering lemon bars is a delightful journey. Follow these step-by-step instructions to achieve the perfect dessert.
- Prepare the crust: Preheat your oven to 350°F (175°C). In a mixing bowl, combine 1 cup of all-purpose flour, ½ cup of melted unsalted butter, ¼ cup of granulated sugar, and ¼ teaspoon of salt. Mix until the ingredients come together to form a crumbly dough.
- Press the dough into the pan: Take an 8-inch square baking dish and lightly grease it with cooking spray or butter. Transfer the dough into the pan and press it evenly across the bottom. Use your fingers or the bottom of a measuring cup for an even layer. Make sure there are no cracks.
- Bake the crust: Place the crust in your preheated oven and bake for about 20 minutes or until it begins to turn golden brown on the edges. Keep a close eye on it; over-baking can lead to a dry crust.
- Prepare the filling: While your crust is baking, whisk together 4 large eggs in a separate mixing bowl. Add 1 cup of granulated sugar and continue whisking until it’s well combined. Squeeze in 1 cup of freshly squeezed lemon juice and add 2 teaspoons of lemon zest for extra flavor. Finally, mix in ¼ teaspoon of baking powder to help the filling rise slightly.
- Combine filling with crust: Once the crust is done baking, carefully pour the lemon filling over the hot crust without disturbing it too much. This ensures the filling bonds beautifully with the crust.
- Bake the lemon bars: Return the pan to the oven and bake for an additional 20-25 minutes until the filling is set but still slightly jiggly in the center. It’s crucial not to overbake at this stage; the bars will continue to firm up as they cool.
- Cool down: Once baked, remove the lemon bars from the oven and let them cool in the pan at room temperature for about 30 minutes. For best results, cover and place them into the refrigerator for at least 2 hours to fully set. This chilling step enhances the flavor and texture.
- Serve: When you’re ready to serve, dust the top generously with powdered sugar. Cut the bars into squares or rectangles, and plate them beautifully. You can even garnish with lemon slices or fresh mint leaves for an extra touch of elegance.
With attention to detail in each step, you will create lemon bars that are not only aesthetically pleasing but also bursting with flavor.
Variations & Substitutions
Key Lime Variation: If you’re a fan of a different citrus flair, use key limes instead of standard lemons. This variation will give your lemon bars a more tropical vibe. The tangy flavor from the key limes is slightly different, offering a creamier texture. Prepare the filling in the same way: replace the lemon juice with fresh key lime juice, and you will be pleasantly surprised by the outcome. This variation is particularly popular during summer events, as it provides a refreshing twist.
Berry Swirl Lemon Bars Variation: For a fruity touch, consider making berry swirl lemon bars. You can use any berry—raspberries, blueberries, or strawberries will work beautifully. Prepare your lemon filling as directed but also mash a cup of your chosen berries and swirl them into the filling before pouring it over the crust. This not only adds a vibrant color but also pairs wonderfully with the tangy lemon flavor. The sweetness of the berries complements the tartness of the lemon, creating a captivating harmony.
Gluten-Free Lemon Bars Variation: For those following a gluten-free diet, simply substitute the all-purpose flour with a gluten-free flour blend. Look for blends that contain xanthan gum to maintain the texture. The process remains largely unchanged, ensuring everyone can enjoy these delightful lemon bars. Just be cautious with the baking time; gluten-free crusts may bake faster, so keep a close watch to prevent over-baking.
Common Mistakes to Avoid
When embarking on your lemon bar-making journey, there are a few **critical mistakes** that could potentially derail your efforts. One common pitfall is overbaking the crust, which can lead to a dry texture. Make sure you keep a close eye on it, as it can go from perfectly baked to too dark quickly. Similarly, overcooking the lemon filling can make it rubbery. It’s okay if it still has a slight jiggle in the center when you take it out of the oven; it will continue to set while cooling down.
Another issue could arise from not using fresh lemon juice; opting for bottled lemon juice can result in a bland flavor. Always zest and juice fresh lemons for the best results. Lastly, ensure that you allow the bars ample time to cool and set in the refrigerator before serving. Skipping this step can result in a soupy mess that won’t hold its shape when cut.
Storage, Freezing & Reheating Tips
Proper **storage** is essential for maintaining the delightful flavor and texture of your lemon bars. They can be stored in an airtight container in the refrigerator for up to a week. Ensure they are fully cooled before sealing them to retain their quality.
If you want to prolong their freshness, lemon bars can easily be frozen. First, cut the bars into individual pieces and wrap them tightly in plastic wrap or aluminum foil. Seal them in an airtight container or freezer bag, making sure to label the date. They can be frozen for up to 3 months. When you’re ready to enjoy them, simply thaw them overnight in the refrigerator.
Reheating is generally not necessary; they are best served cold or at room temperature. If you must reheat, do so carefully in a low oven, just enough to take the chill off without compromising their texture.
Frequently Asked Questions
Can I use other citrus juices besides lemon?
Absolutely! While lemons are the classic choice, you can substitute lime, orange, or grapefruit juices for a unique flavor twist. Each citrus option will impart its unique sweetness and tartness, giving you a new variation of lemon bars.
How can I tell if my lemon bars are done baking?
Look for the edges to be set yet have a slight jiggle in the center. If it appears too liquidy, it likely needs more baking time. A good rule of thumb is to let them cool down before cutting; they will firm up as they set.
How do I prevent my crust from getting soggy?
Ensure that your crust is pre-baked long enough and cooled before adding the filling. Including a **thin layer** of cornstarch or flour in the crust can act as a barrier, preventing moisture from soaking through.
What if I don’t have fresh lemons?
While fresh lemons are recommended for flavor, bottled lemon juice can be a short-term substitute. However, you may find it lacks the fresh, vibrant taste that comes from juicing your lemons.
Can I add a meringue topping to my lemon bars?
Yes! For an elevated version, consider topping your lemon bars with a light meringue. Simply whip up egg whites with sugar until they form stiff peaks, then spread over the cooled lemon filling before briefly broiling until golden. Just be sure to serve them promptly.
Conclusion:
The lemon bars recipe encapsulates everything you love about spring dessert—a delightful balance of sweet and tart that is both refreshing and satisfying. With simple ingredients and manageable steps, you will find this recipe a worthy addition to your baking repertoire. Go ahead, try your hand at these lemon bars, customize them to your taste, and share them with family and friends. With each bite, you’ll bring a taste of spring to your table, creating moments of joy and connection. So roll up your sleeves, gather your ingredients, and start baking these delightful treats today!


