Prep time: 30 minutes
Cook time: 12 minutes
Total time: 42 minutes
Servings: 24 cookies
There is something utterly delightful about the aroma of cookies baking in the oven, particularly during the vibrant season of spring. The scent of freshly baked goods wafts through your kitchen, wrapping you in a comforting embrace. If you’re eager to create a treat that embodies the freshness of spring, look no further than Strawberry Thumbprint Cookies. These cookies are not just a feast for the eyes; they are an incredible combination of textures and flavors—crisp on the outside, soft in the middle, and bursting with sweet, fruity goodness on the inside. With this recipe, you’ll be equipped with everything you need to create cookies that both your family and friends will adore.
This recipe is special because it draws from the quintessential flavors of spring. Those vibrant strawberries bring a burst of color and sweetness, perfectly complementing the buttery, melt-in-your-mouth cookie base. You’ll learn how to make these delectable cookies from scratch, including tips on the best techniques for achieving the perfect thumbprint. Additionally, we’ll explore variations and substitution options for those with specific dietary needs or ingredient preferences.
What Is Spring Cookies: Strawberry Thumbprint Cookies?
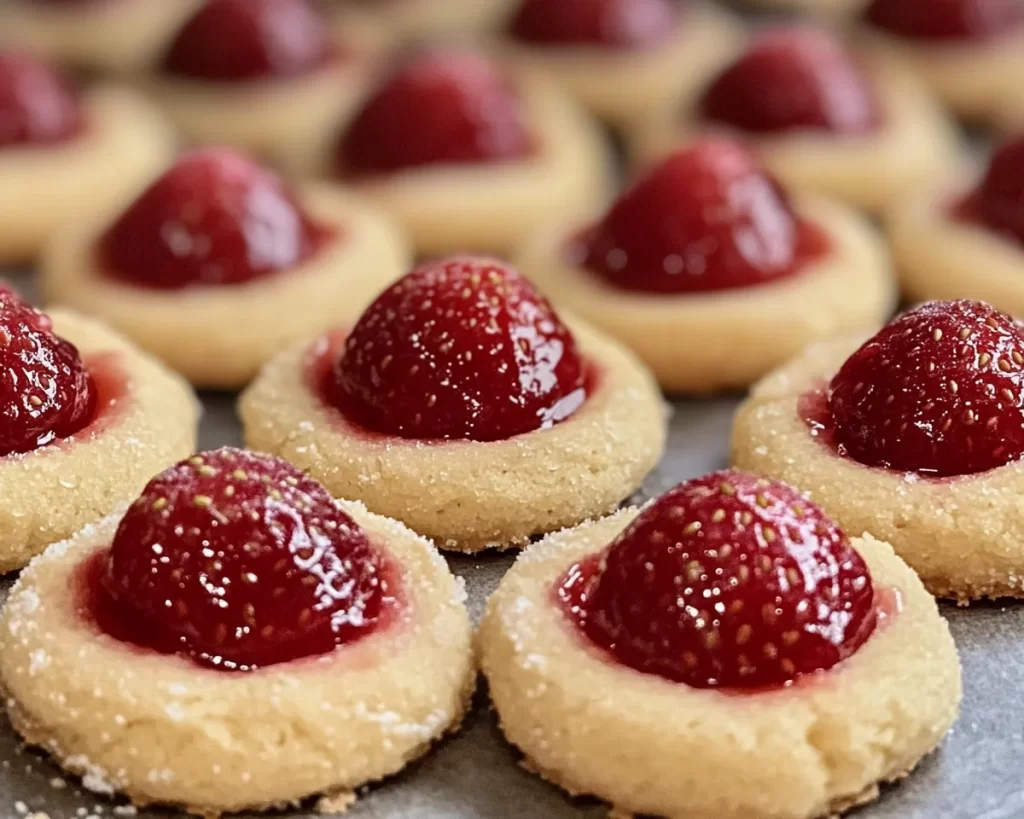
Spring Cookies: Strawberry Thumbprint Cookies are a delightful and fun cookie that has origins rooted in Eastern Europe, particularly among Jewish communities. The “thumbprint” method of making these cookies involves pressing your thumb into the dough to create a small indentation, which is then filled with strawberry jam or fresh strawberries. The result is a perfectly baked cookie that provides a satisfying texture contrast—crisp edges complementing a chewy center filled with sweet and tangy fruit.
The flavor of these cookies is a celebration of spring itself. The sweetness of the strawberries melds beautifully with the buttery cookie base, creating a harmonious blend that makes each bite a treat. As you take a bite, the texture offers a slight crunch followed by a soft, chewy interior, with the jam providing a luscious finish. These cookies are not just visually appealing with their inviting colors and shapes; they bring a sense of nostalgia and warmth, perfect for sharing with loved ones during spring gatherings, picnics, or simply enjoying at home with a cup of tea.
You’ll also find that the beauty of this recipe lies in its versatility, allowing you to modify it to suit various dietary restrictions while still maintaining that splendid taste. Whether you prefer a gluten-free option or want to experiment with different fruit fillings, Strawberry Thumbprint Cookies are a canvas for creativity.
Why You’ll Love This
One of the primary reasons you’ll fall in love with this recipe is its simplicity. This cookie requires straightforward ingredients that are likely already in your pantry, minimizing shopping efforts. The combination of flavors is not only delicious but also nourishing, giving you the satisfaction of providing a homemade treat that is better for you than many store-bought cookies.
Cost is another significant factor; making cookies at home is generally more economical than purchasing premium bakery treats. Additionally, you have the advantage of choosing high-quality ingredients, which can positively affect both flavor and health aspects. Many people assume that baking from scratch is complicated, but this recipe is approachable even for beginners; the step-by-step guide demystifies the process and ensures your success.
If you think baking is only for special occasions, think again. These cookies can easily become a staple in your household, charming your family with their delightful taste and beautiful presentation. You can also customize the cookies based on your family’s preferences. If your children enjoy a particular fruit or flavor, feel free to switch it up!
Lastly, the sense of accomplishment you’ll feel as you watch your friends and family enjoy the cookies is unparalleled. There is something incredibly rewarding about serving baked goods that you’ve made with love. You’ll have everyone coming back for seconds and asking for the recipe.
Ingredients You’ll Need
- 2 cups all-purpose flour: This is the base for our cookies, providing structure. If gluten-free is a must, you can substitute it with a gluten-free flour blend.
- 1 cup unsalted butter: The rich, creamy butter adds flavor and helps create a tender texture. Make sure it’s softened to room temperature for easy mixing.
- ¾ cup granulated sugar: This will sweeten the dough and contribute to the cookie’s delightful crunch.
- 1 large egg: The egg acts as a binding agent, helping to hold the ingredients together.
- 1 teaspoon vanilla extract: This adds a lovely aroma and enhances the overall flavor profile.
- ½ teaspoon baking powder: This ingredient helps the cookies rise properly, giving them a light texture.
- ½ teaspoon salt: Enhances the sweetness of the cookies and balances the flavors.
- ¾ cup strawberry jam (or fresh strawberries): The star of the show! You can use store-bought jam or make your own for a fresher taste.
Each ingredient plays a crucial role in creating the perfect balance of flavors and textures. Don’t be afraid to get creative! If strawberries aren’t available or you want to switch things up, you can explore using other fruit jams, like raspberry, apricot, or even blueberry. Just be sure to choose a flavor that excites your taste buds!
How to Make
- Begin by preheating your oven to 350°F (175°C). Line a baking sheet with parchment paper to prevent the cookies from sticking. This small step will also make cleanup much easier once you’re done baking.
- In a large mixing bowl, combine the softened unsalted butter and granulated sugar. Using an electric mixer, cream the two together until the mixture is light and fluffy, which typically takes about 3-5 minutes. This step is crucial because it incorporates air into the batter, leading to a lighter cookie.
- Add in the egg and vanilla extract, mixing until fully combined. The egg not only binds the mixture but also contributes to a soft and tender texture. Make sure to scrape down the sides of the bowl to ensure all ingredients are mixed evenly.
- In a separate bowl, whisk together all-purpose flour, baking powder, and salt. Gradually add the dry ingredients to the wet mixture, mixing until just combined. Be careful not to overmix; this will ensure your cookies remain soft and tender.
- Using a cookie scoop or tablespoon, scoop the dough and roll it into balls, approximately 1 inch in diameter. Place the dough balls on the prepared baking sheet, leaving some space between each to allow for spreading during baking.
- Now comes the fun part! Using your thumb or the back of a small spoon, press gently into the center of each dough ball to create a well. Make sure not to press too hard, as you’ll want the edges to remain intact. This thumbprint will hold the strawberry jam beautifully!
- Fill each thumbprint with about ½ teaspoon of strawberry jam. If the jam seems too thick, you can microwave it for a few seconds to loosen it up slightly.
- Pop the baking sheet into the preheated oven and bake for about 10-12 minutes, or until the edges are lightly golden. Keep an eye on them; overbaking can lead to a tougher cookie!
- Once baked, remove the cookies from the oven and allow them to cool on the baking sheet for about 5 minutes before transferring them to a wire rack. This cooling period is essential to help them firm up, making them easier to handle without breaking.
- Once fully cooled, serve these delicious cookies. They taste best on the day they are made but can be stored for several days if needed.
With each step, be mindful of your timings; this helps ensure every cookie turns out fantastic! Allowing for cooling time, and paying close attention to the baking time will greatly affect your final product.
Variations & Substitutions
Gluten-Free Variation: For those following a gluten-free diet, you can easily swap the all-purpose flour with a gluten-free flour blend. Many blends are designed to mimic the properties of regular flour, giving you similar texture and taste. Additionally, ensure that your jam is gluten-free to keep the entire cookie safe for consumption.
Dairy-Free Variation: If you prefer an entirely dairy-free option, you can substitute the butter for a vegan option such as coconut oil or a dairy-free margarine. Not only does this make the cookies dairy-free, but coconut oil adds a subtle hint of flavor that can enhance your cookies’ taste.
Fruit Variation: While strawberries shine in this recipe, feel free to experiment with different fruit fillings. Raspberry, apricot, or even lemon curd can provide a refreshing twist on the traditional thumbprint cookie. Just be cautious with the amount of filling, as some fruits can be juicier than others.
Add-Ins Variation: For those who can’t resist a little extra texture and flavor, consider adding chopped nuts like walnuts or pecans into the dough for added crunch. You could also mix in some chocolate chips for a sweet twist that both kids and adults will love.
Low-Sugar Variation: For a healthier take, you can reduce the sugar in the recipe by 25% without compromising the flavor. Alternatively, you could substitute regular sugar with a sugar alternative like Stevia or coconut sugar, both of which provide a sweet taste without the calories.
Each of these variations caters to different preferences and dietary needs while ensuring that you can enjoy these flavorful cookies regardless of your dietary restrictions.
Common Mistakes to Avoid
Making cookies can be a complex endeavor, especially if you’re new to baking. One common mistake is not properly measuring your flour, which can lead to dry cookies. Always spoon your flour into your measuring cup and level it off with a knife—don’t pack it down!
Another pitfall is overmixing your dough once you’ve added the flour. This can result in dense cookies rather than tender cookies. Mix until just combined; a few streaks of flour are okay. Also, keep a close eye on your baking time; cookies can go from perfect to overbaked in seconds. Set a timer to avoid overbaking, and keep checking for that golden edge.
Using cold butter can also lead to issues. Make sure your butter is at room temperature for easy creaming with the sugar. This step is vital for incorporating air, which gives cookies their rise and fluffy texture. Lastly, avoid overcrowding your baking sheet; give your cookies space to spread comfortably without merging into each other.
Storage, Freezing & Reheating Tips
For best quality, store your Strawberry Thumbprint Cookies in an airtight container at room temperature. They can last up to five days, maintaining their delightful texture and flavor. Alternatively, if you want to extend their shelf life, placing them in the freezer is a fantastic option.
To freeze, allow the cookies to cool completely, and then place them in a single layer on a baking sheet. Freeze them for a few hours until solid, and transfer them to a freezer-safe bag or an airtight container. These can stay in the freezer for up to three months. When you’re ready to enjoy them, simply let them thaw at room temperature or pop them in the microwave for a few seconds for a fresh-baked taste.
Be cautious with reheating; you want to warm them just enough to enhance their flavor without drying them out. If they seem a bit hard after thawing, a quick 10-15 seconds in the microwave should do the trick!
Frequently Asked Questions
Can I use fresh strawberries instead of jam?
Yes, you can use fresh strawberries for the filling! If you opt for fresh fruits, chop them finely and mix them with a little sugar to enhance their sweetness and help create a syrupy filling.
How can I make these cookies more nutritious?
To increase the nutritional value, consider adding ground flaxseed or chia seeds to the dough. These add fiber and healthy fats without altering the flavor significantly, making them a wholesome treat.
Can I make the dough ahead of time?
Absolutely! You can prepare the cookie dough and refrigerate it for up to 24 hours before baking. Just ensure you let it sit at room temperature for about 15 minutes before scooping and baking, as chilled dough can be difficult to work with.
What if my cookies spread too much during baking?
If your cookies spread excessively, it may be due to too much butter or not chilling the dough. You can try chilling the dough for 30 minutes before scooping, which helps prevent excess spread during baking.
Are these cookies suitable for freezing?
Yes, Strawberry Thumbprint Cookies freeze very well! Ensure they are fully cooled before storing in airtight containers, and thaw at room temperature when ready to enjoy.
Conclusion:
These Spring Cookies: Strawberry Thumbprint Cookies are a joyous celebration of flavors that capture the essence of spring in every bite. They are perfect for sharing with friends and family, whether during festive gatherings or as a comforting treat for yourself. Don’t hesitate to experiment with different fillings and variations to make this recipe your own. We encourage you to enjoy the process of baking and to create lasting memories in your kitchen. Try out this recipe today, and delight in the fresh, vibrant flavors of spring!


