Prep time: 20 minutes
Cook time: 0 minutes
Total time: 20 minutes
Servings: 6-8
Spring is a delightful time of year, bringing fresh produce and a sense of renewal. One of the most enjoyable ways to celebrate the season is by creating a vibrant and interactive **spring charcuterie board** complete with **mini sandwich bites**. This recipe allows for creativity and variety, making it perfect for gatherings, picnics, or simply enjoying a leisurely afternoon snack.
What Is Spring Charcuterie Board Ideas with Mini Sandwich Bites in 5 Steps?
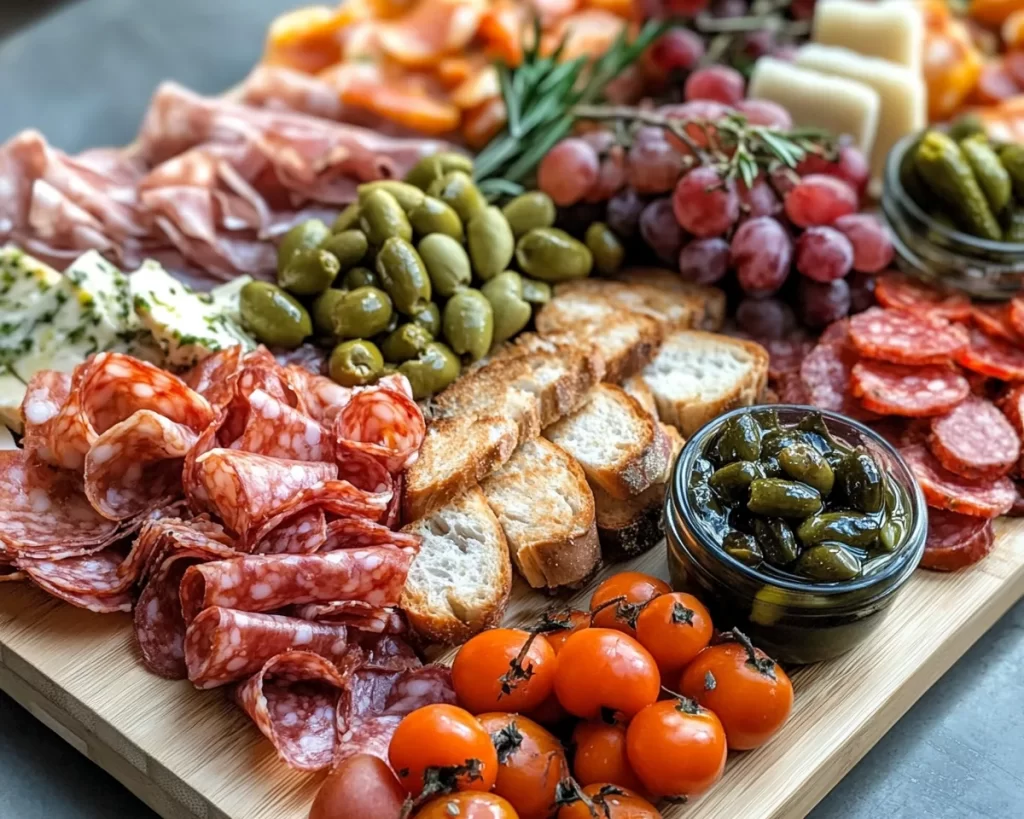
A **spring charcuterie board** is a beautifully arranged platter that features a variety of meats, cheeses, fruits, and other accompaniments, all meant for sharing and savoring. Adding mini sandwich bites elevates your board, giving guests a convenient way to indulge in delicious flavors while encouraging a relaxed, social atmosphere. This style is particularly fitting for spring events, as the bright colors and fresh ingredients are visually appealing and tastefully refreshing.
Why You’ll Love This
You’ll love this idea for many reasons. First, it allows you to showcase seasonal produce that is abundant in spring, bringing freshness and vibrancy to every bite. You’ll also appreciate its versatility; easily customize the ingredients to suit your taste preferences and dietary needs. Furthermore, charcuterie boards are always a hit at parties, as they create a sense of camaraderie among guests who can mingle and chat while enjoying tasty bites. Finally, assembling this charcuterie board is surprisingly simple, making it ideal for both busy parents and kitchen novices looking to impress their guests.
Ingredients You’ll Need
To create your **spring charcuterie board** with mini sandwich bites, gather the following ingredients:
- Cheeses: 250g of assorted cheeses, such as brie, cheddar, and goat cheese for creamy, tangy flavors.
- Cured Meats: 150g of thinly sliced salami and prosciutto to achieve a nice balance of saltiness.
- Vegetables: 1 cup of colorful bell peppers and cherry tomatoes for crunch and freshness, cut into bite-sized pieces.
- Fruits: 1 cup of ripe strawberries and grapes to add sweetness and contrast.
- Mini Sandwiches: 6 small sandwiches with a variety of fillings like turkey, avocado, and hummus.
- Dips: A small bowl of pesto or hummus for added flavor.
- Crackers: An assortment of whole-grain crackers to serve with the cheeses and dips.
- Herbs: Fresh herbs like basil and mint for garnish and additional freshness.
How to Make
Creating your **spring charcuterie board** in five simple steps is straightforward and enjoyable.
- Start by preparing your mini sandwiches. Take your desired bread and cut it into small squares or circles. Spread your selected fillings generously. Common options include turkey with avocado or a classic ham and cheese. After assembling, cut the sandwiches into manageable bites.
- Next, arrange your cheeses on the board. Place the assorted cheeses in different sections, ensuring they have ample space. Use a cheese knife for easy serving, and cut a few slices from the larger blocks. This will entice guests to taste and try different combinations with meats and vegetables.
- Once the cheeses are in place, add your cured meats. You can create folds or rolls to give a more dynamic presentation. Scatter them around the cheeses, interspersing with the mini sandwiches for visual appeal.
- Now, incorporate the fresh vegetables and fruits. Create small mounds of chopped bell peppers and serve cherry tomatoes on the side. This adds vibrant colors, making the charcuterie board inviting. Place clusters of strawberries and grapes to provide a touch of natural sweetness.
- Finally, finish the board by adding your dips and crackers. Use small bowls to contain the dips for easy serving. Arrange the crackers attractively around them. Garnish the entire board with fresh herbs, completing your **spring charcuterie board** with an aromatic touch.
Variations & Substitutions
Vegetarian Variation: For a vegetarian twist, replace the cured meats with additional vegetables like marinated artichokes, olives, and roasted red peppers. Incorporate a variety of cheeses, such as feta or gouda, to enhance flavors.
Dairy-Free Option: Substitute traditional cheeses with non-dairy alternatives made from nuts or soy, ensuring all guests can enjoy the board without dietary restrictions. Focus on bold flavors with herbed spreads or vegan pesto for dips.
Gluten-Free Adaptations: Make a gluten-free charcuterie board by using gluten-free crackers or fresh veggie sticks for dipping. Emphasize a range of textures and tastes through different nuts, fruits, and cheeses that are gluten-free certified.
Savory Mini Sandwiches: Get creative with sandwich options by using different types of bread like rye or ciabatta. Experiment with fillings such as roasted vegetables, various spreads, and flavorful cheeses, keeping in mind your preferences.
Seasonal Ingredients: Change up the ingredients based on what’s seasonal in your area. For instance, use fresh asparagus or radishes in spring and berries in summer to keep your charcuterie board exciting and aligned with seasonal produce.
Common Mistakes to Avoid
One common mistake is overcrowding the board. It can become visually unappealing if all ingredients are piled on top of each other. Instead, aim for balance by allowing space for each ingredient to shine in its own section.
Another issue is not varying textures. Make sure to mix crunchy, creamy, and soft items within the board, creating an interesting eating experience. For instance, serve crispy crackers alongside smooth cheeses and hearty sandwiches.
Finally, don’t forget about proper pairings. Certain cheeses go well with specific meats and fruits, while others clash. Conduct some taste tests to find the most harmonious combinations before your event.
Storage, Freezing & Reheating Tips
For any leftovers, it’s best to store your charcuterie board properly to ensure freshness. Wrap the uneaten mini sandwiches in plastic wrap or foil, and keep all dairy items in airtight containers to retain their quality. Most components can be stored in the fridge for up to 3 days.
If you need to freeze any sandwiches, ensure they are well-wrapped to prevent freezer burn. They should reheat well in an oven or microwave, but consider warming them gently to maintain texture.
Always prioritize food safety. Never leave your charcuterie board at room temperature for more than 2 hours. If temperatures soar, keep items chilled in a cooler until ready to serve.
Frequently Asked Questions
Can I customize the ingredients based on dietary restrictions?
Absolutely! The beauty of a charcuterie board lies in its flexibility. Cater to vegan, gluten-free, and other dietary preferences by selecting suitable ingredients like plant-based cheeses and gluten-free crackers. Always check labels to ensure hidden ingredients align with guests’ dietary needs.
How far in advance can I prepare the charcuterie board?
You can prep elements like the mini sandwiches and cut fruits and vegetables a few hours to a day in advance. However, for the best quality and flavor, it’s recommended to assemble the board no more than 2-3 hours before serving to keep ingredients fresh and visually appealing.
What types of boards work best for presentation?
Wooden cutting boards or marble slabs are popular for charcuterie presentations. They not only showcase the food beautifully but also allow for easy assembly. Ensure that the board is clean, and consider using smaller serving platters for additional space if hosting a larger gathering.
How do I serve the charcuterie board effectively?
To serve, provide small utensils, such as cheese knives and toothpicks, to allow guests to help themselves comfortably. Consider creating small labels for each item to inform guests about available choices, especially for items with potential allergens.
Can I use frozen fruits and vegetables?
While it’s always best to use fresh produce for texture and taste, you can utilize thawed frozen fruits if fresh options aren’t available. However, they may lose their firm texture and change in appearance. Always prioritize quality to create an appetizing presentation.
Conclusion:
Creating a **spring charcuterie board** with mini sandwich bites not only satisfies hunger but also cultivates social connections among guests. It invites creativity in presentation and encourages enjoyable snacking. Take advantage of seasonal ingredients to spot the flavors that truly represent the season. Ideal for busy parents and kitchen beginners, this recipe provides a splendid mix of taste and convenience, perfect for any spring gathering. Enjoy this colorful, flavorful feast and watch as your guests indulge in every last bite.