Prep time: 15 minutes
Cook time: 30 minutes
Total time: 45 minutes
Servings: 8 slices
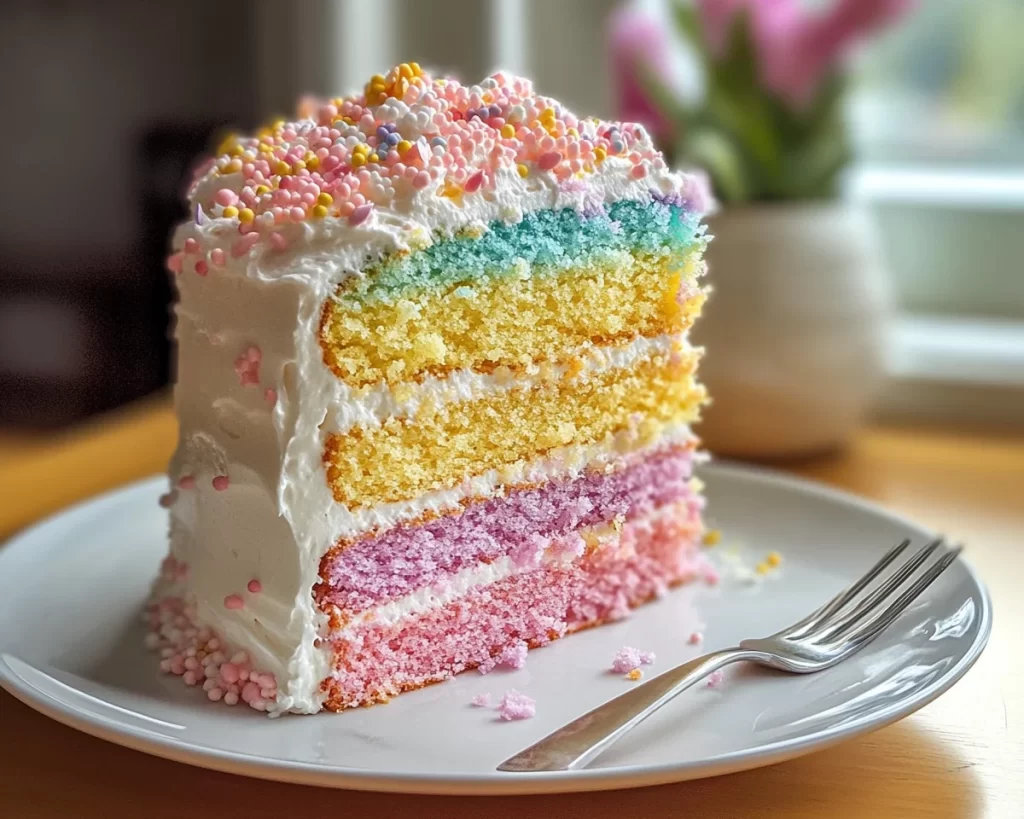
Spring Cakes: Pastel Ombre Layer Cake is a delightful dessert that captures the essence of the season. This cake is not only visually appealing but also offers a burst of flavors with each bite. Perfect for spring gatherings or celebrations, it combines layers of soft, fluffy cake with pastel-colored frosting. It’s an absolute hit among guests, making it ideal for birthdays, baby showers, or simply as a treat for a family gathering.
What Is Spring Cakes: Pastel Ombre Layer Cake in 45 Minutes?
Spring Cakes: Pastel Ombre Layer Cake is a vibrant and visually striking dessert composed of multiple layers of cake colored in hues reminiscent of a spring garden. The ombre effect is achieved through beautifully tinted buttercream frosting, giving the cake a stunning gradient from light to dark shades. This cake is perfect for those who want to impress without spending hours in the kitchen, as it can be prepared swiftly, allowing you to enjoy the results nearly immediately.
Why You’ll Love This
You will love this recipe for many reasons. First, it’s straightforward and quick, requiring only 45 minutes from start to finish. Second, the combination of fluffy vanilla cake layers and creamy frosting will tickle your taste buds. The vibrant colors not only grab attention but also make this cake a centerpiece at any gathering. Plus, it’s adaptable. You can customize the flavor of the cake and frosting, appealing to all preferences. It’s the kind of dessert that leaves a lasting impression but is simple enough to make even for novice bakers.
Ingredients You’ll Need
- All-Purpose Flour: 2 cups – This forms the base of your cake, providing structure and a tender crumb.
- Granulated Sugar: 1 ½ cups – Adds sweetness, helping balance the flavors of the cake.
- Unsalted Butter: ½ cup (softened) – Contributes to a rich flavor and moist texture.
- Baking Powder: 2 ½ teaspoons – This helps the cake rise and become fluffy.
- Salt: 1 teaspoon – Enhances the sweetness and balances flavors.
- Eggs: 4 large – They act as a binding agent, adding moisture and richness.
- Vanilla Extract: 2 teaspoons – Adds a beautiful flavor profile to the cake.
- Whole Milk: 1 cup – This provides moisture and richness to the batter.
- Food Coloring: Various pastel colors – For creating the ombre effect in the frosting.
- Powdered Sugar: 4 cups – The base for the frosting, providing the right sweetness and texture when whipped.
- Heavy Cream: ½ cup – This adds richness to the frosting while giving it a creamy consistency.
How to Make
- Preheat your oven to 350°F (175°C). Grease and flour three 9-inch round cake pans. This ensures your cakes come out easily without sticking.
- In a large mixing bowl, cream together the softened butter and granulated sugar until light and fluffy. This process is crucial for incorporating air into the mixture, leading to a lighter cake texture.
- Add the eggs one at a time, mixing well after each addition. This helps create an emulsion, which contributes to the cake’s moisture. Stir in the vanilla extract.
- In another bowl, whisk together the flour, baking powder, and salt. Gradually add this dry mixture to the wet mixture, alternating with milk, starting and ending with flour. This method prevents overmixing and results in a tender cake.
- Pour equal amounts of batter into each prepared cake pan. You want each layer to be uniform to achieve the desired height in the final cake.
- Bake in the preheated oven for 25-30 minutes, or until a toothpick inserted in the center comes out clean. Allow them to cool for 10 minutes in the pans before turning them out onto wire racks.
- Once the cakes are completely cool, prepare the frosting by combining the powdered sugar and heavy cream in a mixing bowl. Beat until smooth and creamy. Divide the frosting into separate bowls for tinting with food coloring.
- Start frosting the first layer with the lightest color, adding the second layer on top and frosting it with a slightly darker shade. Repeat this with the final layer, creating an ombre effect as you go.
- Apply a crumb coat on the entire cake, which is a thin layer of frosting that seals in any crumbs. Chill for 15 minutes, then finish with a thicker layer of frosting, smoothing it out for a clean finish.
- Garnish with edible flowers or sprinkles if desired, slice, and serve this stunning cake at your next spring gathering.
Variations & Substitutions
Chocolate Ombre Layer Cake: For a decadent twist, substitute half of the all-purpose flour with unsweetened cocoa powder. This will yield a rich chocolate cake that’s equally soft and delightful. You can pair it with a chocolate buttercream frosting using the same technique as the ombre, and the result will be a visually stunning and deliciously rich dessert.
Gluten-Free Version: Use a gluten-free all-purpose flour blend to make this cake gluten-free. The texture may slightly vary, but it will still yield a moist and tasty cake. Pair with a gluten-free frosting to ensure everyone can enjoy a slice.
Fruit-Flavored Layers: You can add fruit purees such as raspberry or lemon to the batter for additional flavor. Replace part of the milk with the puree, enhancing the cake with a fresh, fruity taste and aroma.
Common Mistakes to Avoid
When making this cake, one common mistake is over-mixing the batter. Overmixing can lead to a dense cake rather than a light, airy texture. To avoid this, mix just until combined, and be sure to alternate adding dry and wet ingredients.
Another issue is not properly measuring ingredients, particularly flour. Make sure to spoon the flour into your measuring cup and level it off without packing it down to ensure the correct amount is used. Too much flour can result in a dry cake.
Lastly, ensure your cakes cool completely before frosting. Attempting to frost a warm cake can result in melting frosting and a slippery mess. Allow plenty of cooling time before applying the final decorative touches.
Storage, Freezing & Reheating Tips
To store your decorated Spring Cakes, keep it in an airtight container at room temperature for 2-3 days. If you need to store it longer, consider refrigerating it, especially if your frosting contains cream. The cake can also be frozen. Wrap each layer tightly in plastic wrap and place them in a freezer-safe container. They can be frozen for up to 3 months without losing flavor or texture.
When ready to eat, thaw your cake in the refrigerator overnight. If you frost the cake before freezing, allow it to come to room temperature, and then you can enjoy the cake as you would fresh.
Frequently Asked Questions
Can I make this cake ahead of time?
Absolutely! You can bake the layers in advance and store them in an airtight container. Frosting can also be prepared a day in advance and stored in the refrigerator. When you’re ready to assemble, just take everything out and allow it to come to room temperature.
What can I do if my cake layers are uneven?
If your cake layers dome in the center, you can level them with a sharp knife after they cool. This will make stacking and frosting easier and create a professional-looking finish. Additionally, you can trim a tiny bit off the edges to ensure they stack neatly.
Is there a way to make this cake dairy-free?
Yes! You can substitute the butter with dairy-free margarine or coconut oil, and replace the whole milk with almond milk or another non-dairy milk. Ensure your powdered sugar is also free from any dairy additives.
How can I decorate this cake?
There are countless ways to decorate your Spring Cakes. Fresh fruits, edible flowers, or even sprinkles can add to the visual appeal. Use a piping bag to create beautiful rosettes or simply spread the frosting with a spatula for a more rustic appearance.
What is the best way to slice the cake?
For clean slices, it’s best to use a sharp, serrated knife, dipping it in hot water and wiping it clean between each cut. This technique prevents the frosting from sticking to the knife and gives you immaculate slices for serving.
Conclusion:
This Spring Cakes: Pastel Ombre Layer Cake is not only a feast for the eyes, but it’s also a delightful treat that brings joy and sweetness to any occasion. With easy-to-follow steps and plenty of customization options, anyone can tackle this beautiful dessert. Whether you are a seasoned baker or just starting, this cake promises to yield stunning results that will impress friends and family alike. Enjoy baking and sharing this delicious cake as we celebrate the beauty of spring!