Prep time: 30 minutes
Cook time: 25 minutes
Total time: 55 minutes
Servings: 12
Spring celebrations often call for a special dessert, and what could be more delightful than a cake adorned with strawberry buttercream flowers? This treat not only looks stunning but also bursts with the fresh, sweet flavor of strawberries. Think of this cake as a canvas for your culinary artistry, where you can showcase your skills with vibrant and delicious buttercream flowers that are perfect for family gatherings and special occasions.
This recipe is not just about creating a beautiful cake; it also captures the essence of spring. Imagine slicing into a light sponge cake that is paired with a creamy, dreamy strawberry buttercream. Each bite is a celebration of flavor, texture, and the beauty of nature. What makes this recipe special is not just its elegance but also its accessibility. You don’t need to be a seasoned baker to create something that looks like it came from a professional bakery. By following the step-by-step instructions, you’ll gain confidence in your baking and decorating skills.
You will learn how to master the art of making the perfect sponge cake and the strawberry buttercream that elevates it. Additionally, I will share valuable tips and variations for customizing this cake to suit your preferences or dietary needs. So whether you’re a busy parent looking to impress at your child’s birthday party or a beginner trying to navigate the world of cake decorating, this recipe is tailored for you.
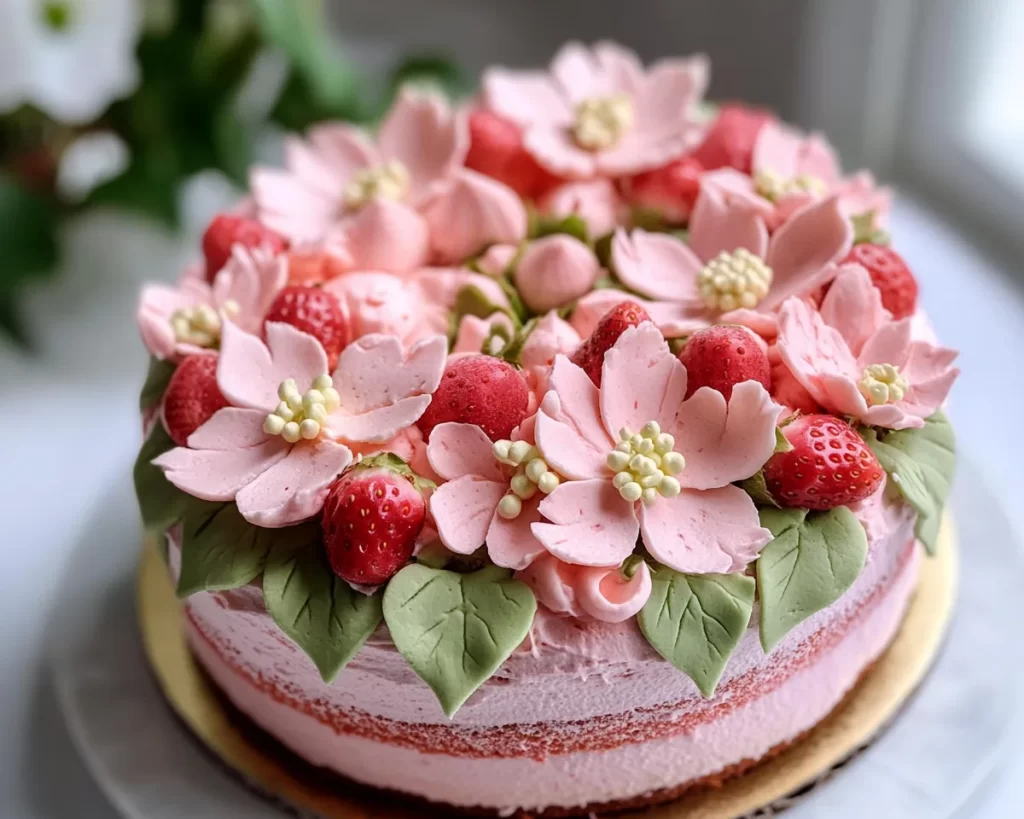
What Is Spring Cake Designs: Strawberry Buttercream Flowers?
Spring Cake Designs featuring Strawberry Buttercream Flowers is a whimsical, beautifully decorated cake that embodies the freshness of the season. Originating from traditional cake decorating techniques, this cake combines a light vanilla or sponge cake base with a luscious, strawberry-infused buttercream. The standout feature, of course, is the buttercream flowers, which can be piped in a variety of styles and colors, offering both visual appeal and rich flavors.
The texture of the cake itself is moist and fluffy, ensuring that each slice melts in your mouth. The strawberry buttercream, made from real strawberries, provides a perfect balance by introducing a sweet and slightly tart flavor, making it incredibly refreshing. These flavors and textures come together to create an experience that’s truly memorable, whether you serve it at a garden party or enjoy it during a casual family dinner.
This dish is adaptable; you can customize the cake to be gluten-free, dairy-free, or use alternative sweeteners, depending on your audience. Overall, it’s a versatile dessert that can be made for various occasions, while still allowing the baker to shine.
Why You’ll Love This
One of the main reasons you’ll adore this cake is its exceptional taste. The combination of the light cake and the strawberry buttercream creates a flavor explosion that is both refreshing and satisfying. Plus, the vibrant flowers make for a gorgeous centerpiece on any table. It’s not just a dessert; it’s a conversation starter!
From an ease-of-preparation perspective, the steps are simple yet rewarding. Even if you’re a novice in the kitchen, the clear instructions will guide you every step of the way. You don’t need to stress over achieving perfection right away; practice makes perfect, and every cake will turn out uniquely beautiful.
Cost-wise, making a cake at home is usually cheaper than purchasing a fancy decorated one, especially when you can control the ingredients and avoid artificial additives. Also, by using seasonal strawberries, not only do you boost flavor, you also keep costs down while supporting local farmers.
One common misconception about baking is that it requires precise conditions or elaborate equipment; however, this recipe breaks that barrier. You can adapt it based on what you have available. Remember, baking should be fun and approachable. And if you ever feel lost, don’t hesitate to ask for help—cooking is always better with friends.
Ingredients You’ll Need
To create this stunning Spring Cake with Strawberry Buttercream Flowers, you’ll need the following ingredients:
- All-purpose flour: 2 cups. This forms the base of your cake and helps to create a light and fluffy texture.
- Baking powder: 2 teaspoons. This important leavening agent ensures that your cake rises properly.
- Salt: 1/2 teaspoon. Enhances the flavors of the other ingredients.
- Unsalted butter: 1 cup, softened. Adds richness and moisture to the cake.
- Granulated sugar: 1 1/2 cups. Provides sweetness and contributes to the cake’s structure.
- Eggs: 4 large. These serve as binding agents and add moisture.
- Vanilla extract: 2 teaspoons. Enhances the overall flavor profile.
- Buttermilk: 1 cup. Gives the cake a tender crumb while adding a slight tang.
- Fresh strawberries: 1 cup, pureed for the frosting. These will provide the vibrant flavor and color to the buttercream.
- Powdered sugar: 4 cups. This sweetens and thickens the buttercream.
- Heavy cream: 2 tablespoons. Helps achieve the right consistency in your buttercream.
Each ingredient plays a vital role in the overall outcome of your cake, from flavor and texture to appearance. If necessary, substitutions can easily be made: for the flour, you could use gluten-free flour for a gluten-free version, or replace the buttermilk with almond milk mixed with a teaspoon of vinegar for a dairy-free alternative.
How to Make
Creating this Spring Cake entails several steps, but your patience will be greatly rewarded. Follow these instructions for a cake that impresses both in flavor and aesthetics.
- Preheat Your Oven: Begin by preheating your oven to 350°F (175°C). This ensures that your cake bakes evenly and achieves that beautiful golden color.
- Prepare Your Cake Pans: Grease and flour two 9-inch round cake pans. Alternatively, you could line the bottoms with parchment paper for easy cake release. Don’t skip this step—nothing is more frustrating than a cake that sticks to the pan!
- Mix Dry Ingredients: In a medium-sized bowl, whisk together the all-purpose flour, baking powder, and salt. This step is crucial as it ensures that the leavening agent is evenly distributed throughout the flour.
- Cream Butter and Sugar: In a large mixing bowl, beat the softened unsalted butter and granulated sugar together until the mixture is light and fluffy, about 4-5 minutes. This process incorporates air into the butter, which is essential for a light cake.
- Add Eggs and Vanilla: Add in the eggs one at a time, mixing well after each addition. Then stir in the vanilla extract. The mixture should become smooth and creamy.
- Incorporate Dry Ingredients: Gradually add the dry ingredients to the wet mixture, alternating with buttermilk. Start and finish with the flour mixture. Mix until just combined; over-mixing can lead to a dense cake.
- Divide the Batter: Divide the batter evenly between the two prepared cake pans and smooth the tops with a spatula. The batter should be evenly spread for uniform baking.
- Baking Time: Place the pans on the middle rack in the preheated oven and bake for 25–30 minutes. A toothpick inserted in the center should come out clean. This aromatic scent will fill your kitchen as the cake bakes!
- Cooling: Once baked, remove the cake from the oven and let it cool in the pans for 10 minutes. Then, carefully transfer it to a wire rack to cool completely. Avoid frosting a warm cake to prevent the frosting from melting.
- Prepare the Strawberry Buttercream: While your cake is cooling, make your buttercream. In a large bowl, beat the softened butter until creamy. Slowly add powdered sugar and strawberry puree, mixing until combined. Add heavy cream as needed to achieve your desired consistency.
- Frost the Cake: Once the cakes are completely cool, place one layer on a serving plate. Spread a layer of strawberry buttercream on top before adding the second layer. Frost the top and sides, creating a smooth finish. This is also your time to get creative with the piping of flowers!
Be sure to take your time when frosting and decorating your cake, as this is where your personality shines. Curved, vibrant petals and delicate leaves can be achieved through practice. Consider watching a few online tutorials if you’re new to cake decorating; it’s a joyful skill to develop!
Variations & Substitutions
Gluten-Free Version: You can easily make this cake gluten-free by substituting the all-purpose flour with a gluten-free flour blend. This option caters to those with celiac disease or gluten sensitivity, and it allows everyone to enjoy this delightful treat. Just be cautious—some gluten-free blends may not rise as well, so look for brands with xanthan gum included for better results.
Dairy-Free Version: If you’re looking to make this recipe dairy-free, simply replace the unsalted butter with a dairy-free butter substitute or coconut oil. For the buttermilk, use almond or soy milk mixed with a splash of vinegar. This variation ensures that lactose-intolerant individuals can partake in this joyous dessert without any discomfort.
Vegan Version: To take it a step further and make it vegan, you can use flax eggs instead of regular eggs. Mix 1 tablespoon of ground flaxseed with 3 tablespoons of water for each egg needed. Additionally, ensure that both the butter and milk substitutes are vegan-friendly. Your cake will still turn out fluffy and delicious, and the strawberry frosting will bring all the essential flavors.
Different Flavors: While strawberry is the star here, why not switch it up? You can replace the strawberry puree with any fruit of your choice, such as raspberry, blueberry, or even a ripe banana puree. Each fruit will impart its unique flavor and color, offering a fun twist on the classic cake. It’s your creation—feel free to experiment!
Common Mistakes to Avoid
Baking can be daunting, but avoiding these common mistakes can make a world of difference:
Over-mixing the Batter: One of the most common errors is over-mixing once the dry ingredients are added. This can lead to a tough cake texture instead of the desired light and airy consistency. Mix just until combined, and don’t be afraid of a few small lumps!
Baking at the Wrong Temperature: Always preheat your oven to the right temperature. If your oven is too hot, the cake may brown too quickly without baking through. Conversely, if it’s too cool, the cake may not rise properly. An oven thermometer can help ensure that you’re baking at the correct temperature.
Using Cold Ingredients: Always ensure that your butter and eggs are at room temperature before mixing. Cold ingredients can prevent the batter from emulsifying properly, leading to a dense cake.
Neglecting to Check for Doneness: Just because you’ve set a timer doesn’t mean your cake is done. Always perform the toothpick test or gently press the center of the cake with your finger; it should bounce back. This can prevent the frustrating scenario of an undercooked or overbaked cake.
Storage, Freezing & Reheating Tips
Storing your Spring Cake with Strawberry Buttercream Flowers can be a breeze with these practical tips:
To store, keep the cake in an airtight container at room temperature for up to 2 days. If you’re in a warmer climate, it’s best to refrigerate it; the buttercream frosting can melt if left out for too long. However, note that refrigeration can dry out the cake over time, so always try to bring it back to room temperature before serving for the best texture.
If you want to make your cake ahead of time, consider freezing it. Wrap the individual cake layers tightly in plastic wrap, then aluminum foil, and store in the freezer for up to 3 months. You can also freeze the strawberry buttercream separately, allowing for easy assembly and decoration when you’re ready to serve. Just be sure to let everything thaw in the refrigerator overnight before frosting and serving.
To reheat, if you happen to have leftovers (and yes, I know it’s hard to believe!), gently warm individual slices in the microwave for about 10-15 seconds. This will revive the cake without compromising the frosting.
Frequently Asked Questions
Can I use frozen strawberries for the buttercream?
Yes, you can absolutely use frozen strawberries. Just make sure to thaw them completely and drain any excess water before pureeing. However, fresh strawberries provide a better flavor and texture when making buttercream, so opt for fresh if you can!
How do I prevent my cake from sinking in the middle?
Sinking can usually be attributed to underbaking, so always keep an eye on your cake as it bakes. Make sure to follow the toothpick test to ensure it’s fully cooked through. If your oven temperature is too high, it may bake quickly on the outside but remain gooey inside, leading to sinking.
How can I make my frosting stiffer?
If your strawberry buttercream is too soft, you can add more powdered sugar to stiffen the consistency. Start with 1/4 cup increments until you achieve the desired thickness. Cold butter and refrigeration can also help firm it up if it becomes too warm while decorating.
Can I prepare the buttercream in advance?
Absolutely! You can prepare the strawberry buttercream up to 2 days ahead. Store it in an airtight container in the refrigerator. When ready to use, let it come to room temperature and re-whip it for the best consistency.
How can I make decorative flowers with my buttercream?
There are various piping tips available for creating beautiful flowers. A star tip creates simple, easy flowers, while a petal tip can make more intricate designs. Watching video tutorials can provide visual guidance that will enhance your decorating technique—practice is key!
Conclusion:
This Spring Cake with Strawberry Buttercream Flowers is a showstopper that not only pleases the eyes but also excites the taste buds. Its delightful, fresh flavors combined with the whimsical appearance make it ideal for any spring celebration. I encourage you to try it out, add your personal touch, and share it with your loved ones. You have the power to create something beautiful in your kitchen. Embrace your inner baker and enjoy the process—happy baking!


