Prep time: 30 minutes
Cook time: 25 minutes
Total time: 55 minutes
Servings: 12 servings
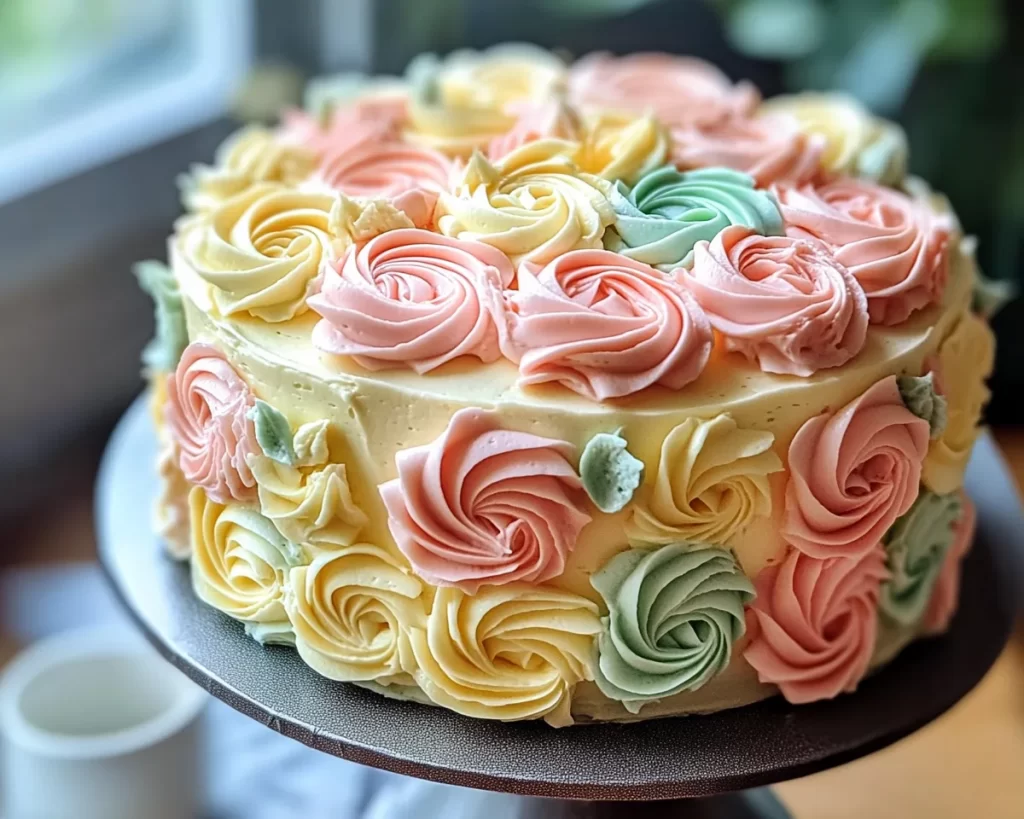
When spring arrives, so do the desires for fresh, vibrant desserts that evoke feelings of warmth and joy. There’s something inherently special about a beautifully decorated cake that can uplift any occasion. Imagine a cake adorned with delicate pastel-colored buttercream rosettes that mimic blooming flowers—a true work of art that’s equally delicious as it is stunning. Not only does this cake visually celebrate the season, but it also serves as a perfect treat for birthdays, weddings, or simply a cheerful gathering with friends and family. Today, I’m excited to share with you my take on this alluring dessert: the Spring Cake Designs: Pastel Buttercream Rosettes Cake.
This recipe combines fluffy vanilla cake layers with creamy buttercream in soft pastel shades, creating an inviting dessert that will leave everyone reaching for a second slice. As you read through, you’ll discover the secrets behind achieving that perfect *rosette* design and tips to ensure every bite is as flavorful as the last. Whether you’re a novice baker or seasoned in the kitchen, this cake is not only easy to create but also provides room for customization and flair, allowing your creativity to shine.
What Is Spring Cake Designs: Pastel Buttercream Rosettes Cake?
The Spring Cake Designs: Pastel Buttercream Rosettes Cake is a delightful dessert that epitomizes the essence of spring. Originating from classic baking techniques, this type of cake is characterized by its light and airy texture, making it a refreshing treat. The combination of fluffy cake layers complements the rich, velvety buttercream, which provides both flavor and visual appeal. When you cut through the cake, you expose the layer of frosting nestled between each slice, creating an inviting look that beckons your taste buds.
The beauty of this cake lies not only in its taste but also in its aesthetic presentation. The *pastel buttercream rosettes*, meticulously piped onto the cake, resemble delicate flowers in full bloom, which can remind us of blooming gardens during springtime. These rosettes can be dyed in various shades—pinks, yellows, and greens—to suit any celebration theme. Each bite blends sweet cream with soft cake, creating a perfect harmony of flavors and textures that will undoubtedly impress your guests.
Why You’ll Love This
There are countless reasons to fall in love with this Spring Cake Designs: Pastel Buttercream Rosettes Cake. First and foremost, the taste is extraordinary. The light vanilla sponge cake combined with the creamy, sweet buttercream creates an explosion of flavor that is neither overly rich nor too sweet. The cake feels light on your palate, making it easy to enjoy after a hearty meal or at a festive gathering.
Beyond its delightful taste, this cake is also incredibly easy to make. With straightforward instructions and readily available ingredients, even beginners can achieve success. The *buttercream rosettes* may sound intimidating, but with a little practice and the right piping tools, you’ll find it to be a relaxing and enjoyable process. Plus, this recipe is versatile; you can customize it based on dietary needs or personal tastes. Whether you opt for a gluten-free version or decide to add a flavor twist with lemon or chocolate, the possibilities are endless.
One common misconception is that homemade cakes are time-consuming and complex. While this cake does require some attention to detail, the workflow is quite efficient. You can even prepare the cake layers in advance and assemble them on the day of serving. Additionally, instead of a full-sized cake, you could opt for smaller versions or cupcakes adorned with buttercream rosettes, making it a fun option for parties or simpler gatherings.
Ingredients You’ll Need
Here’s what you’ll need to craft the Spring Cake Designs: Pastel Buttercream Rosettes Cake, along with some insights into their roles in the recipe:
- 2 cups all-purpose flour: This is the foundation of your cake. You may substitute it with gluten-free flour for a gluten-free version.
- 1 ½ cups granulated sugar: Provides sweetness and helps create a tender texture.
- ½ cup unsalted butter: When softened, it contributes to the richness and moisture of the cake. Remember to use unsalted to control your cake’s salt content.
- 1 cup milk: Adds moisture and creates that fluffy texture we all love.
- 3 large eggs: Provide structure and stability to the cake. You can replace eggs with flaxseed meal or applesauce for a vegan option.
- 2 ½ teaspoons baking powder: The leavening agent that helps the cake rise.
- 1 teaspoon vanilla extract: Enhances the cake’s flavor profile; you can also experiment with almond extract for a different twist.
- 4 cups powdered sugar: The base for the buttercream frosting, giving it that sweet, creamy consistency.
- 1 cup unsalted butter (for frosting): Similar to the cake, this will lend creaminess and texture to the frosting.
- Food coloring (variety of pastels): For dyeing your buttercream into beautiful hues for the rosettes.
These ingredients combine to create a cake that is both deliciously tasty and visually stunning, perfect for celebrating springtime occasions.
How to Make
Follow these step-by-step instructions to create your own Spring Cake Designs: Pastel Buttercream Rosettes Cake:
- Preheat the oven: Preheat your oven to 350°F (175°C). This ensures a warm environment that facilitates even baking.
- Prepare your cake pans: Grease and flour two 9-inch round cake pans. This prevents the cakes from sticking, allowing for easy release once baked.
- Mix the dry ingredients: In a large mixing bowl, whisk together the all-purpose flour and baking powder. This step ensures that the leavening agent is evenly distributed throughout the flour.
- Cream the butter and sugar: In a separate bowl, beat the softened unsalted butter and granulated sugar together until fluffy and light in color. This process incorporates air, making your cake soft.
- Add the eggs and vanilla: Beat in the eggs one at a time, mixing well after each addition. Add the vanilla extract and continue mixing until well combined.
- Combine dry and wet mixtures: Gradually pour the dry mixture into the butter mixture, alternating with the milk. Begin and end with the dry ingredients, mixing lightly to combine without overworking the batter.
- Pour into pans: Divide the batter evenly between the prepared cake pans. Smooth the tops using a spatula for an even bake.
- Bake: Place the pans in the preheated oven, baking for 25 to 30 minutes. Your cake is ready when a toothpick inserted in the center comes out clean.
- Cool the cakes: Remove the pans from the oven and allow the cakes to cool in the pans for about 10 minutes. Then, carefully transfer them to a wire rack to cool completely before frosting.
- Make the buttercream: In a large mixing bowl, beat the second portion of unsalted butter until creamy. Gradually add the powdered sugar, mixing until smooth. You can add a splash of milk to adjust the buttercream’s consistency.
- Color the buttercream: Divide the frosting into separate bowls and add food coloring. Mix until you achieve the desired pastel shades.
- Assemble the cake: Once the cake layers are completely cooled, place one layer on a serving plate. Spread a layer of buttercream frosting on top of the first layer, then add the second layer and cover the entire cake in a thin crumb coat of frosting. Chill for 30 minutes to set.
- Decorate with rosettes: Using a piping bag fitted with a star tip, pipe rosettes around the sides and top of the cake in your chosen pastel colors. Feel free to decorate with edible glitter or sprinkles for additional flair.
- Serve: Slice and enjoy your creation with family and friends, delighting in both its beauty and taste!
This process may seem detailed, but with each step, you’ll find yourself closer to creating something truly special that is not only appealing but equally delightful to enjoy.
Variations & Substitutions
Gluten-Free Variation: If you’re in need of a gluten-free option, consider using a high-quality gluten-free all-purpose flour blend. This can create a cake that everyone can enjoy, without compromising on taste or texture. It’s essential to choose one that contains xanthan gum, which mimics the binding properties of gluten. Follow the same measurements as you would with regular flour, and be sure to mix well to avoid clumps.
Chocolate Version: For chocolate lovers, this recipe can easily be adapted. Simply replace ½ cup of the all-purpose flour with unsweetened cocoa powder. This will infuse a rich chocolate flavor into the cake. You can also adjust the sugar based on your taste; chocolate usually requires a bit more sweetness to balance the bitter notes. Pair with a chocolate buttercream or mix cocoa into the original buttercream for a unique combination that is sure to impress.
Lemon Infusion: Adding a hint of lemon can really brighten up the flavors in this cake. Incorporate the zest of one lemon into the batter and replace a portion of the milk with fresh lemon juice. This zippy twist creates a refreshing cake that perfectly complements the creamy buttercream. The citrus aroma will fill your kitchen and will be a nice conversational piece at your spring gatherings!
Vegan Option: To create a vegan version of this cake, replace the eggs with a flaxseed mixture (1 tablespoon of ground flaxseed mixed with 2.5 tablespoons of water per egg) to help bind the ingredients together. The milk can be substituted with almond milk or your favorite plant-based milk, and ensure to use a vegan butter for the frosting. Not only will you keep it plant-based, but you’ll also be able to have the rich flavors and textures that shine through.
These adaptations ensure you can cater to different dietary preferences and tastes without losing the beauty or flavor of this delightful cake.
Common Mistakes to Avoid
When baking this cake, be aware of a few common pitfalls that could affect your results. Overmixing the batter is a critical mistake; it can lead to a dense cake rather than a light and fluffy one. After you combine the wet and dry ingredients, mix just until combined. It’s perfectly acceptable to have a few lumps in your batter.
Another issue arises with frosting; if your buttercream is too soft, it may not hold its shape when piped onto the cake. Ensure the butter is at room temperature, but not overly soft. If it does become too soft, try chilling it for a few minutes to firm it back up. Conversely, if your frosting is too stiff, add a small splash of milk and mix well until it reaches the desired consistency.
A poorly leveled cake can also create a challenge when assembling your cake. Before frosting, make sure the tops of your cake layers are level by trimming off any domes with a serrated knife. This will help prevent the cake from leaning and ensure that your decorations come out beautifully.
Lastly, always remember to cool your cake completely before frosting. If you frost a warm cake, the buttercream will melt and slide off, ruining your decorative designs. A well-cooled cake provides the best foundation for those stunning buttercream rosettes.
Storage, Freezing & Reheating Tips
Storing your Spring Cake Designs: Pastel Buttercream Rosettes Cake properly ensures that it remains fresh and delicious. If you plan on enjoying your cake over several days, cover it with a cake dome or wrap it in plastic wrap to prevent it from drying out. Proper storage will maintain its texture, and flavor, and keep the buttercream from becoming crusty.
For longer-term storage, you can freeze the cake. To do this, make sure it’s completely cooled and then double wrap it in plastic wrap, followed by aluminum foil. This prevents freezer burn and keeps your cake fresh for up to three months. When you’re ready to enjoy it, thaw it in the refrigerator overnight before allowing it to come to room temperature before serving.
If you have extra buttercream frosting, it can also be stored in the refrigerator for up to two weeks in an airtight container. Just give it a quick stir before using it again. Remember, always check for freshness and quality before consuming.
Frequently Asked Questions
Can I make this cake in advance? Absolutely! You can prepare the cake layers and even the buttercream frosting a day or two in advance. Keep the cake layers stored tightly wrapped at room temperature, and the frosting in the refrigerator. Just assemble and decorate it on the day you wish to serve it for the best presentation.
What can I use instead of food coloring? If you’d prefer a natural alternative to food coloring, you can experiment with natural dye sources such as beet juice for pink, turmeric for yellow, or matcha powder for green. Keep in mind that these may give a slightly different hue and flavor compared to traditional food coloring.
Can I use other cake flavors for this recipe? Certainly! While vanilla is traditional, other flavors such as almond, coconut, or even spice cake can be delightful alternatives. Just follow the same process, ensuring you balance the flavors with the buttercream you choose.
How do I store leftover cake? Store any leftover cake in an airtight container or wrap it tightly with plastic wrap to keep it fresh. It can be kept at room temperature for a couple of days or in the refrigerator for up to a week. You can also freeze your slices if you want to keep it for a longer period.
Can I make mini versions of this cake? Yes! This cake recipe translates beautifully into cupcakes or mini cakes. Simply adjust the baking time (typically around 15-18 minutes for cupcakes) and use the same techniques for decorating with mini rosettes. This can be a fun way to serve at gatherings!
Conclusion:
In conclusion, the Spring Cake Designs: Pastel Buttercream Rosettes Cake is a wonderful way to celebrate the vibrant flavors and beauty of spring. With its light and fluffy layers, rich buttercream, and stunning presentation, it’s bound to be a hit at any gathering. I encourage you to try this recipe, explore the variations, and even consider customizing it to fit your unique taste. Don’t forget to share this cake with friends and family, as the joy of baking is best enjoyed together. Your efforts in creating this gorgeous dessert will surely be appreciated, making your baking journey truly rewarding. Happy baking!