Prep time: 30 minutes
Cook time: 30 minutes
Total time: 1 hour
Servings: 12 servings
Spring is a time for renewal, rebirth, and, most importantly, **delicious desserts**. Nothing screams “spring” like a vibrant and beautifully decorated **Floral Spring Sheet Cake**. This cake not only tantalizes the taste buds with its sweet and fluffy texture but also serves as a feast for the eyes with its lovely floral designs. Homemade cakes have a way of evoking warm memories—from family gatherings to casual get-togethers with friends. They’re also a wonderful opportunity to indulge your **creativity** and showcase your baking skills.
In this article, you will learn how to create your very own **Floral Spring Sheet Cake**. We will explore the fascinating aspects of the dish, the reasons you will love making it, and all the ingredients you will need. You can expect step-by-step instructions that make it easy to follow, along with helpful tips, essential variations, and answers to common questions. Whether you’re a beginner in the kitchen or an experienced baker, this cake will bring joy to your celebrations while impressing your guests.
What Is Spring Cake Designs: Floral Spring Sheet Cake Design?
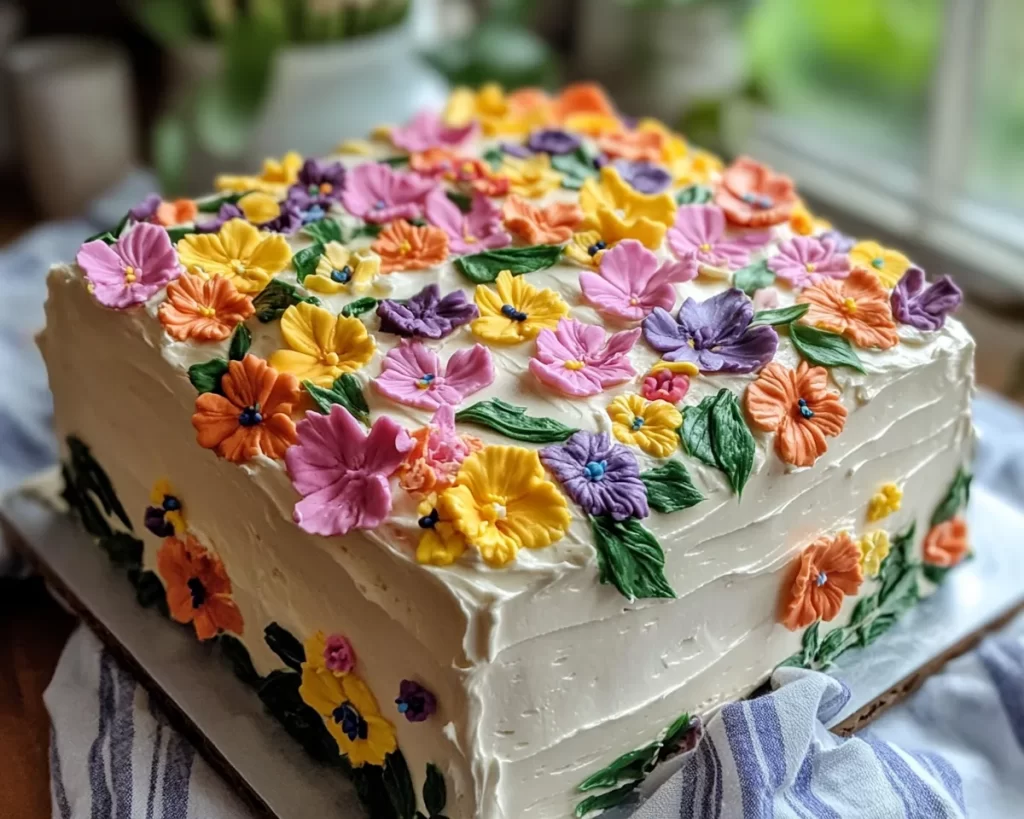
The **Floral Spring Sheet Cake** is a delightful combination of moist sponge cake adorned with colorful **buttercream flowers** that embody the essence of the spring season. Originating as a staple at celebrations, sheet cakes are known for their user-friendly nature and can accommodate various flavor profiles and themes. The cake is typically baked in a **rectangular pan**, making it easy to serve and share.
Texture-wise, the cake is light and fluffy, melting in your mouth with each bite. The flavor is usually enhanced with hints of vanilla or almond extract, bringing a delightful sweetness that pairs wonderfully with the rich buttercream frosting. The decorations play a significant role; the vibrant and lively floral designs reflect the blooming flowers of spring. Not only does this cake taste fantastic, but it also serves as a stunning centerpiece for any celebration, making it ideal for birthdays, showers, or even spring picnics.
Preparing the **Floral Spring Sheet Cake** is an experience in itself, bringing together a medley of flavors and colors. The addition of fresh fruits or edible flowers can elevate the cake even further, showcasing the freshness of the season, and ensuring every slice is a **culinary delight**.
Why You’ll Love This
You will love this **Floral Spring Sheet Cake** for many reasons! First and foremost, it is incredibly delicious. The combination of a light and moist cake with rich **buttercream frosting** creates a flavor explosion with each bite. With such a delightful balance of sweetness, it is sure to be a crowd-pleaser.
The ease of preparation is another benefit. Unlike multi-layered cakes, which can be daunting for novice bakers, this sheet cake requires relatively simple techniques. It is an excellent introduction for **beginners**, and even seasoned cooks can appreciate the effortless assembly and decorating aspects. Just imagine effortlessly slicing into a beautifully decorated sheet cake, with soft cake layers and creamy frosting.
In terms of cost, the ingredients for this cake are highly accessible and generally budget-friendly. With minimal specialized tools required, you can whip up this charming dessert without breaking the bank. Additionally, it allows for **customization**—whether you prefer a classic vanilla flavor or wish to experiment with lemon or almond, the flavor possibilities are endless! You can even modify it to suit different dietary needs (for example, gluten-free or egg-free options), making it a versatile choice for various occasions.
As with any popular dish, there exist misconceptions. Some may think that making a beautifully decorated cake requires extensive skill. However, with the **right techniques** and a bit of practice, anyone can create stunning cake designs. Mistakes are part of the learning process, and the beauty of baking is that you can always improve with each attempt.
Ingredients You’ll Need
To create your **Floral Spring Sheet Cake**, you will need the following ingredients:
- 2 cups of all-purpose flour: This is the key structure-building ingredient, giving the cake its light, fluffy texture. For a gluten-free alternative, you can substitute with a **gluten-free flour blend**.
- 1 and ½ cups of granulated sugar: This sweetens the cake and helps retain moisture. You may use coconut sugar for a slightly healthier alternative.
- ½ cup of unsalted butter (softened): It contributes to the cake’s richness and creates a tender crumb. Ensure it’s at room temperature for easy mixing.
- 1 cup of milk: This adds moisture. Whole milk or even almond milk (for a dairy-free version) works beautifully.
- 3 large eggs: Eggs help bind all the ingredients and add richness and moisture. They also enhance the cake’s structure.
- 1 tablespoon of baking powder: This is crucial for providing lift and achieving that perfect fluffiness.
- 1 teaspoon of vanilla extract: This adds a delightful flavor. For a twist, you can use almond extract.
- 1/2 teaspoon of salt: Enhances the overall flavor by balancing sweetness.
- 3 to 4 cups of buttercream frosting: Essential for decorating and adding sweetness. You can make it from scratch or purchase it pre-made.
- Food coloring: To tint your buttercream for floral designs. Natural food coloring is an excellent option for a healthier choice.
Each ingredient plays a vital role, not only in the flavor but also in the cake’s overall structure. When preparing your cake, don’t hesitate to explore different brands and types of ingredients; they can all subtly change the taste and texture, making every baking experience unique.
How to Make
Creating your **Floral Spring Sheet Cake** may seem daunting at first, but with careful attention to detail, you will find it rewarding. Follow these step-by-step instructions to ensure the best results.
- Preheat your oven: Start by preheating your oven to 350°F (175°C). Proper oven temperature is essential for achieving a perfectly baked cake. Make sure to adjust the racks if needed for even heat distribution.
- Prepare the cake batter: In a large mixing bowl, combine the softened butter and sugar. Cream them together using an electric mixer on medium speed until the mixture is light and fluffy. This step usually takes about 2-3 minutes. The **air** incorporated during this process will give your cake its light texture.
- Add in the eggs: Crack the eggs into the bowl one at a time, mixing thoroughly after each addition. This ensures that they are well incorporated. You should see the batter become smooth and creamy. Scrape down the bowls to ensure even mixing.
- Mix the dry ingredients: In a separate bowl, sift together the flour, baking powder, and salt. This helpline break up any lumps and mix the dry ingredients uniformly. Sifting also aerates the flour, which helps with the cake’s fluffiness.
- Combine wet and dry ingredients: Gradually add the dry ingredients to the wet mixture, alternating with the milk. Begin and end with the flour mixture. Mix on low speed until just combined, avoiding overmixing, which can create a dense texture.
- Flavor it up: Finally, add the vanilla extract and mix for a few seconds until just combined. Ensure all ingredients are uniformly incorporated without leaving any lumps in the batter.
- Prepare the baking pan: Grease a rectangular sheet cake pan (preferably 9×13 inches) with butter or baking spray for easy removal. You can also line the bottom with parchment paper for added assurance.
- Pour the batter: Carefully pour the batter into the prepared pan and smooth it out evenly using a spatula. Give the pan a gentle tap on the counter to remove any air bubbles.
- Bake the cake: Place the pan in the preheated oven and bake for approximately 30-35 minutes, or until a toothpick inserted in the center comes out clean. Keep an eye on it toward the end of the baking time to avoid overbaking, which can cause dryness.
- Cool the cake: Once baked, remove the cake from the oven and allow it to cool in the pan for about 10 minutes. Then, carefully invert it onto a wire rack to cool completely. This step is crucial, as a warm cake may result in melted frosting later.
- Prepare the buttercream frosting: While the cake is cooling, make your buttercream frosting by beating softened butter in a bowl until creamy. Gradually add powdered sugar, mixing until achieved desired sweetness and consistency. For added flavor, mix in some vanilla extract and a splash of milk if necessary. If desired, divide the frosting into different bowls and tint them with food coloring for decorative purposes.
- Frost the cake: Once the cake has completely cooled, spread a generous layer of buttercream frosting over the top using an offset spatula. For a smooth finish, dip the spatula in hot water before spreading. Now comes the most enjoyable part: decorating with your beautifully colored buttercream flowers. Use piping bags fitted with different tips to create various floral designs.
- Let it set: After decorating, let the cake sit at room temperature for about 30 minutes to an hour. This will help the frosting set beautifully. Serve it fresh, or refrigerate for later enjoyment.
Each step is essential for the overall quality and presentation of your cake. As a beginner, don’t hesitate to take your time, and enjoy the culinary experience.
Variations & Substitutions
Lemon Floral Sheet Cake Variation:
Add a zingy twist to the traditional floral cake by incorporating fresh lemon zest and a splash of lemon juice into the batter. The bright citrus flavor pairs wonderfully with floral decorations, making it perfect for spring events. Replace some of the milk with fresh lemon juice for an added punch while keeping the cake moist. Those who love a fresh and fruity flavor will adore this variant. To enhance the flavor even more, consider a lemon-flavored buttercream or consider a **cream cheese frosting** for a nice creamy tang.
Chocolate Floral Sheet Cake Variation:
For chocolate lovers, this variation is a great option. Simply swap out 1 cup of the all-purpose flour with **unsweetened cocoa powder**. This change will create a luscious chocolate cake that serves as the perfect base for your flowers. When frosting, consider a chocolate buttercream to accompany the cake delicately and visually contrast with colored floral decorations. It’s an excellent choice for birthdays or casual celebrations where chocolate fans gather.
Vegan Floral Sheet Cake Variation:
This variation caters to those following a **vegan diet**. Substitute the eggs with **flaxseed meal** or **applesauce**, and replace the milk with plant-based milk like almond or soy. Use a vegan butter alternative for the frosting while ensuring that your food coloring is vegan-friendly as well. The end result is a beautiful and colorful sheet cake that retains all the charm of the original while being inclusive for everyone to enjoy. Plus, the flavor remains delightful!
Gluten-Free Floral Sheet Cake Variation:
Make this cake suitable for those with gluten sensitivities by using a high-quality **gluten-free flour blend**. Ensure that other ingredients, such as the baking powder, are gluten-free as well. The texture may vary slightly, but you can replace some of the flour with ground **almonds** or **coconut flour** to maintain moisture. This variant allows everyone to enjoy the cake without compromising on texture or flavor.
Common Mistakes to Avoid
One of the most common mistakes is **overmixing** the batter. This can lead to a dense cake rather than the light texture that you want. Always mix until just combined—this ensures air incorporation without overworking the gluten. Another frequent issue is incorrect oven temperature; an oven that is too hot can cause the cake to dome in the center, while one that is too cool may yield an undercooked middle. Always use an oven thermometer to confirm accurate temperatures.
When it comes to frosting, a common mistake is skimping on **butter**. Using too little can result in a poor spreadable texture, making it tricky to work with the frosting. Ensure that your butter is softened to room temperature, which will lead to smoother and more creamy frosting.
Finally, not letting your cake cool completely before frosting can ruin all your hard work. The warmth can cause the frosting to melt or become runny, leading to a less-than-stellar appearance. Allow ample time for cooling—patience, in this case, pays off.
Storage, Freezing & Reheating Tips
To keep your **Floral Spring Sheet Cake** fresh and delicious, proper storage is essential. Once the cake is cool, cover it with plastic wrap or store it in an airtight container. This will prevent it from drying out. If you plan to store the cake for more than a day, it’s best to refrigerate it, especially if you used dairy in your frosting.
For longer-term storage, you can freeze the cake. Make sure the cake is completely cooled, then **wrap it tightly** in plastic wrap and aluminum foil. This dual-layer will help protect the cake from freezer burn. The cake can be stored in the freezer for up to three months. When you’re ready to enjoy it, simply thaw it in the refrigerator overnight before frosting and serving.
If you’ve already frosted the cake but have leftovers, it’s best to store it in the fridge. The frosting can continue to harden as it settles, but it’s best enjoyed within three days for optimal flavor and texture. To reheat, place individual slices in the microwave for about 10 seconds to take the chill off. This ensures that the cake remains moist, enhancing the overall eating experience.
Frequently Asked Questions
Can I decorate the cake the night before?
While you can technically decorate the cake ahead of time, it’s best to do so on the same day for maximum freshness. If you must prepare in advance, consider refrigerating it. Just be aware that condensation can affect the appearance of the frosting. To counter this, ensure the cake sits at room temperature for a bit before serving.
What if my cake is dry?
If you find that your cake has turned out dry, don’t fret! One effective solution is to make a simple syrup (equal parts of sugar and water, heated until dissolved) and brush it over the cake layers before frosting. This method helps to infuse moisture, restoring some softness, making the cake more palatable.
Can I use different flavors for the frosting?
Absolutely! The buttercream frosting can be flavored in various ways. Consider **lemon zest** for a citrusy kick or **coffee essence** for something sophisticated. Remember to adjust the powdered sugar to ensure the right consistency and sweetness is achieved.
Can I use fresh flowers for decoration?
Using fresh flowers can add an enchanting look to your cake, but be sure they are **edible and pesticide-free**. Popular choices include pansies, violets, and marigolds. Just ensure to wash them thoroughly before adorning your cake. If in doubt, using colored frosting can yield equally stunning results.
Is there a recipe for a gluten-free version of the frosting?
Yes, you can create a gluten-free frosting by ensuring that all ingredients are labeled gluten-free, including the powdered sugar and food coloring. Opt for naturally gluten-free cocoa powder if you’re making a chocolate frosting. All the flavors and textures can be retained without compromising dietary needs.
Conclusion:
The **Floral Spring Sheet Cake** is a delightful treat that embodies the spirit of spring through its beautiful design and irresistible flavor. It’s easy enough for beginners and versatile enough to cater to various taste preferences. Whether you choose to stick to the classic version or experiment with one of the exciting variations, your cake is guaranteed to be a hit.
As you try this recipe, remember to enjoy the process and let your creativity shine. Feel free to customize the design and flavor according to your preferences. Invite family and friends to share in the joy of your freshly baked creation, and don’t forget—sharing is caring! Now, gather your ingredients and get baking; your **Floral Spring Sheet Cake** awaits!


