Prep time: 30 minutes
Cook time: 25 minutes
Total time: 2 hours 55 minutes
Servings: 12
Indulging in a slice of a delightful cake can bring back memories of family gatherings, joyous celebrations, and heartfelt birthdays. The **Spring Birthday Cake: Strawberry Vanilla Layer Cake** perfectly encapsulates these moments, embodying a vibrant celebration of flavors that will make any occasion special. The soft layers of vanilla cake are infused with a burst of fresh strawberries, creating a moist and refreshing dessert that is both visually appealing and irresistibly delicious. Baking this cake is not only an activity but a nostalgic journey that will warm your heart and fill your home with sweet aromas.
As you dive into this recipe, you’ll discover how to create beautiful layers of fluffy vanilla cake and luscious strawberry filling, complete with a rich buttercream frosting to top it all off. This article will guide you through each step of the process, share essential tips and variations, and enable you to understand why this cake is not just another dessert but rather a statement piece that can light up any birthday celebration. Armed with the right ingredients and a little patience, you’ll find that the joy of baking a Spring Birthday Cake is just as delightful as the pleasure of sharing it with friends and family.
What Is Spring Birthday Cake: Strawberry Vanilla Layer Cake?
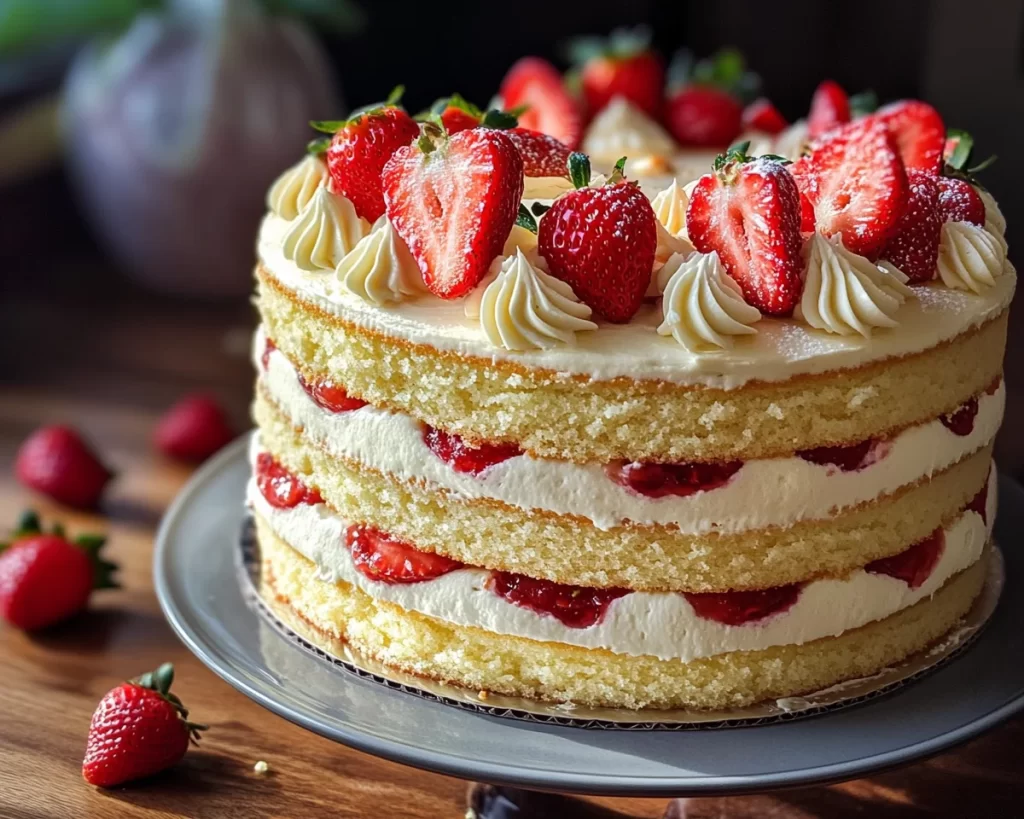
The **Spring Birthday Cake: Strawberry Vanilla Layer Cake** is a beautiful dessert that hails from the rich traditions of layer cakes. This delectable treat is characterized by its soft and airy vanilla cake layers, lovingly layered with a fresh strawberry filling that sings of spring and summer. Originating from the desire to celebrate life’s special moments with sweetness, this cake is ideal for birthday parties, garden celebrations, or any occasion that calls for joy and festivity.
This cake is notable for its mascara of fluffy buttercream frosting that not only adds a velvety texture but also enhances the overall flavor experience. The fusion of the sweet, creamy frosting with the fresh strawberries creates a multidimensional flavor profile that is both comforting and uplifting. Each slice offers a terrific balance—fluffy vanilla with a burst of fruity freshness. You’ll appreciate the way the cake maintains its moistness while still providing a tender crumb, making it perfect for cake enthusiasts of all ages.
Why You’ll Love This
You will adore this Spring Birthday Cake for several reasons. First, the taste is simply divine, with the natural sweetness of strawberries playing wonderfully against the light flavor of vanilla. The cake is not overly complicated and can be made with common ingredients found in most kitchens, making it both practical and approachable. This delightful dessert is budget-friendly too, proving that you don’t have to spend a fortune to create something fabulous that will impress your guests.
Additionally, the **Spring Birthday Cake** is incredibly versatile. Not only can you customize it with different fillings or frostings, but you can also adapt it to suit various dietary restrictions—think gluten-free flour or dairy-free alternatives. Common mistakes can often arise during baking, but with a few simple tips, you can avoid these pitfalls and create a cake that is as beautiful as it is delicious. For instance, proper measuring techniques can significantly affect the texture, so using a scale can ensure accuracy and success in your baking endeavors.
Ingredients You’ll Need
- All-purpose flour: This forms the cake’s structure and provides a tender crumb. If you’re looking for a gluten-free option, consider substituting with a high-quality gluten-free flour blend.
- Granulated sugar: This sweetens the cake and affects its texture, contributing to a light and fluffy finish.
- Baking powder: Essential for giving the cake rise; ensure it’s fresh for the best results.
- Salt: Enhances the sweetness and balances flavors.
- Unsalted butter: Provides richness and moisture. It’s best to use room temperature butter for easy creaming with sugar.
- Large eggs: These contribute to the cake’s structure and moisture. Room temperature eggs easily incorporate into the batter.
- Whole milk: Adds creaminess and moisture; you can substitute with almond milk or soy milk for dairy-free options.
- Vanilla extract: A key flavor enhancer; opt for pure vanilla extract for the most authentic flavor.
- Fresh strawberries: The star of the show, lending vibrant color and refreshing taste. They should be ripe for the best flavor.
- Powdered sugar: Used for the buttercream frosting; it creates a smooth texture when combined with butter.
- Heavy cream: Adds lightness and structure to the frosting, ensuring it is fluffy and easy to spread.
How to Make
- Preheat your oven: Start by preheating your oven to 350°F (175°C). This step is crucial as a properly warmed oven ensures even baking and helps the cake rise beautifully. Prepare two 9-inch round cake pans by greasing them with butter and dusting them with flour to prevent sticking when it’s time to remove the cakes.
- Mix the dry ingredients: In a large bowl, whisk together the all-purpose flour, granulated sugar, baking powder, and salt. This helps to evenly distribute the ingredients and eliminates lumps. Take a moment to enjoy the vanilla aroma that will waft through your kitchen as you mix. This is your foundation for a perfectly textured cake!
- Cream the butter and sugar: In a separate bowl, cream the unsalted butter with the granulated sugar until light and fluffy. This can take about 3-5 minutes with an electric mixer. You want to beat in enough air to create a light crumb in the finished cake. Remember, this process is vital—skip it, and you may end up with a dense result.
- Add the eggs and vanilla: Beat in the eggs, one at a time, ensuring that each egg is fully incorporated before adding the next. Stir in the vanilla extract, which will elevate the cake’s flavor profile and make your kitchen smell delicious!
- Incorporate the dry ingredients: Gradually add the dry mixture to the butter mixture, alternating with the whole milk. Begin with the dry ingredients and finish with them, mixing until just combined. Overmixing can lead to tough cake, so be gentle. The batter should be smooth, with a slightly thick texture—if it feels too runny, it might not hold up in baking.
- Prepare to bake: Pour equal portions of batter into the prepared pans. Gently spread the batter to the edges and smooth the top with a spatula. Place the pans in the preheated oven and bake for 25 minutes, or until a toothpick inserted in the center comes out clean. Make sure to rotate the pans halfway through baking for even heat distribution.
- Cool the cakes: Once baked, remove the cakes from the oven and let them cool in the pans for 10 minutes before transferring them to a wire rack. Allow them to cool completely. This step is crucial; if you frost the cake while it’s warm, the frosting will melt and slide off, ruining your presentation.
- Prepare the strawberry filling: While the cakes are cooling, wash and hull the fresh strawberries. Slice them and place them in a bowl. Add a tablespoon of sugar and let them sit for about 15 minutes to draw out their juices. This creates a natural strawberry syrup that will enhance the filling’s flavor and moisture.
- Make the buttercream frosting: In a mixing bowl, beat the unsalted butter until creamy. Gradually add the powdered sugar, a bit at a time, along with the heavy cream and a splash of vanilla extract. Beat until the mixture is smooth and fluffy. If the frosting is too thick, add a bit more cream to reach your desired consistency—don’t be afraid to taste as you go!
- Assemble the cake: Level the tops of the cooled cake layers using a serrated knife if they have domed. Place the first layer on your serving platter and spread a layer of frosting on top. Add half of the strawberry filling over the frosting, ensuring it’s evenly distributed. Place the second layer on top and repeat the process, finishing with a generous layer of frosting on top and around the sides of the cake for a polished look.
- Decorate: To finish, decorate the top with additional sliced strawberries or a drizzle of strawberry syrup, if you desire. This step not only adds a pop of color but also signals to your guests that this cake is a special treat.
- Chill and serve: Before serving, consider refrigerating the cake for about 30 minutes to allow the buttercream to set slightly, making it easier to slice. When you’re ready to enjoy, cut the cake into slices and revel in the layers of fluffy cake and sweet filling!
Variations & Substitutions
Gluten-Free Variation: If you need to accommodate gluten sensitivities, you can easily transform this classic cake into a gluten-free masterpiece. Select a gluten-free all-purpose flour blend that includes xanthan gum for the best results. Follow the same proportions as the original recipe, and you’ll still achieve that light, fluffy texture. Just be sure to check your baking powder to ensure it is gluten-free, as some brands may contain gluten.
Dairy-Free Variation: For those avoiding dairy, simple swaps can be made to create a scrumptious dairy-free cake. Use coconut milk or almond milk instead of whole milk, and substitute dairy-free butter or margarine in place of the unsalted butter. The strawberry filling can also be made with coconut cream, which adds richness and a hint of coconut flavor, enhancing the overall cake experience.
Chocolate Layer Cake: If you’re a chocolate enthusiast, consider making a chocolate version of this cake. Substitute half of the all-purpose flour with unsweetened cocoa powder for a delicious chocolate base. The strawberry filling pairs beautifully with chocolate, creating a decadent sweet and tart layered cake. You can also incorporate chocolate buttercream for an indulgent finish.
Additional Fruit Options: While strawberries are the star of our cake, you can easily swap them out for other fruits that are in season. Use ripe peaches, blueberries, or raspberries for a similar effect. Keep in mind that different fruits may vary in sweetness; adjusting the sugar levels in the filling can help achieve the perfect balance. Each fruit brings its unique flavor, allowing you to customize the cake to suit your preferences or the season.
Cream Cheese Frosting: For a richer, tangy flavor, try using cream cheese frosting instead of the traditional buttercream. To do this, combine softened cream cheese with butter, powdered sugar, and a splash of vanilla extract until creamy and smooth. The tangy notes of cream cheese beautifully complement the fresh fruit layers while providing a unique taste to your cake.
Common Mistakes to Avoid
One of the most frequent issues home bakers face is overmixing the batter, which can lead to a cake that is tough or gummy rather than tender and fluffy. Keep your mixing to a minimum once you add the flour to prevent developing too much gluten. Remember, achieving a soft crumb is all about balance!
Another common mistake is underestimating the importance of ingredient temperatures. Using cold eggs or butter can affect how well they incorporate into the batter, leading to an uneven texture. Be sure to bring your ingredients to room temperature before starting your recipe.
Additionally, an inadequate oven preheating can result in uneven baking, leading the cakes to rise improperly. Always preheat to the specified temperature, and if you’re using separate ovens, consider rotating the layers halfway through baking to ensure even cooking.
Last but not least, don’t rush the cooling step. Frosting a warm cake not only causes the frosting to slide off but may also create a mess when slicing. Allow your cakes to cool completely before frosting, ensuring a beautiful presentation when it’s time to serve.
Storage, Freezing & Reheating Tips
To maintain the freshness of your Spring Birthday Cake, proper storage is key. If you have leftovers, store the cake in an airtight container or cover it tightly with plastic wrap. It can be kept at room temperature for up to three days if you plan to consume it within that time frame. To maximize its shelf life, consider refrigerating it, as the cool environment prevents spoilage and keeps the frosting intact.
For long-term storage, the cake can be frozen for up to three months. It’s advisable to freeze it unfrosted to maintain the taste and texture. Wrap each layer tightly in plastic wrap, followed by aluminum foil to prevent freezer burn. When ready to enjoy the cake, let it thaw in the refrigerator overnight before frosting.
If you need to reheat a slice, placing it in the microwave for about 10 seconds is sufficient to bring back its moistness without compromising texture. This quick heating brings out the cake’s delightful flavors and ensures a pleasing experience.
Frequently Asked Questions
Can I make this cake ahead of time?
Absolutely! This cake can be prepared a day in advance. Just bake the layers, let them cool completely, and then wrap them in plastic wrap and store them in the refrigerator. Frosting and assembling the cake is best done on the day you plan to serve it, preserving the freshness of the strawberries and the frosting.
Can I use frozen strawberries instead of fresh?
Yes, you can use frozen strawberries, but it’s essential to thaw and drain them well before using them in your filling. They may release more moisture than fresh strawberries, so adjusting the sugar in the filling may be necessary to avoid a watery consistency.
What if my cake layers domed in the oven?
If your cake layers dome while baking, it could indicate that the oven temperature is too high. In this case, try reducing the temperature by 25°F (about 15°C) and bake longer if necessary. Alternatively, you can level the domed tops after cooling them to even out the layers before frosting.
What makes the buttercream frosting fluffy?
The key to a fluffy buttercream frosting lies in the creaming process. Beating the butter until it’s light and fluffy and incorporating powdered sugar gradually helps to suspend air, resulting in a smooth and airy frosting. If the frosting appears too thick, adding a little cream will enhance its airiness.
Can I use other cake pans besides round ones?
Definitely! You can adapt this recipe to use other shapes of cake pans, such as square or rectangular ones. Just be sure to adjust baking times accordingly, as they might require longer or shorter baking durations depending on their size and shape.
Conclusion:
This Spring Birthday Cake: Strawberry Vanilla Layer Cake is a delightful way to celebrate life’s special moments with loved ones. The combination of soft vanilla cake layered with fresh strawberries and creamy frosting affords a wonderful experience that you simply cannot resist. Feel free to personalize it to your taste or dietary needs, as your variations will make it even more special.
So whether you’re a seasoned baker or a beginner, get ready to impress with this stunning cake that promises joy and deliciousness in every bite. Don’t hesitate to give it a try, share your creations with family and friends, and inspire them to join in on the fun of baking!


