Prep time: 30 minutes
Cook time: 30 minutes
Total time: 1 hour
Servings: 12 servings
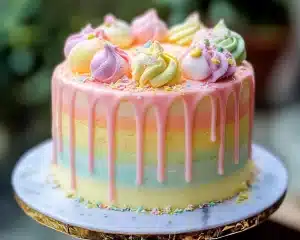
The **Spring Birthday Cake: Spring Flower Buttercream Cake** is more than just a dessert; it’s a celebration on a plate. Imagine a cake adorned with delightful colors and textures, bringing warmth and joy to any special occasion. This cake not only captures the essence of spring with its vibrant decorations and rich flavors but also serves as a personal reminder of found memories, family gatherings, and the laughter shared over birthdays. In this article, you will learn how to create a show-stopping cake that will wow your guests and make your taste buds dance with delight.
You may be wondering if baking a cake from scratch is difficult or time-consuming, but with the right guidance, you’ll discover it’s easier than you think! From the preparation of the fluffy vanilla cake layers to the intricate flower decorations, we’ll break down every step in a way that makes you feel confident and ready to bake. Get ready to impress with this recipe, no matter your skill level!
What Is Spring Birthday Cake: Spring Flower Buttercream Cake?
The **Spring Birthday Cake: Spring Flower Buttercream Cake** is a delightful treat that celebrates the flavors of vanilla and fresh springtime ingredients. Originating from the trend of using natural elements in cake decor, this dessert not only looks stunning but is filled with layers of light and fluffy vanilla cake complemented by rich buttercream frosting. The cake is often adorned with beautiful buttercream flowers, embodying the beauty of spring and making it an ideal centerpiece for any birthday bash.
At its core, this cake is airy and moist, with a subtle sweetness that doesn’t overpower the senses. You will find the combination of the fluffy cake and creamy frosting creates a melt-in-your-mouth experience that leaves everyone asking for seconds. The addition of natural colors in the buttercream not only elevates its visual appeal but also aligns with a growing trend of healthier desserts, allowing you to enjoy a slice of spring without guilt.
In essence, this cake is a celebration of the season, and its texture is as inviting as its appearance. With each bite, you’ll enjoy a blend of flavors and that comforting, homemade touch that is so often cherished in family traditions.
Why You’ll Love This
You’re going to fall in love with the **Spring Flower Buttercream Cake** for several reasons. First and foremost, the taste is simply unbeatable. It combines fresh, creamy flavors with a light and airy texture, making it a hit among both adults and children alike. This cake not only satisfies your sweet tooth but also provides a wholesome option that doesn’t compromise on flavor.
Ease of preparation is another significant advantage of this recipe. Even if you’re a beginner in the kitchen, the straightforward steps will guide you through the process, ensuring that you don’t feel overwhelmed. Each layer bakes to perfection, and the decorating can be as simple or as intricate as you desire. This versatility makes it suitable for any occasion, be it a birthday, a spring celebration, or even just a treat for yourself or loved ones.
Cost is yet another fantastic reason to make this cake! Most of the ingredients are pantry staples. Butter, sugar, flour, and eggs are budget-friendly options that can easily be found in your local grocery store. Plus, the satisfaction of creating a beautiful cake from scratch often outweighs any store-bought alternatives.
Finally, the cake is incredibly versatile. Feel free to customize it by adding additional flavors, such as lemon or almond, or even incorporating fresh fruits into the layers for a delightful twist. It caters to various dietary preferences, so you can adjust the recipe to suit gluten-free or vegan diets, ensuring everyone at your gathering can indulge.
Ingredients You’ll Need
To make this mouthwatering **Spring Birthday Cake**, you’ll need the following ingredients:
- 2 ½ cups all-purpose flour
- 2 ½ tsp baking powder
- 1 tsp salt
- 1 cup unsalted butter, softened
- 2 cups granulated sugar
- 4 large eggs
- 1 tbsp pure vanilla extract
- 1 cup whole milk
- 4 cups powdered sugar
- ½ cup heavy cream
- Food coloring (various colors for the flowers)
- Fresh fruits or edible flowers for decoration (optional)
Each ingredient plays a crucial role in achieving the final product. The **all-purpose flour** provides the structure and stability needed for the cake layers. **Baking powder** acts as a leavening agent, giving the cake its light texture, while **salt** enhances the flavors.
The **unsalted butter** adds richness, while **granulated sugar** contributes to the sweetness and helps to create a moist texture. **Eggs** serve as a binding agent, holding everything together. When it comes to flavor, **pure vanilla extract** is a key player, delivering that comforting familiarity we associate with cake. The **whole milk** provides moisture, ensuring your cake comes out tender and delicious.
Adding a fluffy buttercream frosting is essential, and you’ll do this by mixing **powdered sugar** with **heavy cream** to create the perfect consistency. Don’t forget that, for decoration, food coloring is essential to bring your flowers and design to life, and fresh fruits or edible flowers can be used to add that final touch of elegance.
How to Make
Now that you have your ingredients ready, let’s dive into the step-by-step instructions. Follow these guidelines carefully for a perfect cake experience.
- Preheat the Oven: Start by preheating your oven to 350°F (175°C). Ensure your oven has reached the desired temperature before you place your cakes in, as this ensures even cooking. It’s crucial for a perfectly risen cake.
- Prepare the Baking Pans: Grease and flour two 9-inch round cake pans. Alternatively, you can use parchment paper at the bottom for easy removal. This step is essential to prevent sticking, which can ruin the beautiful cake layers.
- Mix Dry Ingredients: In a large bowl, combine 2 ½ cups of all-purpose flour, 2 ½ teaspoons of baking powder, and 1 teaspoon of salt. Whisk these ingredients together to ensure they are evenly distributed. This foundation of dry components is vital for a balanced cake.
- Beat the Butter and Sugar: In another bowl, cream together 1 cup of softened unsalted butter and 2 cups of granulated sugar until light and fluffy. This process incorporates air into the butter, which helps create a light texture. You should aim for a pale color; usually, this takes about 5 minutes of mixing.
- Add Eggs and Vanilla: Add 4 large eggs one at a time to the creamed mixture, mixing well after each addition. Next, mix in 1 tablespoon of pure vanilla extract. The eggs not only help bind the ingredients together but also contribute to the cake’s rich flavor.
- Alternate Adding Dry Ingredients and Milk: Gradually add the flour mixture and 1 cup of whole milk to the butter mixture, alternating between the two, starting and ending with the flour. Stir until just combined. Be careful not to over-mix, as this can lead to a dense cake.
- Pour Batter into Pans: Divide the batter evenly between the two prepared cake pans. Smooth the tops with a spatula to ensure even baking. This small detail can greatly impact the appearance of your cake when it’s time to frost!
- Bake: Place the cakes in the preheated oven and bake for 25-30 minutes, or until a toothpick inserted into the center comes out clean. Keep an eye on them around the 25-minute mark, as all ovens vary slightly regarding cooking time.
- Cool the Cakes: Once baked, remove the pans from the oven and let them cool in the pans for about 10 minutes. This makes removal easier. After cooling slightly, turn the cakes out on a wire rack to cool completely. This step is essential because frosting a warm cake may cause the frosting to melt.
- Prepare the Buttercream Frosting: In a large bowl, combine 4 cups of powdered sugar with ½ cup of heavy cream and beat until smooth. If the frosting is too thick, add more cream, one tablespoon at a time, until you reach the desired consistency. Make sure to taste it; this is the sweet flavor you will be piling on your cake!
- Add Color: If you want a vibrant display, separate your frosting into smaller bowls and add food coloring to create your desired shades. Consider floral colors like pink, yellow, and lavender for that spring theme!
- Assemble the Cake: Place one layer of cake on a serving platter and spread a generous layer of buttercream on top. Add the second layer and smooth out any excess frosting on the sides and the top. You can use a spatula or a bench scraper for clean edges.
- Decorate: Use a piping bag fitted with a star tip to create beautiful flower decorations on top and around the sides of the cake. You can also incorporate fresh fruits or edible flowers for added charm. Take your time with this; this is where your cake transforms into a work of art!
What you’ll find is that every step adds a layer of love and care, embodying the true spirit of home baking. The aroma that fills the kitchen while the cakes bake is enough to make anyone crave a taste of your creation. Don’t rush; enjoy the process!
Variations & Substitutions
Lemon Spring Cake Variation: If you want to infuse a citrusy twist into your cake, consider substituting one cup of whole milk with fresh lemon juice and adding the zest of one lemon to the batter. This variation will enhance the flavor profile into a bright and zesty treat, perfect for spring occasions. Lemon is invigorating and pairs beautifully with the buttercream frosting.
Chocolate Delight Variation: Swap the vanilla extract for chocolate extract and replace half of the all-purpose flour with cocoa powder to create a rich, luscious chocolate cake. Topped with chocolate buttercream, this variant will appeal to chocolate lovers and provide a delightful twist to the traditional recipe.
Gluten-Free Option: Use a gluten-free all-purpose flour blend instead of regular flour. Ensure that your baking powder is also gluten-free. The taste will still be delectable, allowing those with dietary restrictions to join in the fun without compromise.
Vegan Version: To make this cake vegan, substitute the eggs with a flaxseed mixture (1 tablespoon of ground flaxseed mixed with 2.5 tablespoons of water per egg) and replace the butter with coconut oil or a vegan margarine. Use almond milk or oat milk instead of whole milk. This variation retains the moistness and flavor while catering to a vegan lifestyle.
These variations allow you to tailor the recipe to any occasion or preference, encouraging you to experiment and create a signature cake that speaks to your personal tastes.
Common Mistakes to Avoid
One of the most common mistakes is **over-mixing** the batter. Doing this can cause the cake to turn dense, rather than fluffy and airy. Mix only until just combined, and you’ll achieve that perfect texture. Additionally, ensure that your butter is at room temperature before creaming with sugar, as cold butter will not incorporate air efficiently, leading to a denser cake.
Another mistake is not accurately measuring your flour. Pack the flour in your measuring cup, and your cake may turn out dry. Instead, spoon it lightly into your cup and level it off for an accurate measurement.
A critical warning is to ensure that the cakes are fully cooled before frosting. Applying frosting to a warm cake will not only ruin your design but will also make the frosting slide off. Be patient and let your cakes cool completely!
Lastly, check your oven temperature. An inaccurately calibrated oven can lead to cakes that are either underbaked or overbaked. Using an oven thermometer can help avoid this pitfall, ensuring your cakes bake evenly.
Storage, Freezing & Reheating Tips
To store your Spring Birthday Cake, cover it with plastic wrap or store it in an airtight container. Keeping it in a cool, dry place helps maintain the cake’s moisture for up to 3 days. However, avoid refrigerating it; cold air will dry out the cake and alter its texture.
If you wish to prepare the cake ahead of time, you can freeze the layers before frosting. Wrap each layer tightly in plastic wrap and foil and store in the freezer for up to 3 months. When ready to use, let them thaw in the fridge overnight.
Freezing buttercream is also an option! Place it in an airtight container, and it can last up to 3 months as well. When you need some, just thaw it in the fridge and re-whip for best results.
When reheating, if you’ve stored individual slices in the microwave, heat them for about 10-15 seconds, just enough to warm it up, but not get it too hot, as you want to preserve the texture.
Frequently Asked Questions
Can I use a different type of frosting for this cake? Yes, absolutely! While the buttercream frosting complements this cake beautifully, you can explore cream cheese frosting, whipped ganache, or even a fruit glaze. Each type of frosting will dramatically change the cake’s flavor and texture, allowing you to personalize it further.
What can I do if my cake layers domed in the middle? If your cakes dome slightly during baking, you can easily level them with a serrated knife once they’re cool. This way, you’ll achieve even layers that stack beautifully. To prevent doming, you may consider lowering the oven temperature slightly and baking a bit longer.
How far in advance can I bake this cake? You can bake the layers up to three days in advance. Just make sure they are well-wrapped and stored properly. Frosting is best done just before serving to maintain its freshness and appearance, but you can prepare the buttercream beforehand for convenience.
Can I transport this cake to a party? Yes, you can transport the cake! Make sure it’s securely placed in a cake carrier or on a flat surface in your vehicle. For added security, refrigerate it beforehand to firm up the frosting, making it less prone to sliding during transport.
Can I use artificial food coloring for my buttercream flowers? Yes, artificial food colorings can be used. They will definitely give you vibrant colors. However, if you prefer a more natural approach, consider using vegetable-based colors made from fruits and vegetables, keeping your cake both beautiful and wholesome.
Conclusion:
In summary, the **Spring Birthday Cake: Spring Flower Buttercream Cake** is a delightful mix of flavor, creativity, and tradition. It brings joy to any gathering with its beautiful appearance and heavenly taste, making it the perfect choice for spring celebrations and birthdays alike. Don’t hesitate to customize this recipe to reflect your style, and feel free to share your masterpiece with friends and family.
With each slice, you’re not just serving dessert—you’re offering a piece of warm, homemade love. I encourage you to try it, put a personal spin on it, and maybe even share your experience with others. Happy baking!