Prep time: 30 minutes
Cook time: 25 minutes
Total time: 2 hours
Servings: 12 servings
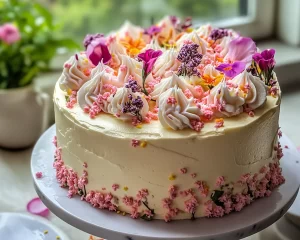
There’s something magical about springtime. The world awakens with vibrant colors, fresh blooms, and the scent of new beginnings. If you’re looking to celebrate a special occasion during this lively season, let me introduce you to the delightful Spring Birthday Cake: Pastel Spring Birthday Cake. This cake isn’t just a dessert; it’s an experience. It’s soft, fluffy, and adorned with pastel colors that evoke the essence of spring. Each slice beckons you with its light texture and bursts of flavor, making it a showstopper for any birthday party or gathering.
This cake holds a special place in countless hearts and memories, particularly for those who love celebrating life’s milestones with sweetness. Imagine a warm afternoon surrounded by family and friends, laughter echoing, and the clinking of forks against plates, as this gorgeous cake takes the center stage. You’ll learn not only how to bake this beautiful cake but also some essential tips, variations, and storage techniques to keep it as fresh as spring itself.
What Is Spring Birthday Cake: Pastel Spring Birthday Cake?
Spring Birthday Cake, or Pastel Spring Birthday Cake, is a light and airy cake that embodies the freshness of spring. Originating from the classic layered cakes, this recipe brings an enchanting twist by incorporating pastel colors and delicate flavors. The cake typically consists of layers of fluffy vanilla sponge cake that are moist and tender, often enhanced with fruity elements. The frosting is where the real fun begins – it’s usually a rich buttercream or cream cheese frosting infused with natural colors to create a soft, delightful presentation.
The overall flavor profile of this cake is a harmonious blend of sweet vanilla and tart citrus notes, complemented by the creamy frosting. The texture is a balance between lightness and richness. Each bite melts in your mouth, with the silky frosting cooling against the fluffy cake. In essence, this cake not only looks beautiful but also brings warmth and joy with every bite, making it perfect for spring celebrations, particularly birthdays.
Why You’ll Love This
There are countless reasons to fall in love with this spring birthday cake. First and foremost, the flavor is a delightful combination of sweetness that doesn’t overwhelm. The cake’s light, fluffy texture pairs beautifully with the creamy frosting, making it a hit for both children and adults alike. Plus, it’s a visually stunning dessert that will grab attention and enhance any table setting.
Another advantage of this recipe is its simplicity. Even if you are a beginner in the kitchen, the step-by-step instructions will guide you through the process seamlessly. With just a few essential ingredients that you might already have in your pantry, creating this cake won’t break the bank. The versatility of the cake also means you can easily adjust it to fit dietary restrictions or personal preferences.
Common misconceptions include the belief that making a layered cake is complicated. In reality, with a little patience and attention to detail, you can achieve the perfect layered cake without much fuss. Just remember to allow each layer to cool completely before frosting, as this will help maintain the structure of the cake.
Ingredients You’ll Need
To whip up this stunning Spring Birthday Cake, you’ll need the following ingredients:
- 2 ½ cups of all-purpose flour: This forms the base of the cake. Look for unbleached flour for a healthier option.
- 2 ½ teaspoons of baking powder: This leavening agent helps your cake rise and become fluffy.
- 1 teaspoon of salt: Enhances the flavor of the cake.
- 1 cup of unsalted butter (softened): Gives richness and moisture; ensure it’s softened for easy mixing.
- 2 cups of granulated sugar: This sweetens and helps achieve a golden crust.
- 4 large eggs: Add structure and moisture; bring them to room temperature for best incorporation.
- 1 tablespoon of vanilla extract: This adds a delightful flavor that harmonizes with the cake.
- 1 cup of milk: Adjust the texture; opt for whole milk for richness.
- Food coloring (various pastel shades): This is optional but essential for the cake’s aesthetic appeal.
- For the frosting:
- 2 cups of unsalted butter: Use softened for best consistency.
- 5 cups of powdered sugar: This sweetens and thickens the frosting.
- 1 teaspoon of vanilla extract: For flavor.
- Milk (as needed): To reach your desired frosting consistency.
By understanding the role of each ingredient, you can easily substitute if needed. For instance, if you’re looking for a gluten-free version, substitute all-purpose flour with a gluten-free blend. Similarly, plant-based substitutes for butter and milk can be used if you are aiming for a vegan cake.
How to Make
To create your beautiful Spring Birthday Cake, follow these step-by-step instructions:
- Preheat your oven to 350°F (175°C). Prepare three 9-inch round cake pans by greasing them and lining the bottoms with parchment paper. This will ensure easy removal after baking.
- In a medium bowl, combine the all-purpose flour, baking powder, and salt. Whisk these dry ingredients together until evenly mixed. This step is essential as it ensures the leavening agent is distributed evenly.
- In a large mixing bowl, cream the softened butter and granulated sugar together until light and fluffy. This can take about 3-5 minutes. The mixture should have a pale yellow color and a smooth texture.
- Add the eggs one at a time to the butter mixture, beating well after each addition. Incorporate the vanilla extract at this point. This will help the mixture emulsify, maintaining a uniform structure.
- Gradually add the flour mixture and milk to the butter mixture, alternating between the two. Begin and end with the flour mixture. Mix until just combined; be careful not to overmix as this can lead to a dense cake.
- Once the batter is mixed, divide it evenly into three bowls. Add a different pastel food coloring to each bowl and gently fold it in until the desired shades are achieved. This creative step adds a joyful and vibrant aspect to your cake.
- Pour the batters into the prepared cake pans. Make sure to smooth out the tops with a spatula. Bake in the preheated oven for about 25 minutes or until a toothpick inserted in the center comes out clean. Take care to not open the oven door before the minimum baking time, as this can affect the rising.
- Once baked, remove the cakes from the oven and let them cool in the pans for about 10 minutes. Then carefully transfer them to wire racks to cool completely. Ensure the cakes are entirely cooled before frosting to avoid melting.
- Meanwhile, prepare the frosting. In a large bowl, beat the softened butter until creamy. Gradually add the powdered sugar and mix on low speed until combined. Then add the vanilla extract and enough milk to achieve a spreadable consistency.
- Level the cooled cakes if necessary. Place the first layer on a serving plate. Spread a generous amount of frosting on top and add the second layer. Repeat with the third layer. Spread frosting over the top and sides of the cake carefully, ensuring an even layer with your offset spatula.
- Finally, decorate the cake with sprinkles or fresh flowers if desired. The vibrant colors and decorative elements accentuate the festive nature of the cake, making it visually appealing.
Each step of this process has textures and aromas that will guide you through creating this delightful cake. You’ll be able to savor the warmth of your kitchen as you mix and bake, with the anticipation of serving something extraordinary.
Variations & Substitutions
Chocolate Spring Birthday Cake: For chocolate lovers, you can easily switch the vanilla sponge for a chocolate cake. Replace 1 cup of flour with 1 cup of unsweetened cocoa powder. This variation not only has a rich flavor but also lends itself to colorful frosting. Pair it with a chocolate ganache or vanilla buttercream for the perfect contrast.
Gluten-Free Spring Birthday Cake: Substitute regular flour for a gluten-free flour blend. This cake remains light and fluffy, allowing everyone to enjoy a slice without worrying about gluten. Adding a bit of xantham gum to the mix will help maintain the structure typical to all-purpose flour.
Vegan Spring Birthday Cake: Replace the eggs with flaxseed meal (1 tablespoon flaxseed meal + 2.5 tablespoons water per egg), and use dairy-free butter and almond or oat milk. When prepared correctly, this cake will be just as moist and delicious, appealing to those with dietary restrictions.
Citrus Spring Cake: To elevate the flavor profile, add the zest of lemons or limes to the batter. This adds a refreshing zing and pairs beautifully with a lemon buttercream frosting. It’s perfect for those who appreciate a slightly tart flavor to balance the sweetness.
Each of these variations not only pivots the primary recipe but also caters to different audiences and preferences, turning a simple celebration cake into a versatile ensemble piece for any occasion.
Common Mistakes to Avoid
When making a layered cake, there are several common pitfalls that can happen. One principal mistake is **not measuring ingredients accurately**. Using a kitchen scale or proper measuring cups can help ensure that the texture stays consistent. Overmixing the batter, particularly after adding flour, can lead to a dense cake, so mix just until combined.
Another mistake is **not letting the cake cool completely before frosting**. If the layers are warm, the frosting could melt, leading to a messy exterior and uneven layers. Use a serrated knife to level any domed tops; this will aid in better stacking and stability.
Finally, a common oversight is **skipping the parchment paper in the pans**. This simple step ensures that your cake layers come out intact, allowing for beautiful, manageable layers rather than crumbles.
Storage, Freezing & Reheating Tips
Proper storage of your Spring Birthday Cake is crucial to maintain its freshness. Cover the cake loosely with plastic wrap to prevent it from drying out. It can be stored at room temperature for up to three days but should be refrigerated if it contains perishable ingredients like cream cheese frosting.
If you want to preserve your cake for a more extended period, consider freezing it. Wrap each layer in plastic wrap followed by aluminum foil to avoid freezer burn. The cake can be frozen for up to three months. When ready to enjoy, move the cake to the fridge for several hours or overnight to thaw gently, keeping it moist as it comes back to room temperature.
Frequently Asked Questions
Can I make this cake in advance? Yes! In fact, you can prepare the layers a day before and store them separately in the fridge. Just ensure they are well-wrapped in plastic wrap to keep them from drying out. Frosting can also be made in advance; store it in the refrigerator in an airtight container until ready to use.
What can I do if my cake layers domed? If your cake layers have domed tops, don’t fret! Using a serrated knife, gently level the tops to ensure even layers. This will not only improve the cake’s appearance but will also help with stacking.
Can I substitute the eggs in this recipe? Absolutely! For every egg, you can replace it with a mixture of 1 tablespoon of flaxseed meal and 2.5 tablespoons of water. This works well to bind the ingredients while maintaining moisture.
How do I know when my cake is done baking? The best method is to insert a toothpick into the center of a cake layer. It should come out clean or with a few moist crumbs attached. Additionally, the edges should start to pull away from the sides of the pan.
Can I use different frosting for this cake? Certainly! This Spring Birthday Cake is versatile when it comes to frosting options. You can use a cream cheese frosting for added tang, whipped cream for a lighter touch, or even a ganache for a rich chocolate twist. Your creativity can dictate the flavors here.
Conclusion:
This Spring Birthday Cake: Pastel Spring Birthday Cake is not only a feast for the eyes but also a treat for the taste buds. Its ability to evoke warmth and joy makes it the perfect choice for celebrating those cherished moments. Whether you’re hosting a birthday party or simply looking to enjoy a slice with your afternoon tea, this cake is bound to become a staple in your baking repertoire. Don’t hesitate to customize it with your favorite flavors and colors. Try your hand at creating this beautiful and delicious cake, and watch as it becomes a beloved recipe in your home. Happy baking!