Prep time: 30 minutes
Cook time: 20 minutes
Total time: 50 minutes
Servings: 12
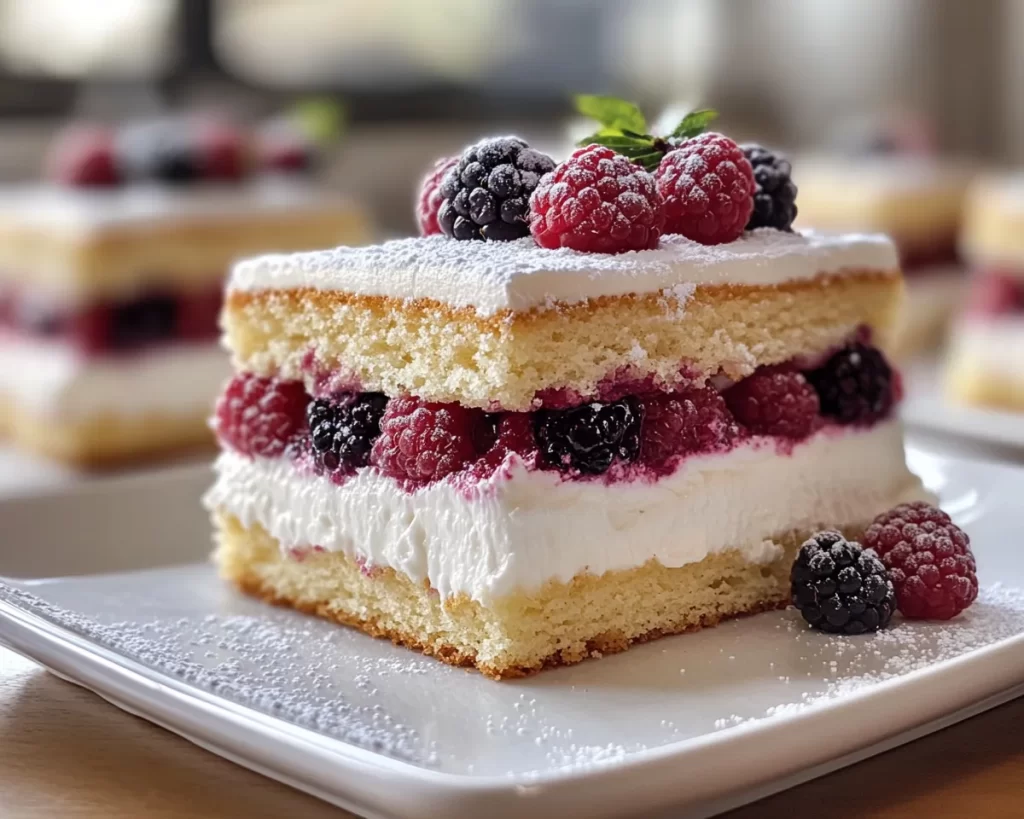
Are you craving a delightful treat that brings spring right to your kitchen? Look no further! These Mini Vanilla Berry Layer Cakes are the perfect indulgence for those sunny days when you want something sweet but not overwhelmingly rich. The light, fluffy vanilla cake layers combined with a medley of fresh berries create a harmonious balance that’s not only visually stunning but also utterly delicious. Whether you’re planning a spring gathering, a birthday party, or simply want to enjoy a lovely dessert at home, this recipe delivers on all fronts.
What makes these cakes truly special is their elegance and simplicity. Each cake is a mini masterpiece, allowing for personal customization with different berries or toppings. You can also impress your family and friends with your baking skills while keeping the process easy and manageable. By the end of this article, you’ll learn how the simple yet refined flavors come together, tips for success, and some delightful variations to make this recipe your own!
What Is Spring Baking: Mini Vanilla Berry Layer Cakes (Easy + Pretty)?
The concept of spring baking has long been associated with using fresh, seasonal ingredients to create light and flavorful desserts. Mini Vanilla Berry Layer Cakes encapsulate this idea beautifully. Originating from classic layer cakes, these tiny cakes focus on highlighting the natural sweetness of berries while keeping the texture airy and the flavors subtle yet satisfying. The cakes are made using a simple vanilla sponge that is both soft and slightly moist, making it a delightful vessel for whipped cream and fresh fruits.
With bright colors from the berries, these cakes not only please the palate but also serve as eye-catching centerpieces at any gathering. Imagine a table adorned with petite cakes showcasing vibrant strawberries, blueberries, and raspberries — a true feast for the eyes. The subtle vanilla taste allows the berries’ flavor to shine through, making it a wonderful choice for those who appreciate the freshness of spring. They are also a breeze to prep, making them perfect for both novice and experienced bakers.
The beauty of these Mini Vanilla Berry Layer Cakes lies in their versatility. While traditionally made with certain berries, you can easily adapt the cake to suit different tastes or dietary needs without losing its charm. Whether you want to stick with the classic version or mix things up, this dish offers the ultimate canvas for your culinary creativity.
Why You’ll Love This
There are several reasons why this Mini Vanilla Berry Layer Cake recipe will become a favorite in your home. First and foremost, the taste is simply divine. The sweet, fluffy vanilla cake mingled with the tangy freshness of assorted berries creates a symphony of flavors that delights the palate. Each bite is like a little celebration of spring, perfect for when you want something light yet satisfying.
This recipe is incredibly easy to follow, making it accessible for everyone, from busy parents looking to whip up a quick dessert to beginners in the kitchen who are still mastering the art of baking. The steps are straightforward, and the relatively short cooking time makes it a feasible option for those rushing around but still wanting to impress.
Cost is another benefit — you can usually find fresh berries at reasonable prices during the spring season, allowing for a fresh and budget-friendly option for dessert. With this recipe, you also have the flexibility to pick and choose your ingredients, making it easy to adapt based on what you have on hand or what’s in season.
Lastly, Mini Vanilla Berry Layer Cakes are a versatile treat suitable for various occasions. Whether you plan on serving them at a spring picnic, during an afternoon tea, or as a delightful ending to a weeknight dinner, they are sure to garner compliments. This dessert is especially appealing as it can cater to various dietary preferences by simply swapping out ingredients.
Ingredients You’ll Need
To create your Mini Vanilla Berry Layer Cakes, you will need the following ingredients:
- All-purpose flour: This forms the base of your cake and gives it structure. You can substitute with cake flour for a lighter texture.
- Granulated sugar: Sweetens the cake and aids in browning during baking.
- Unsalted butter: Adds moisture and richness. Make sure it is at room temperature for easy incorporation.
- Eggs: Acts as a binder and adds to the overall texture. Use large eggs for best results.
- Vanilla extract: Infuses the cake with a lovely flavor. Always opt for pure vanilla extract if possible.
- Baking powder: A leavening agent that helps the cake rise. Double-check the expiration date for effectiveness.
- Milk: Contributes moisture to the batter and creates a soft crumb. You can use dairy or non-dairy alternatives as substitutes.
- Assorted berries: Fresh strawberries, blueberries, raspberries, or any combination hit the spot for flavor and presentation.
- Heavy cream: Used for whipping into a fluffy frosting that complements the cake layers beautifully.
- Powdered sugar: Sweetens the whipped cream frosting without granules, creating a smooth consistency.
- Mint leaves: Optional for garnishing, adding a pop of color and flavor contrast.
Each ingredient plays a critical role in the outcome of your cake, so ensure you measure everything accurately. The balance between dry and wet ingredients will determine the overall texture, so do not skimp!
How to Make
Follow this step-by-step guide for a successful baking experience:
- Preheat the oven: Begin by preheating your oven to 350°F (175°C). This ensures an evenly baked cake. Prepare your cake pans by greasing them with cooking spray or butter, then dusting them with flour to help the cakes release easily.
- Mix the dry ingredients: In a medium bowl, combine the all-purpose flour, baking powder, and salt. Stir with a whisk to ensure they are evenly distributed. This step helps to prevent any lumps and guarantees a fluffier cake by aerating the flour.
- Cream the butter and sugar: In a large mixing bowl, beat the room-temperature unsalted butter and granulated sugar together using an electric mixer. Beat on medium speed until the mixture is light and fluffy, which should take about 3 to 5 minutes. This aeration is crucial for a light cake.
- Add the eggs: Crack in the eggs one at a time, mixing well after each addition. Incorporate the vanilla extract as well. Be sure to scrape down the sides of the bowl to ensure everything is well combined. You want a smooth batter without lumps.
- Incorporate dry ingredients and milk: Gradually add the flour mixture to the wet ingredients, alternating with the milk. Start and end with the flour mixture. Mix gently until just combined; do not overmix, as this can lead to a dense cake.
- Fill the pans: Divide the batter evenly among the prepared cake pans. Use a spatula to smooth the tops. This ensures even cooking and will help create uniform layers for your cakes.
- Bake the cakes: Place the pans in the preheated oven and bake for 15 to 20 minutes. Keep an eye on them during the latter part of the baking time; they are done when a toothpick inserted into the center comes out clean or with just a few crumbs attached.
- Cool the cakes: Once baked, remove the cakes from the oven and let them cool in the pans for about 10 minutes. Carefully turn them out onto a wire rack to cool completely. Cooling them entirely is essential before frosting; otherwise, the whipped cream can easily melt.
- Prepare the whipped cream: In a clean mixing bowl, pour in the heavy cream and sprinkle in the powdered sugar. Using a mixer, beat on high speed until stiff peaks form. This process takes about 3 to 5 minutes. Be patient, and stop when you see beautiful peaks forming, but do not overwhip.
- Assemble the cakes: Once the cakes have completely cooled, take one layer and spread a dollop of whipped cream on top. Add a layer of assorted berries, then top with the second cake layer. Repeat the process if you are creating more layers. Finally, frost the top and sides of the cake with the remaining whipped cream.
- Decorate: Finish by adorning with additional berries and maybe a few mint leaves for that pop of color. This not only enhances the look but adds freshness on the palate as well. Chill in the refrigerator for about 30 minutes to help everything set before serving.
By following these steps closely, you’ll create stunning mini cakes that are irresistibly delicious. Remember, the key is in the details – pay attention to your mixing times, and don’t rush the cooling process!
Variations & Substitutions
Chocolate Vanilla Layer Cakes: If you’re a chocolate lover, consider incorporating cocoa powder into the cake batter. You can replace about ¼ cup of the all-purpose flour with unsweetened cocoa powder to give a rich flavor. Pair this with berries for a delightful contrast—berries cut through the richness, creating an enjoyable balance.
Lemon Berry Layer Cakes: Another refreshing twist is to add lemon zest and a little lemon juice to the batter. This enhances the flavor and provides a bright, zesty bite that pairs exceptionally well with the sweetness of the berries. Lemon complements the natural flavors, making them even more vibrant.
Gluten-Free Mini Cakes: For those with gluten sensitivities, swap out the all-purpose flour with a gluten-free all-purpose blend. Be sure to choose a blend that contains xanthan gum, which helps provide the necessary structure typical of wheat-based cakes. Your results should yield a moist and fluffy cake that everyone can enjoy.
Vegan Mini Layer Cakes: To make this dessert vegan-friendly, substitute eggs with flax eggs (1 tablespoon flaxseed meal and 2.5 tablespoons water per egg) and use plant-based milk and non-dairy butter. The resulting cakes will still be light and fluffy while accommodating dietary restrictions.
Berries Only Cake: For a fruit-forward flavor, add a variety of pureed berries to the cake batter instead of just using them for layering. This will intensify the essence of berries throughout the cake. Simply mix about ½ cup of pureed berries into the batter to enrich the flavor profile.
No matter which variation you choose, these little adjustments can help you personalize your Mini Vanilla Berry Layer Cakes and cater them to various dietary needs and flavor preferences.
Common Mistakes to Avoid
When baking cakes, some common pitfalls may arise, but with the right knowledge, you can avoid them. One of the most significant mistakes is not properly measuring ingredients. Sifting flour or measuring by weight ensures accuracy, which is crucial for achieving the desired texture. Use kitchen scales or measurement cups and spoons for precise readings.
Another common issue is overmixing the batter. This can lead to a dense cake rather than a light, airy texture. When you add the dry ingredients to the wet, mix until just combined — it’s okay if there are a few lumps remaining. Understanding that the cake continues baking even after it’s removed from the oven is also key. Allowing your cakes to cool properly helps maintain their moisture and softness.
Lastly, don’t skip the cooling process before frosting. Applying whipped cream to warm cake layers will cause the cream to melt and can turn your beautiful cake into a soggy mess. Following all steps carefully will lead to cake perfection, including allowing for proper cooling time.
Storage, Freezing & Reheating Tips
To store your Mini Vanilla Berry Layer Cakes, place them in an airtight container in the refrigerator. They will typically last up to 3 days, remaining flavorful and fresh. If you know that you will not consume the cakes within that timeframe, consider freezing them. Wrap the cakes tightly in plastic wrap, then place them in a freezer-safe bag. They can be frozen for up to 2 months.
When ready to enjoy the frozen cakes, transfer them to the refrigerator to thaw overnight. Refrain from refreezing cakes that have already been thawed and enjoyed. For best results, it’s recommended to frost the cake after it’s thawed to ensure the whipped cream maintains its light texture.
Always prioritize food safety: keep any leftovers stored properly and consume them within their recommended timeframe. Proper storage enhances the overall taste and prevents any foodborne illnesses.
Frequently Asked Questions
Can I use frozen berries instead of fresh?
Yes, frozen berries can be used; just ensure they are thawed and drained of excess moisture before adding them to the cakes. This prevents them from making the batter too wet, which can affect the cake’s texture.
How can I make the whipped cream stable?
To stabilize your whipped cream, consider adding a tablespoon of cream cheese or instant pudding mix. This helps maintain the whipped texture for a longer period, especially if the cake will sit out for a while.
Can I make this cake ahead of time?
Absolutely! You can prepare the cake layers a day or two in advance. Just store them in an airtight container until you’re ready to assemble. Wait to add the whipped cream frosting until a few hours before you plan to serve the cakes to keep them fresh.
What if I don’t have baking powder?
If you don’t have baking powder, you can substitute it with baking soda and an acid, such as vinegar or lemon juice. Use 1 teaspoon of baking soda and an acid to equal each teaspoon of baking powder required in the recipe. This might affect the cake’s texture slightly, but it can still yield delicious results.
Can I omit the whipped cream?
Yes, if you prefer a lighter option, omitting the whipped cream is completely fine. You can simply dust the cake with powdered sugar or serve it with a berry coulis or fruit syrup instead.
Conclusion:
In summary, these Mini Vanilla Berry Layer Cakes are not just a dessert but a delightful experience that brings the flavors of spring to your table. The ease of preparation allows both beginner and experienced bakers to succeed and customize to their liking. Whether you plan to create them for a special occasion or a simple family dinner, these cakes are sure to impress. Don’t hesitate to personalize and explore the different variations mentioned. Get creative with flavors, and don’t forget to share your delightful creations with friends and family. Happy baking, and may your kitchen be filled with the aromas of these gorgeous mini cakes!