Prep time: 20 minutes
Cook time: 30 minutes
Total time: 50 minutes
Servings: 12
There’s nothing like a beautifully prepared piece of cake that brings a smile to your face and warms your heart. If you’re on the hunt for a stunning dessert that not only tastes heavenly but also looks alluring, let me introduce you to the darling of the dessert world — Pink Velvet Cake. This delightful cake is perfect for celebrations, special occasions, or when you simply want to indulge in something extraordinary.
Pink Velvet Cake holds a special place as a twist on the classic red velvet. With its mesmerizing pink hue and a hint of cocoa, it not only captivates with its aesthetic but also with its moist texture and rich flavor. You’ll learn how to make this enchanting treat from scratch, along with tips for making it even more delightful than you could imagine.
What Is Pink Velvet Cake?
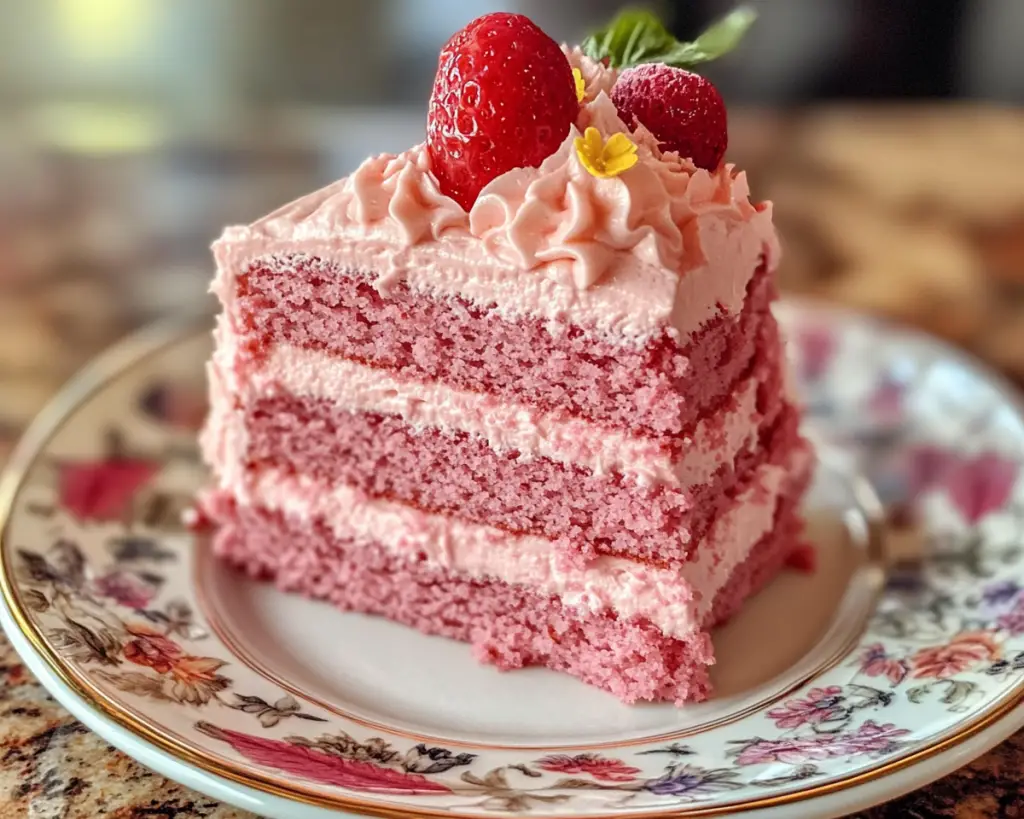
Pink Velvet Cake is a sumptuous dessert that combines the classic qualities of velvet cakes with a charming blush color. Traditionally, velvet cakes are known for their fine crumb and tender texture; the addition of cocoa powder gives them depth without overpowering the other flavors. The use of buttermilk introduces a slight tanginess, which is characteristic of these cakes, resulting in a delicious end product.
The striking pink color often comes from red food coloring or even natural ingredients such as beet juice, making it visually striking and perfect for a range of celebrations, from birthdays to bridal showers. The subtle sweetness, paired with a rich cream cheese frosting, makes the pink velvet cake a crowd-pleaser. It’s not just about the taste; it’s about the beautiful presentation, too. Imagine serving a slice of this elegant cake to guests, or perhaps enjoying a piece on a cozy afternoon. The balance of flavors and textures makes it irresistible, and it’s bound to become a favorite in your dessert repertoire.
Why You’ll Love This Pink Velvet Cake
There are countless reasons why Pink Velvet Cake deserves a spot in your baking rotation. Firstly, its enchanting color appeals to both kids and adults, making it an excellent choice for parties or festive gatherings. During those special moments, having a visually captivating cake can elevate the entire event.
Secondly, the recipe allows you to create a stunning dessert that doesn’t demand complicated techniques, making it perfect for beginners or busy parents. You can whip this up quickly with common ingredients typically found in your pantry. Plus, the **moisture** from buttermilk and the richness of the butter and sugar provide a melt-in-your-mouth experience that is hard to resist.
Cost-effective yet luxurious, this cake is often cheaper to prepare than many store-bought options. The versatility means you can adapt it, whether you’re looking for a gluten-free version or wanting to integrate seasonal fruits for an exciting twist. The base is adaptable, allowing you to create various flavors such as vanilla or almond without losing its signature charm.
If you think that adding food coloring ruins a cake, think again. The purpose is not only aesthetic; the cake itself carries a delicate, rich flavor that speaks volumes even without the bright hue. The key is to balance the sweetness with subtle cocoa notes and the pronounced flavor of the frosting.
Ingredients You’ll Need
- All-purpose flour: The base of your cake. For a gluten-free version, opt for a 1:1 gluten-free flour blend.
- Granulated sugar: This adds sweetness and contributes to the lovely texture of the cake.
- Unsweetened cocoa powder: Just a hint to enhance flavor without turning the cake into chocolate velvet.
- Baking powder: The leavening agent that ensures your cake rises beautifully.
- Baking soda: Works in tandem with the baking powder for a light-textured cake.
- Salt: It enhances the flavors, cutting through the sweetness for balance.
- Buttermilk: Offers moisture and a slight tang that makes this cake tender. You can substitute with yogurt mixed with a bit of milk.
- Vegetable oil: Ensures a rich, moist cake. You can substitute melted coconut oil as an alternative.
- Large eggs: Adds structure, moisture, and richness to the cake.
- Vanilla extract: Enhances the overall flavor profile of the cake.
- Pink food coloring: To achieve the beautiful pink hue. You can use natural juices like beet juice if you prefer.
- Heavy cream cheese: For the frosting; it brings a delightful richness.
- Powdered sugar: Sweetens the frosting while providing a smooth texture.
- Butter: Adds to the richness of the frosting; use unsalted for better control of the sweetness.
How to Make Pink Velvet Cake
Creating a Pink Velvet Cake is easier than you might think. Follow these step-by-step instructions for an impressive outcome that’ll delight both your taste buds and your eyes.
- Preheat the oven: Start by preheating your oven to 350°F (180°C). Prepare your cake pans by greasing them with butter and dusting lightly with flour, which helps prevent sticking.
- Mix dry ingredients: In a large mixing bowl, sift together the all-purpose flour, unsweetened cocoa powder, baking powder, baking soda, and salt. This process ensures even distribution of the dry ingredients and creates a light texture for your cake.
- Combine wet ingredients: In another bowl, whisk together the granulated sugar and vegetable oil until combined. Add in the eggs, one at a time, ensuring each is fully incorporated before adding the next. Mix in the vanilla extract and buttermilk until you achieve a smooth, velvety mixture.
- Color the batter: Add the pink food coloring in small increments. Start with a few drops, mixing thoroughly to achieve the color you desire. Keep in mind that the cake will look slightly darker when baked, so don’t be afraid to go bolder!
- Combine mixtures: Gradually add your dry ingredients to the wet mixture in three parts, alternating with the buttermilk. Stir gently until just combined; avoid over-mixing to keep that lovely tenderness.
- Pour into pans: Divide the batter evenly between your prepared cake pans. Gently tap each pan on the countertop to release any trapped air bubbles.
- Bake: Place the cake pans in the preheated oven and bake for 25 to 30 minutes, or until a toothpick inserted into the center comes out clean. Set your timer and resist the urge to open the oven door until at least the halfway mark!
- Cool the cakes: Once done, allow the cakes to cool in the pans for about 10 minutes before transferring them to a wire rack. Let them cool completely to room temperature, which is essential for easy frosting.
- Prepare the frosting: While the cakes are cooling, you can make your cream cheese frosting by combining the cream cheese and softened butter in a large bowl. Beat them together until creamy and fluffy before gradually mixing in the powdered sugar and a pinch of salt. Adjust the consistency with milk if needed.
- Frost the cake: Once cooled, place one layer of the cake on a serving platter. Evenly spread a layer of frosting over the top and place the second layer on top. Use the remaining frosting to cover the top and sides of the cake, creating a beautiful finish. Don’t worry if it’s not perfect; that rustic look adds charm!
- Serve: Slice and serve your Pink Velvet Cake to amazed guests, or set it up for a special celebration. Enjoy the delightful flavors as they melt in your mouth!
3 Variations & Substitutions
Coconut Pink Velvet Cake: If you adore the tropical flavor of coconut, try to incorporate shredded coconut into the batter. This will provide an additional layer of flavor and texture. You can replace some of the buttermilk with coconut milk for a deeper taste.
Gluten-Free Version: Make this cake suitable for gluten-free eaters by switching the all-purpose flour for a gluten-free flour blend. Ensure that the blend contains xanthan gum, which mimics the elasticity of gluten, keeping the cake light and fluffy.
Filled Pink Velvet Cake: For an extravagant touch, consider filling the cake with fresh berries or a fruit compote between the layers. This will enhance the flavor and add a natural, fruity sweetness that pairs wonderfully with the richness of the cream cheese frosting.
Common Mistakes to Avoid
When making Pink Velvet Cake, it is essential to avoid a few common pitfalls to ensure success:
Firstly, **overmixing the batter** can result in a dense cake. Mix just until the ingredients are combined, as the texture should be tender and fluffy. Also, be cautious with the **baking time**; underbaking can create a gooey center while overbaking will dry it out. Always rely on a toothpick test to determine doneness.
Using **non-room temperature ingredients** can also affect the mixing process, leading to uneven texture. Always allow eggs and cream cheese to sit out at room temperature before using them.
Finally, don’t skip on **prepping** your pans correctly. Greasing and flouring the pans helps create a barrier preventing the cake from sticking and breaking upon removal. Trust me, a smooth removal retains the beauty of your cake!
Storage, Freezing & Reheating Tips
Once you have made your magnificent Pink Velvet Cake, you will want to make sure it stays as fresh and delicious as possible. To store your cake, ensure it’s fully cooled, and then cover it tightly with plastic wrap or aluminum foil to prevent it from drying out. It can be kept at room temperature for about 2 days.
If you want to extend the freshness, refrigerate it inside an airtight container for up to a week. For longer storage, consider freezing the cake. Wrap the individual cake layers tightly in plastic wrap, followed by aluminum foil. The cake can last up to 3 months in the freezer.
When you’re ready to enjoy, simply thaw the frozen layers in the refrigerator overnight, and then frost as desired. For reheating individual slices, a slice in the microwave for about 10-15 seconds should bring back its moist and tender texture!
Frequently Asked Questions
Can I use natural food coloring instead of artificial?
Yes! You can absolutely use natural food coloring, such as beet juice or pomegranate juice, to achieve a beautiful pink hue without the use of artificial ingredients. Just remember, natural colorants may alter the flavor subtly.
What should I do if my cake sinks in the middle?
If your cake sinks in the center, it could be due to several factors, including underbaking or incorrect oven temperature. Always use an oven thermometer to check if your oven’s temperature is accurate. If you notice the cake sink after baking, you can cut the center out and fill it with fresh fruit or whipped cream as a creative solution.
Can I make this cake ahead of time?
Absolutely! Pink Velvet Cake can be baked one or two days in advance. Just store it covered at room temperature until you’re ready to frost and serve. If you’ve already frosted the cake, it’s best to refrigerate it to maintain freshness.
What’s the best way to level the cakes for frosting?
To level the cakes, let them cool completely first. Then, using a serrated knife, gently slice off the domed tops to create flat surfaces. This ensures even layers and a professional-looking finish when frosting.
Can I replace buttermilk with milk?
Yes, but for the best results, consider adding a teaspoon of vinegar or lemon juice to regular milk and letting it sit for about 5 minutes to make a DIY buttermilk substitute. This will replicate the tang and acidity needed for the cake.
Conclusion:
There you have it! Pink Velvet Cake, a delightful dessert that dazzles with its presentation and richness in flavor. With its unique color and appealing taste, this cake is sure to become a cherished recipe in your baking collection. Don’t hesitate to customize it further; after all, baking is about having fun and expressing creativity. Gather your ingredients, share it with family and friends, and make endless sweet memories together. I encourage you to not only bake but explore the joy in the process — your heart will thank you!


