**Prep time:** 15 minutes
**Cook time:** 15 minutes
**Total time:** 30 minutes
**Servings:** 16 servings
When it comes to sweet treats, few desserts can rival the epic combination of Oreo cookies and chocolate. If you think about it, there’s just something magical about the rich creaminess of fudge that pairs perfectly with the iconic flavor of Oreos. This delectable dessert marries the smooth, dreamy texture of fudge with the crumbly crunch of Oreos, creating a delightful experience in every bite. Today, we’ll be preparing an indulgent batch of Oreo Cookies and Cream Fudge that is sure to wow your family and friends.
This fudge is not only simple to make, but it is also an excellent treat for any occasion—whether it’s a birthday party, a holiday gathering, or just a sweet ending to a long day. In this article, I’ll guide you through the entire process, sharing tips for perfecting your fudge, variations for customizing it to your tastes, and answers to common questions about making this irresistible treat.
What Is Oreo Cookies and Cream Fudge?
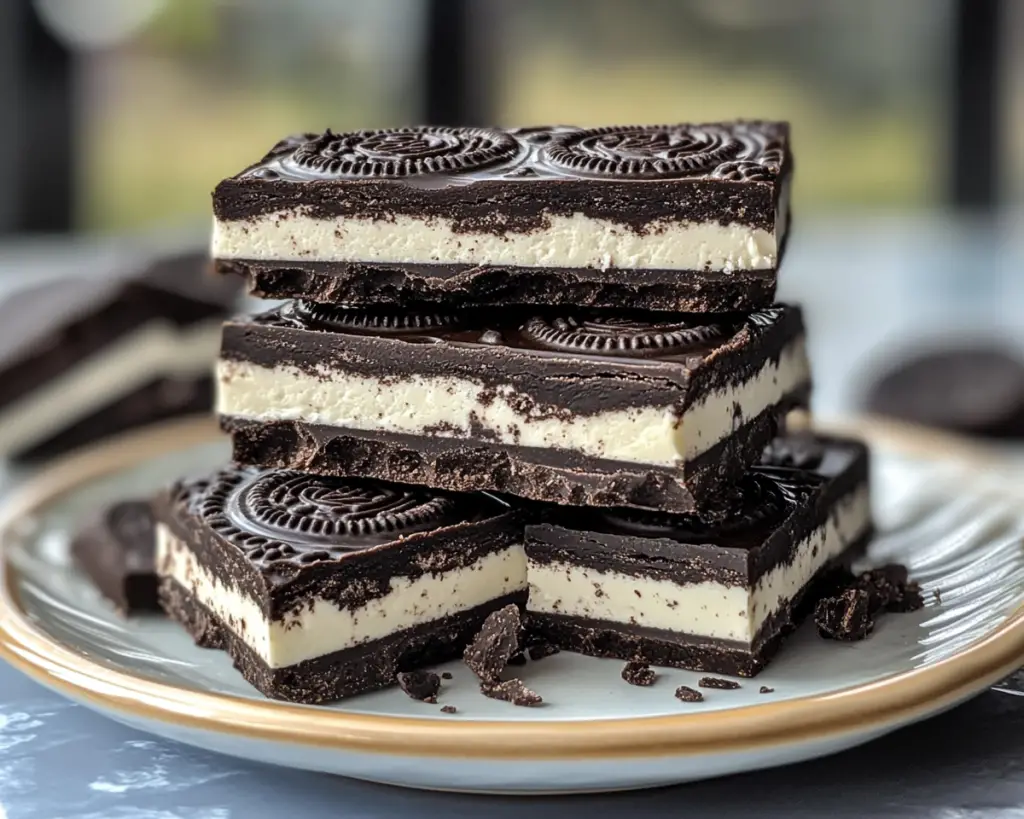
Oreo Cookies and Cream Fudge is a sensational dessert that combines the flavors and textures of classic Oreo cookies and rich chocolate fudge. Typically, **fudge** is a soft candy made by mixing sugar, butter, and milk, which is boiled to a certain point and then cooled down. The ingredients used in fudge can vary, but in this case, we’ll be using sweetened condensed milk and white chocolate to create a smooth and creamy base.
The **Oreo cookie** component brings crunchy, chocolatey bites filled with a luscious vanilla cream filling. These components together create an irresistible treat that has a silky texture yet crunchy bits. The aesthetics of this fudge are also noteworthy: the contrasting colors of creamy white chocolate and dark chocolate cookie pieces make for a stunning visual presentation, ensuring its appeal to everyone from kids to adults.
This recipe is easy to follow and doesn’t require any special tools aside from a saucepan and a baking dish. The result? A colorful, sweet, and utterly satisfying dessert that can be made in just half an hour.
Why You’ll Love This Oreo Cookies and Cream Fudge
One of the biggest draws of this Oreo Cookies and Cream Fudge is how delightful it is to eat. The **smooth texture** of the fudge pairs perfectly with the **crunch** of the Oreos, creating a dynamic mouthfeel that keeps you coming back for more. You’ll also appreciate how easy it is to make—perfect for busy parents or beginners in the kitchen! You won’t need any complicated techniques or equipment.
In addition to ease and taste, it’s also a budget-friendly recipe. Often, gourmet desserts can be expensive to make at home or to buy. This fudge utilizes inexpensive, readily accessible ingredients, making it a great choice for meals on a budget or for those looking to impress without overspending.
Furthermore, this dessert is highly versatile. Want to switch things up? You can easily customize the fudge by adding nuts, different types of chocolate, or even flavored extracts to enhance its taste. So whether you’re hosting a gathering or treating yourself, this fudge can be adapted to suit any occasion.
Ingredients You’ll Need
To whip up this tasty Oreo Cookies and Cream Fudge, you will need the following ingredients:
– **2 cups white chocolate chips**: This forms the base of your fudge, giving it a sweet and creamy consistency. You can also use white chocolate bars, chopped into smaller pieces.
– **1 cup sweetened condensed milk**: This adds sweetness and a soft, moist texture to the fudge. If you prefer a dairy-free version, you can look for non-dairy alternatives.
– **1 cup Oreo cookies, crushed**: The star ingredient! Crush the cookies for added crunch throughout the fudge. If you want larger chunks, feel free to leave some pieces bigger.
– **1/2 teaspoon vanilla extract**: This enhances the overall flavor of the fudge. To match the taste of the Oreos more closely, consider using a chocolate or cookies and cream-flavored extract for added depth, especially if you wish to elevate the fudge.
How to Make Oreo Cookies and Cream Fudge
Now that we have all our ingredients ready, let’s dive into the step-by-step instructions on how to create this delicious fudge!
1. **Prepare the pan**: Start by lining an 8×8-inch baking dish with parchment paper, making sure to leave some overhang on the sides. This will help you lift the fudge out easily once it sets. Lightly spray the parchment paper with cooking spray to further ensure that the fudge doesn’t stick.
2. **Melt the chocolate**: In a medium-sized saucepan over low heat, combine the **white chocolate chips** and the **sweetened condensed milk**. Stir continuously as the chocolate begins to melt. Be patient and don’t let it boil; if the temperature gets too high too quickly, your chocolate may seize up, leading to a grainy texture.
3. **Mix in the vanilla**: Once the chocolate is fully melted and smooth, remove the pan from the heat. Stir in the **vanilla extract** until it’s evenly incorporated. This step is crucial as it builds the flavor foundation of your fudge.
4. **Add the crushed Oreos**: Gently fold in the **crushed Oreo cookies**. Do this carefully to avoid breaking the cookies too much; you want to retain some texture rather than a fine powder. Ensure that the cookie pieces are evenly distributed throughout the fudge mixture.
5. **Pour into prepared pan**: Transfer your fudge mixture into the lined baking dish, spreading it out evenly with a spatula. Gently press down to ensure a flat top and to compact the fudge slightly. This helps in getting denser, firmer fudge.
6. **Set the fudge**: Place the baking dish in the refrigerator and let the fudge set for at least 2 hours or until firm. If you’re in a rush, you can place it in the freezer for about an hour. The fudge should easily hold its shape when you remove it from the pan.
7. **Slice and enjoy**: Once set, lift the fudge out of the pan using the parchment overhang. Place it on a cutting board and slice it into squares. Each piece should have beautiful specks of Oreo throughout, showcasing the crunchy bits.
8. **Store or serve**: Serve immediately or store in an airtight container in the refrigerator. They’ll keep for about one week—if they last that long!
6 Variations & Substitutions
1. **Dark Chocolate Fudge**: For those who prefer a richer taste, try substituting half or all of the white chocolate chips with dark chocolate chips. Dark chocolate will complement the Oreo flavor beautifully, adding a slightly more intense sweetness to the fudge.
2. **Add Nuts**: For a great crunch and added health benefits, consider adding chopped nuts, such as walnuts or pecans, to the fudge mixture. About ½ cup of nuts can be folded in with the Oreos. This will add texture and flavor.
3. **Mint Oreo Fudge**: If you’re a fan of mint chocolate, you can use Mint Oreos instead of regular ones. Additionally, consider adding a few drops of peppermint extract to amplify that cool minty flavor.
4. **Peanut Butter Swirl**: Drizzle melted peanut butter over the top of the fudge before allowing it to set, or fold in a half cup of creamy peanut butter to the chocolate mixture. This will create a deliciously nutty fudge experience.
5. **Cookies and Cream Swirl**: For extra visual appeal, reserve some crushed Oreos and sprinkle them on top before it sets. Alternately, make swirls of chocolate fudge within your fudge by melting dark chocolate, cooling it slightly, and swirling it in before it sets.
6. **Coconut Flavored Fudge**: For a tropical twist, add ½ cup of shredded sweetened coconut to the mixture before spreading it into the pan. The coconut’s chewy texture works wonderfully with the smoothness of the fudge.
Common Mistakes to Avoid
Although this recipe is straightforward, several common pitfalls can occur while making fudge:
– **Overheating the chocolate**: Chocolate is sensitive to heat and can easily burn. Make sure to melt it over low heat, stirring frequently. If it starts to seize, instantly reduce the heat and add a teaspoon of heavy cream to smooth it out.
– **Not letting it set**: Patience is key! Allow the fudge enough time to fully chill. Cutting it too early can result in soft, messy pieces instead of firm squares.
– **Using low-quality chocolate**: The flavor of your fudge heavily depends on the quality of the ingredients. Choose good-quality chocolate chips for the best flavor and texture.
– **Not using a lined pan**: Skipping this step can make it nearly impossible to remove the fudge from the pan without breaking it. Always line the pan with parchment and ensure you have overhang.
– **Ignoring measuring**: Baking is a precise science. Make sure to measure all ingredients accurately to ensure the correct consistency and flavor of your fudge.
Storage, Freezing & Reheating Tips
Storage of your Oreo Cookies and Cream Fudge is simple and straightforward:
– **Room Temperature**: Store in an airtight container at room temperature for up to three days. If your home is particularly warm, it’s best to refrigerate it to avoid melting.
– **Refrigerator**: For longer preservation, or if you prefer a firmer fudge, keep it in the refrigerator for up to a week.
– **Freezing**: You can freeze fudge as well! Wrap individual pieces tightly in plastic wrap, then place them in an airtight container or freezer bag. Thaw in the refrigerator overnight before serving.
– **Avoid Reheating**: Fudge is best enjoyed at room temperature. If it has been refrigerated, let it come to room temperature before consuming. Reheating it can compromise the texture, making it too soft.
Frequently Asked Questions
1. **Can I use other types of chocolate besides white chocolate?**
Absolutely! You can substitute the white chocolate with semi-sweet or dark chocolate, making it perfect for those who prefer intense chocolate flavors. Just remember to adjust the sweetness, as different chocolates can have varying sugar levels.
2. **What can I do with leftover fudge?**
If you have leftovers, you can crumble it over ice cream, use it to make fudge brownies, or incorporate it into milkshakes for a delicious treat.
3. **Can I make this fudge without sweetened condensed milk?**
If you prefer a lower sugar option, you could substitute sweetened condensed milk with unsweetened condensed milk, but keep in mind that this will change the texture and taste, making it less sweet and creamy.
4. **How do I know when the fudge is set?**
The fudge should be firm to the touch, and if you press down, it should spring back slightly. If it feels soft or gooey, it needs more time in the fridge.
5. **How can I enhance the flavor of the fudge?**
While this recipe is delicious as is, you can enhance the flavor by adding extracts such as almond, orange, or a splash of espresso to bring out richer flavors, depending on your taste preference.
If you haven’t yet tried this Oreo Cookies and Cream Fudge, you’re missing out on a delightful treat that’s perfect for any occasion! This recipe is sure to satisfy your sweet tooth and bring smiles all around. So gather your ingredients, prepare your pan, and let’s get started!
In conclusion, Oreo Cookies and Cream Fudge stands out as one of those desserts that blend familiarity with the thrill of decadence. Perfect for any event or just a cozy night in, this fudge will surely become a favorite among friends and family. I encourage you to give this delightful recipe a try, and feel free to customize it and make it your own! Serve it up, share it around, and enjoy the smiling faces that accompany every bite!
If you enjoyed this recipe, you might also love our **[Easy Dessert Recipes for Beginners]**. Happy cooking!


