Prep time: 15 minutes
Cook time: 0 minutes
Total time: 4 hours
Servings: 12
Creating desserts that appeal to children can sometimes be a challenge, especially when you want it to be quick and easy. The No Bake Oreo Cheesecake Bars for Kids Parties are a fantastic solution. They are simple to make, require no baking, and are sure to delight everyone at the party. With a rich, creamy filling paired with the beloved flavor of Oreos, these dessert bars are a crowd-pleaser. Whether it’s a birthday party, a school event, or simply a sunny afternoon at home, these bars are perfect for any occasion.
What Is No Bake Oreo Cheesecake Bars for Kids Parties?
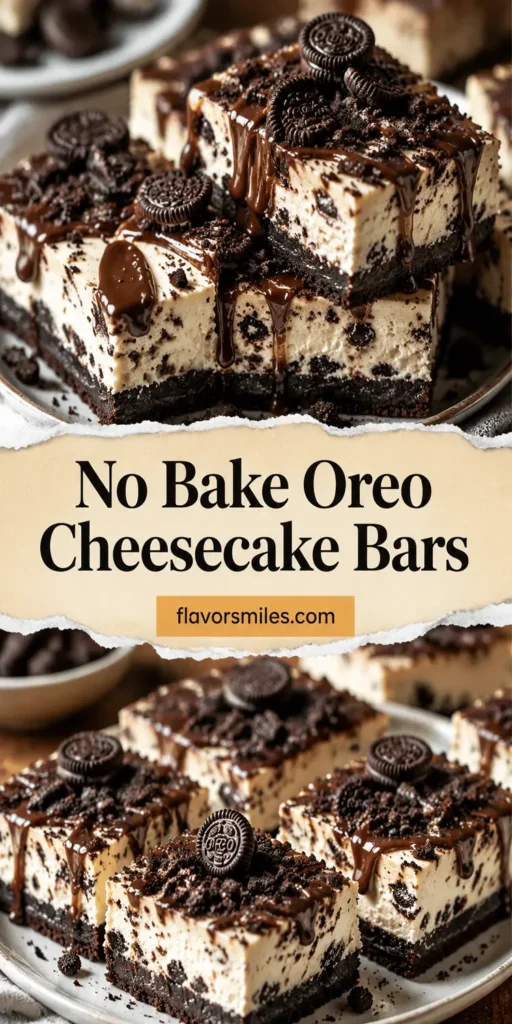
No Bake Oreo Cheesecake Bars are a delightful no-bake dessert that combines the irresistible taste of creamy cheesecake with crunchy Oreo cookies. This dessert is layered with a biscuit crust made from crushed Oreos, a creamy cheesecake filling, and topped with even more crushed Oreos. It’s an easy recipe that doesn’t require any baking, making it ideal for busy parents and novice bakers alike. The cool, rich texture and sweet flavor make these bars not only a treat for kids but also an indulgence that adults can enjoy.
Why You’ll Love This
You’ll love these No Bake Oreo Cheesecake Bars because they are adaptable and straightforward to prepare. As a busy parent, you might appreciate that they can be made ahead of time and stored in the refrigerator until you need them. The addition of Oreos provides a nostalgic flavor that everyone loves, transporting you back to simpler times. These bars are perfect for meal prep—you can make them on a Sunday to have a sweet treat ready for the week. They’re great for sharing, allowing for a generous yield that can serve many. What’s more, the absence of cooking means no kitchen mess, freeing up your time for other fun party preparations.
Ingredients You’ll Need
- Oreo cookies: 24 whole cookies for crust and topping, plus extra for garnish.
- Butter: ½ cup, melted, to bind the crust together.
- Cream cheese: 16 oz, softened, for a smooth, creamy texture in the filling.
- Sugar: ½ cup, to sweeten the cheesecake filling.
- Vanilla extract: 1 teaspoon, to enhance the flavor.
- Whipped cream: 2 cups, for lightness in the filling and a fluffy texture.
- Salt: a pinch, to balance the sweetness.

How to Make
- Prepare the crust: Start by crushing the Oreo cookies into fine crumbs. You can do this by using a food processor or placing them in a zip-top bag and crushing them with a rolling pin. Combine the crumbs with the melted butter in a mixing bowl until it resembles wet sand. Press this mixture firmly into the bottom of a lined 9×9 inch baking dish to create an even layer for the crust.
- Make the filling: In a large mixing bowl, beat the softened cream cheese and sugar together until smooth. The mixture should be free of lumps, creating a creamy base for your cheesecake. Add the vanilla extract and a pinch of salt, blending until fully incorporated.
- Add the whipped cream: Gently fold in the whipped cream to your cream cheese mixture. Be careful not to deflate it; you want to maintain the light and airy consistency. Once fully combined, you should have a light and fluffy cheesecake filling.
- Combine with Oreos: Chop up some additional Oreos into small pieces. Fold these pieces into your cheesecake filling for added texture. This will enhance the Oreo flavor throughout the filling.
- Layer the filling: Spread the cheesecake filling over the prepared Oreo crust in the baking dish. Use a spatula to smooth the top evenly. This is where you can get creative with the decoration; you can sprinkle extra crushed Oreos on top for an appealing finish.
- Chill: Cover the dish with plastic wrap and refrigerate for at least four hours, though overnight is best. This will allow the bars to set properly, making them easier to cut into squares once ready to serve.
Variations & Substitutions
Mint Oreo Variation: For a refreshing twist, use Mint Oreo cookies instead of regular ones. This will provide a unique flavor that adds a delightful kick to your cheesecake bars. Simply follow the same process, making sure to include plenty of chopped Mint Oreos in the filling. You might even top with green whipped cream for a festive presentation.
Chocolate Drizzle: If you or the kids love chocolate, drizzling some melted chocolate over the top can elevate the dessert further. After chilling your cheesecake bars, melt semi-sweet chocolate chips and use a spoon to create a beautiful drizzle over the surface before serving. This adds both flavor and an eye-catching visual appeal.
Fruit Topping Variation: Consider using a fruity topping for a pop of color and flavor. Fresh strawberries or raspberries can be placed atop the cheesecake filling right before serving. They also add a refreshing contrast to the creamy richness. Choosing seasonal fruits will enhance both the presentation and taste.
Common Mistakes to Avoid
When making No Bake Oreo Cheesecake Bars, there are a few common mistakes that you might want to steer clear of to ensure your bars turn out perfectly.
Overmixing the filling: Be careful not to overmix the cream cheese and whipped cream mixture. Overmixing can introduce too much air, which can affect the texture of your cheesecake.
Not chilling long enough: It’s essential to chill the bars for adequate time to allow them to set properly. If they are cut too soon, they may fall apart, making for a messy presentation.
Crust consistency: Ensure that the crust is firmly pressed into the pan. A loose crust may crumble and won’t hold the filling properly. Take the time to press it down evenly with the back of a measuring cup or your hands.
Using cold cream cheese: Make sure to soften your cream cheese before using it. Cold cream cheese can lead to lumps in the filling, which detracts from the smooth texture of your dessert.
Storage, Freezing & Reheating Tips
These No Bake Oreo Cheesecake Bars can be stored in an airtight container in the refrigerator for up to five days. If you want to keep them longer, you can freeze them! To freeze, wrap the bars tightly in plastic wrap and then in aluminum foil to prevent freezer burn. Stored this way, they can last for up to two months.
If you want to enjoy some right away after defrosting, let them thaw in the refrigerator overnight before serving. This helps maintain its creamy texture. Always be sure to use a sharp knife to cut through the bars, especially if they have been frozen, to get clean, neat squares.
Frequently Asked Questions
Can I use different cookies for the crust? Absolutely! While Oreos are a classic choice, you can use any similar cookie for the crust. Chocolate graham crackers, for example, will give you a unique flavor. Just make sure the consistency is similar to achieve that perfect crumbly texture.
How can I make these bars healthier? A healthier option can include using reduced-fat cream cheese and sugar substitutes. Greek yogurt can also replace some of the cream cheese for added protein while maintaining that creamy texture. You could also consider using whole grain cookies for the crust.
Can I make these bars dairy-free? Yes! You can use dairy-free cream cheese and substitute coconut whipped cream for the regular whipped cream. For the crust, ensure you choose dairy-free cookies like certain brands of Oreos.
How do I prevent the bars from sticking to the pan? To prevent sticking, line your baking dish with parchment paper, leaving some overhang. This will allow you to lift the entire dessert out easily, and help in cutting even bars.
Can I add toppings to the cheesecake bars? Yes! You can top them with chocolate ganache, whipped cream, or fresh fruit like berries for added flavor and decoration. This not only makes them appealing but adds to the overall taste experience.
Conclusion: These No Bake Oreo Cheesecake Bars for Kids Parties are bound to become a favorite for both kids and adults alike. They are easy to prepare, beautifully decadent, and allow for various creative variations. Next time you have a gathering, treat your friends and family to these delightful bars—they will surely be a hit!