Prep time: 15 minutes
Cook time: 0 minutes
Total time: 15 minutes
Servings: 4 servings
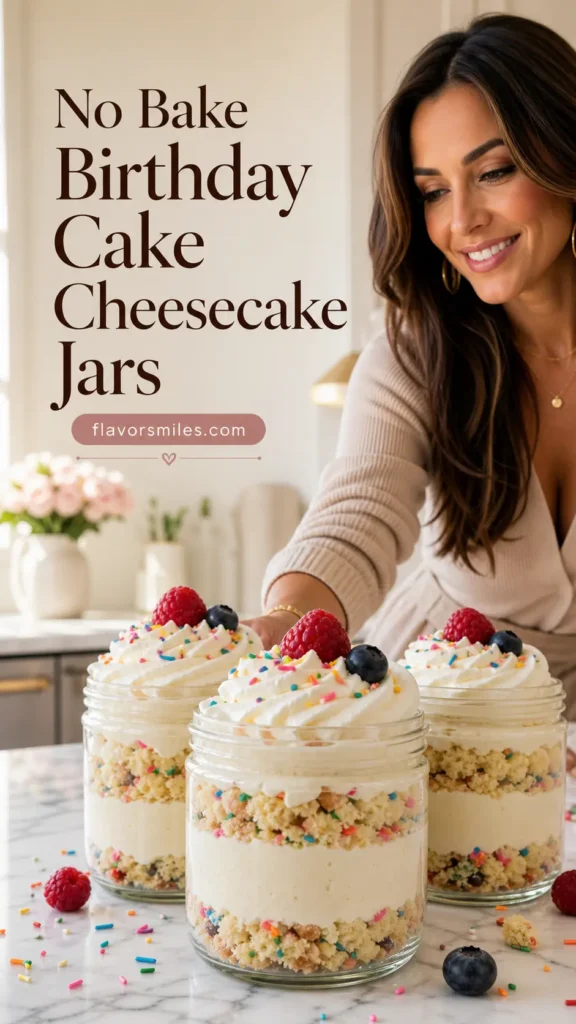
No Bake Birthday Cake Cheesecake Jars are a delightful dessert choice that’s perfect for celebrations without the hassle of baking. These jars combine the richness of cheesecake with the playful elements of a birthday cake, making them a hit for any festive occasion. With layers of creamy cheesecake filling, crumbled cake, and buttery graham cracker crust, it’s a fun way to satisfy your sweet tooth.
In today’s fast-paced world, finding a dessert that’s both easy to make and impressive to present is a tall order. This recipe allows you to whip up a delightful treat in a matter of minutes. Perfect for busy parents, kitchen novices, or anyone looking to indulge in a sweet dessert without spending hours in the kitchen, these cheesecake jars are sure to impress.
What Is No Bake Birthday Cake Cheesecake Jars?
No Bake Birthday Cake Cheesecake Jars are essentially a layered dessert combining traditional cheesecake elements with a festive birthday cake theme. Using pre-baked items, this no-bake recipe allows for a quick assembly of layers, creating a delightful parfait-style dessert. The cheesecake filling is creamy and rich, and the addition of cake pieces adds a nice texture, making every spoonful a celebration of flavor.
Why You’ll Love This
There are several reasons to fall in love with No Bake Birthday Cake Cheesecake Jars. Firstly, they are incredibly simple to prepare, requiring minimal cooking skills—perfect for busy schedules or those who may feel intimidated in the kitchen. Additionally, the versatility of this recipe means you can customize the flavors and colors to match any celebration. The charming presentation in jars makes them an eye-catching centerpiece on any dessert table and a fun treat for both kids and adults. Plus, you can make them ahead of time, allowing you to focus on the party and spend less time juggling cooking tasks.
Ingredients You’ll Need
- 8 oz of cream cheese: This is the base of your cheesecake filling, providing richness and creaminess.
- 1/2 cup of sugar: For sweetness, balancing the tanginess of the cream cheese.
- 1 tsp of vanilla extract: Adds aromatic flavor to the cheesecake.
- 1 cup of heavy whipping cream: Whipped to soft peaks, this creates lightness in your filling.
- 2 cups of funfetti cake mix: Adds flavor and texture, embodying the birthday cake essence.
- 1 cup of milk: Helps to moisten the cake mix when layering in the jars.
- 1 cup of graham cracker crumbs: Forms the crust layer, adding a crunchy texture.
- 1/4 cup of melted butter: Binds the graham cracker crumbs, enhancing flavor.
- Sprinkles: A fun decoration, making the desserts festive and appealing.

How to Make
- Prepare the crust: In a mixing bowl, combine the graham cracker crumbs and melted butter until fully combined. The mixture should resemble wet sand. Press this mixture into the bottom of your jars, creating a firm, even layer.
- Make the cheesecake filling: In a separate bowl, beat the cream cheese with sugar and vanilla extract until it’s smooth and creamy. Make sure to scrape the sides of the bowl often to incorporate all ingredients.
- Whip the cream: In a chilled bowl, whip the heavy cream until it reaches soft peaks. This step is crucial for ensuring a light texture in your cheesecake filling.
- Combine the mixtures: Gently fold the whipped cream into the cream cheese mixture. Go slowly to maintain the airy consistency, which is essential for a light dessert.
- Layer the jars: Start with a layer of cheesecake filling, followed by a layer of the cake mix moistened with milk. Repeat this process until the jars are filled, finishing with a layer of cheesecake filling on top.
- Add the sprinkles: Finish your jars by adding a generous amount of sprinkles on the very top layer to enhance their festive appeal. Chill the jars in the fridge for at least one hour before serving.
Variations & Substitutions
Chocolate Lovers Variation: For those who adore chocolate, substitute half of the funfetti cake mix with chocolate cake mix. You can also add mini chocolate chips into the cheesecake filling for a delightful chocolatey surprise hidden within the layers. This variation retains the fun visual appeal while satisfying a chocolate craving. Don’t forget to use chocolate sprinkles to enhance the presentation!
Fruit-Infused Version: If you’re looking for a fruity twist, consider incorporating layers of fresh fruit. Use pureed berries such as strawberries or blueberries to create fruit layers between the cheesecake and cake layers. This not only adds vibrant color but also introduces a refreshing contrast to the richness of the cheesecake. Topping each jar with additional fruit enhances the visual and flavor elements beautifully.
Gluten-Free Option: To cater to gluten-free eaters, swap out the graham cracker crumbs for gluten-free cookie crumbs. Many brands offer delicious gluten-free options that mimic the texture of traditional graham crackers. Additionally, ensure the cake mix you are using is certified gluten-free. This way, everyone can enjoy these scrumptious jars without worry!
Common Mistakes to Avoid
When making No Bake Birthday Cake Cheesecake Jars, overmixing the cheesecake filling can lead to a dense texture; be gentle when folding in the whipped cream. Skipping the chilling time is also a common error, as it’s essential for the layers to set. Giving them time to chill not only improves the texture but also enhances the flavors as they meld together. Lastly, using warm ingredients can impede the overall setting; ensure all components are at room temperature before mixing.
Storage, Freezing & Reheating Tips
These cheesecake jars can be stored in the refrigerator for up to three days. It’s crucial to ensure they are properly sealed to prevent unwanted absorption of odors from other fridge contents. If you attempt to freeze these desserts, the texture of the cream may change post-thawing; however, the cake portion can be prepared and frozen separately. When ready to serve, simply layer them freshly in the jars, ensuring the texture remains appealing. For reheating any leftover cake components, do so in a microwave under a damp paper towel to maintain moisture, but only if necessary, as these jars are best enjoyed chilled.
Frequently Asked Questions
Can I make these jars in advance? Absolutely! In fact, No Bake Birthday Cake Cheesecake Jars are ideal for making ahead of time. You can assemble them a day before your event, allowing the flavors to meld beautifully while saving you time on the day of the celebration. Just be sure to store them properly in the refrigerator.
What if I don’t have jars? Don’t worry if you don’t have jars! You can use any dessert containers or bowls. Just be aware that presentation will vary, but the taste will remain the same! Layering in clear glass bowls also makes for a beautiful display.
Can I use a different filling than cheesecake? Yes, feel free to experiment! You can substitute the cheesecake filling with a chocolate mousse or a no-bake vanilla pudding recipe for different flavor profiles. Just ensure any substitutes are thick enough to hold the layers.
How long do they stay fresh? No Bake Birthday Cake Cheesecake Jars will keep well in the fridge for about three days. After this period, the texture and flavors may begin to deteriorate, so they are best enjoyed fresh.
What can I do if my filling is too runny? If your cheesecake filling seems too runny, ensure that you have whipped the cream to the correct consistency before folding it in. Also, consider chilling the mixture for a bit longer to help stabilize before layering it into the jars. Adding more cream cheese may help thicken the overall mixture.
Conclusion:
No Bake Birthday Cake Cheesecake Jars combine the joy of cheesecake with the festive spirit of birthday cake, creating a delightful dessert that’s sure to please at any gathering. Simple to prepare and beautifully presented, these jars are adaptable for various tastes and celebrations. Enjoy the delicious layers and the compliments that are sure to follow!