Prep time: 30 minutes
Cook time: 20 minutes
Total time: 50 minutes
Servings: 12 cupcakes
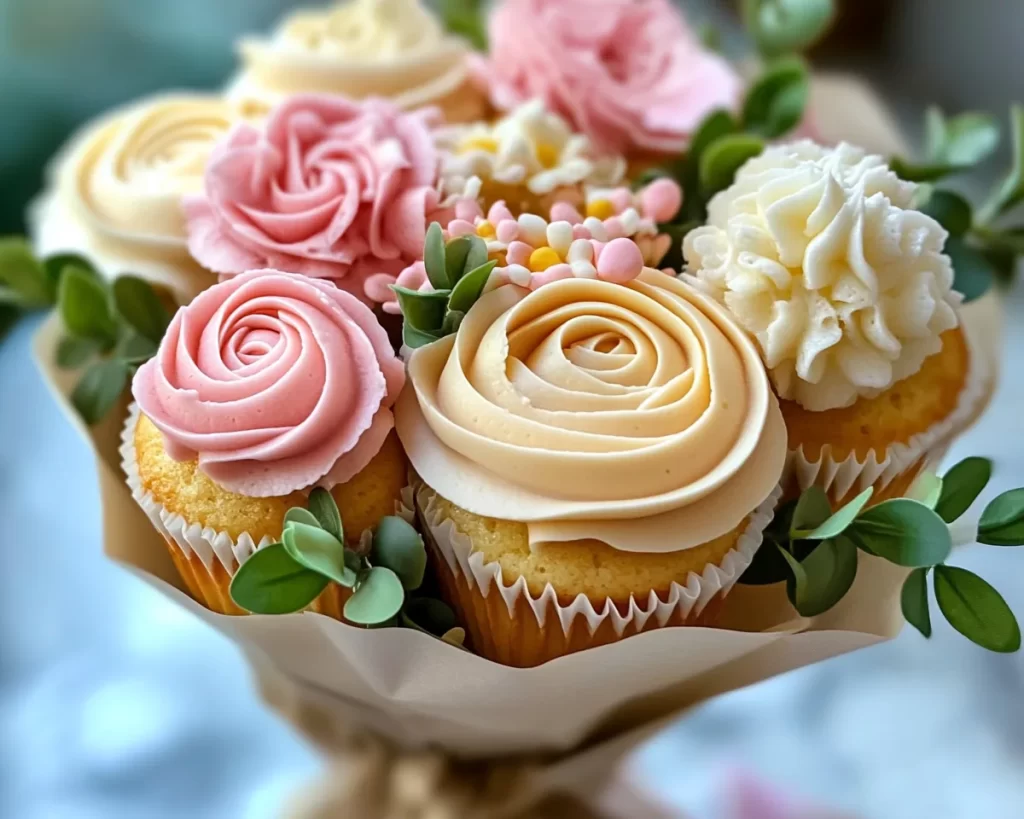
When you think of a perfect way to celebrate someone special in your life, especially on occasions like Mother’s Day, what comes to mind? For many, it’s the delightful experience of creating something unique that adds a personal touch. Imagine the look on your mother’s face when you present her with a bouquet made entirely of beautiful, aromatic, and delicious vanilla cupcakes! The Mother’s Day Vanilla Cupcake Bouquet holds a special place in my heart. It combines the rich flavors of a classic vanilla cupcake with the creativity and charm of fresh flower arrangements. Not only is it a feast for the eyes, it’s also incredibly satisfying to make and share with loved ones.
In this guide, you’ll learn everything about crafting this stunning cupcake bouquet: from selecting the right ingredients to expert baking tips. We’ll dive into the specific techniques required to achieve a soft, moist cupcake, all while ensuring that your floral masterpiece stands tall and vibrant. You’ll also discover a few variations you can try, as well as common pitfalls to avoid. Let’s get started on this delightful culinary adventure!
What Is Mother’s Day Vanilla Cupcake Bouquet?
The Mother’s Day Vanilla Cupcake Bouquet is not just a dessert; it’s a creative expression of love and appreciation! This visually striking arrangement is constructed from soft, fluffy vanilla cupcakes that are beautifully decorated to resemble flowers. The origins of this idea trace back to artistic baking concepts that transform ordinary cupcakes into show-stopping centerpieces. They are typically frosted with a luscious buttercream that can be colored and shaped to mimic petals, making them look just like blooming flowers.
Flavors play a vital role in this recipe. The vanilla cupcakes are subtly sweet and topped with an equally delightful vanilla buttercream that melds perfectly with the cake’s texture. The combination creates a multi-layer experience of flavors and textures. When baked correctly, these cupcakes boast a moist crumb while the frosting adds a smooth, creamy layer on top. The elegance of the presentation elevates any occasion, from Mother’s Day brunch to birthday celebrations, leaving lasting impressions on everyone who receives them.
Why You’ll Love This
There are numerous reasons to adore the Mother’s Day Vanilla Cupcake Bouquet! First, the taste is absolutely fabulous. The balance of sweetness in the vanilla cupcake couples wonderfully with a rich and creamy buttercream, making every bite an indulgent experience. Not to mention, the visual impact of these cupcakes sets them apart from ordinary baked goods, turning a simple treat into an unforgettable gift.
In terms of ease, even if you are a beginner in the kitchen, this recipe is accessible and fun to make. You get to experiment with decorating techniques using piping tips and food coloring, which can be a skill-building experience. It’s also a cost-effective choice; with basic ingredients that you likely already have in your pantry, you can create something extraordinary without breaking the bank.
It’s essential to recognize potential misconceptions about baking and decorating cupcakes. Many people think that achieving beautiful results requires expert-level skills, but with a bit of patience and practice, anyone can master these techniques. The satisfaction of creating something so lovely yourself is a rewarding experience, making it all worthwhile!
Ingredients You’ll Need
- All-purpose flour: This is the base of the cupcakes, providing structure. You can substitute with a gluten-free all-purpose blend if needed.
- Granulated sugar: Adds sweetness and helps with the cupcake’s fluffy texture.
- Baking powder: A leavening agent that gives the cupcakes their rise.
- Salt: Enhances flavor and balances the sweetness.
- Unsalted butter: Used for richness and to create a tender crumb. If you need a dairy-free option, use a plant-based butter.
- Eggs: Provide structure and moisture. For a vegan substitute, consider using flax eggs or chia seeds.
- Vanilla extract: Adds a rich vanilla flavor. Choose pure vanilla for the best results.
- Whole milk: This keeps the batter moist and lends a creamy texture. You can use a non-dairy milk as an alternative.
- Confectioners’ sugar: Essential for making a sweet and smooth frosting.
- Food coloring: Optional, but adds extra fun to your frosting if you want to mimic flower petals.
How to Make
- Preheat the oven: Begin by preheating your oven to 350°F (175°C). This initial step ensures that your cupcakes bake evenly. While the oven heats, you can prepare your baking pans.
- Prepare the baking pans: Line a muffin tin with cupcake liners. This is crucial as it helps to remove the cupcakes once they are baked without sticking. Choose colorful liners to enhance the bouquet presentation.
- Mix the dry ingredients: In a large bowl, whisk together the all-purpose flour, baking powder, and salt. This process helps to evenly distribute the leavening agent, which is essential for fluffy cupcakes.
- Cream the butter and sugar: In a mixing bowl, beat the unsalted butter and granulated sugar until light and fluffy. This typically takes about 3-5 minutes. Proper creaming adds air to the batter, resulting in a light texture.
- Add eggs and vanilla: Beat in the eggs one at a time, mixing well after each addition. Then, stir in the vanilla extract. This not only adds flavor but also helps to bind the ingredients together.
- Combine with dry ingredients: Gradually add the dry mixture to the butter mixture, alternating with whole milk. Start and end with the flour mixture. Mix until just combined to avoid overmixing, which can lead to dense cupcakes.
- Fill the liners: Using a scooper or spoon, fill the cupcake liners about two-thirds full with batter. This allows room for the cupcakes to rise without overflowing.
- Bake the cupcakes: Place the muffin tin in the preheated oven and bake for about 18-20 minutes. The cupcakes are done when a toothpick inserted into the center comes out clean. Keep an eye on them to avoid overbaking, which can dry them out.
- Cool the cupcakes: Once baked, remove them from the oven and let them sit in the tin for 5 minutes. After that, transfer them to a wire rack to cool completely. This is crucial before frosting.
- Prepare the frosting: While the cupcakes cool, you can whip up the buttercream. In a bowl, beat the unsalted butter until smooth, then gradually add confectioners’ sugar and a splash of vanilla extract. Adjust the milk to achieve your desired frosting consistency.
- Frost the cupcakes: Once the cupcakes are completely cooled, use a piping bag fitted with a star tip to frost the tops to resemble flowers. You can be creative with colors, making each cupcake unique!
- Assemble the bouquet: Place the iced cupcakes in a decorated pot or container filled with foam or a similar material to hold them upright. You can add faux greenery, pops of colorful tissue paper, or ribbons for added flair.
Variations & Substitutions
Chocolate Cupcake Variation: If your mom prefers chocolate over vanilla, you can easily modify the base recipe. Replace a portion of the all-purpose flour with cocoa powder to give the cupcakes a rich chocolate flavor. The frosting can remain vanilla or be adjusted to chocolate, using cocoa powder mixed into your vanilla buttercream. This allows you to create chocolate blossom cupcakes that are both delectable and visually appealing.
Coconut Cream Variation: For a tropical twist, you can replace the vanilla with coconut extract and add shredded coconut to the batter. This variation creates a delightful coconut cupcake that is perfect for summer celebrations. Top these with coconut-flavored buttercream and garnish with toasted coconut flakes for an irresistible finishing touch.
Gluten-Free Variation: If you have friends or family who are gluten-sensitive, simply substitute all-purpose flour with a high-quality gluten-free flour blend. Be cautious about the proportion, as some blends may require additional binding agents like xanthan gum. This maintains the desired moisture without compromising the flavor.
Vegan Variation: For a plant-based option, you can substitute traditional ingredients with vegan alternatives. Use flax eggs or applesauce in place of chicken eggs, and almond or oat milk instead of whole milk. You can also opt for vegan butter to whip up the frosting. These swaps make for deliciously moist and fluffy vegan vanilla cupcakes.
Common Mistakes to Avoid
Baking can sometimes feel intimidating, but knowing common pitfalls can help you achieve perfection. One of the most significant mistakes to avoid is overmixing the batter. This can result in tough cupcakes rather than light and fluffy ones. Always mix until just combined and no dry ingredients are visible.
Another common error is not letting the cupcakes cool completely before frosting them. Frosting warm cupcakes can lead to melted and runny frosting, diminishing the aesthetic of your beautiful bouquet. Always allow time for cooling; this will help you achieve that perfect smooth frosting layer.
Also, ensure your oven temperature is accurate. An oven that runs too hot can lead to burnt outsides with an undercooked center. Use an oven thermometer if necessary to verify your baking temperature.
Storage, Freezing & Reheating Tips
One of the benefits of the Mother’s Day Vanilla Cupcake Bouquet is that it can be enjoyed over several days! If you have leftovers, store the frosted cupcakes at room temperature in an airtight container. This keeps them fresh for up to three days. If you live in a humid climate, it’s best to refrigerate them, but remember to let them return to room temperature before serving for the best taste.
If you want to prepare your cupcakes in advance, they can also be frozen. Just ensure they are completely cooled before wrapping them individually in plastic wrap and placing them in a freezer-safe bag. They can be stored this way for up to three months. Thaw them in the refrigerator overnight before frosting.
When reheating cupcakes, a quick 10-15 seconds in the microwave can warm them up beautifully, making for a comforting treat. However, be cautious not to overheat, or you risk drying them out.
Frequently Asked Questions
Can I use a different flavor of cake for the bouquet?
Absolutely! While this recipe highlights vanilla, you can easily swap out the flavor for a chocolate, lemon, or even red velvet cake. Just make sure to adjust the buttercream flavors accordingly to complement the cake of your choice.
How do I transport my cupcake bouquet?
Transporting your cupcake bouquet can be tricky. To do so safely, ensure the bouquet is well-stabilized in its holder. You might want to use a sturdy box to keep it upright, minimizing the chances of the cupcakes tipping over during transit.
How can I make my buttercream frosting look more colorful?
To achieve vibrant colors, invest in gel food coloring instead of traditional liquid coloring. Gel colors provide a more concentrated hue without altering the consistency of the frosting. Start with a small amount and gradually increase until you reach your desired color.
What is the best way to pipe flowers on cupcakes?
Piping flowers requires practice, but a star tip is highly versatile. Use a consistent and steady pressure as you create petals, starting from the center and working outward. Practice on parchment paper first if you’re feeling uncertain.
Can I make this recipe ahead of time?
Yes! You can make the cupcakes in advance and store them unfrosted for up to three days, or freeze them. Just wait to frost them until the day you plan to present or serve them for the best visual appeal and taste.
Conclusion:
The Mother’s Day Vanilla Cupcake Bouquet is not only a feast for the taste buds but also a wonderful way to show appreciation for someone special in your life. With its soft, fluffy cupcakes adorned with vibrant buttercream icing, this unique treat can set any occasion apart. I encourage you to try this recipe yourself and to explore different variations to make it truly your own. Whether you customize the flavors or embellish the decoration, the experience of creating these delightful cupcakes is just as joyful as sharing them with others. So roll up your sleeves, unleash your creativity, and enjoy the delightful process of baking your Mother’s Day masterpiece!