Prep time: 25 minutes
Cook time: 40 minutes
Total time: 1 hour and 5 minutes
Servings: 12
Every year as Mother’s Day approaches, a sweet nostalgia fills the air. You may remember the aroma of baking wafting through your home as your mother prepared her favorite desserts, each bite invoking warmth and love. This Mother’s Day, why not recreate a treat that sparks the same joy? Enter the Mother’s Day Lemon Cheesecake Bars, a delightful blend of creamy cheesecake and zesty lemon. These bars offer an irresistible tang that will have your family coming back for more.
In this recipe, you will learn how to prepare these cheesecake bars from scratch, utilizing simple ingredients that pack a flavor punch. Whether you’re a seasoned baker or just starting, this guide will provide you with the knowledge and confidence to whip up a batch that would make any mother proud.
What Is Mother’s Day Lemon Cheesecake Bars?
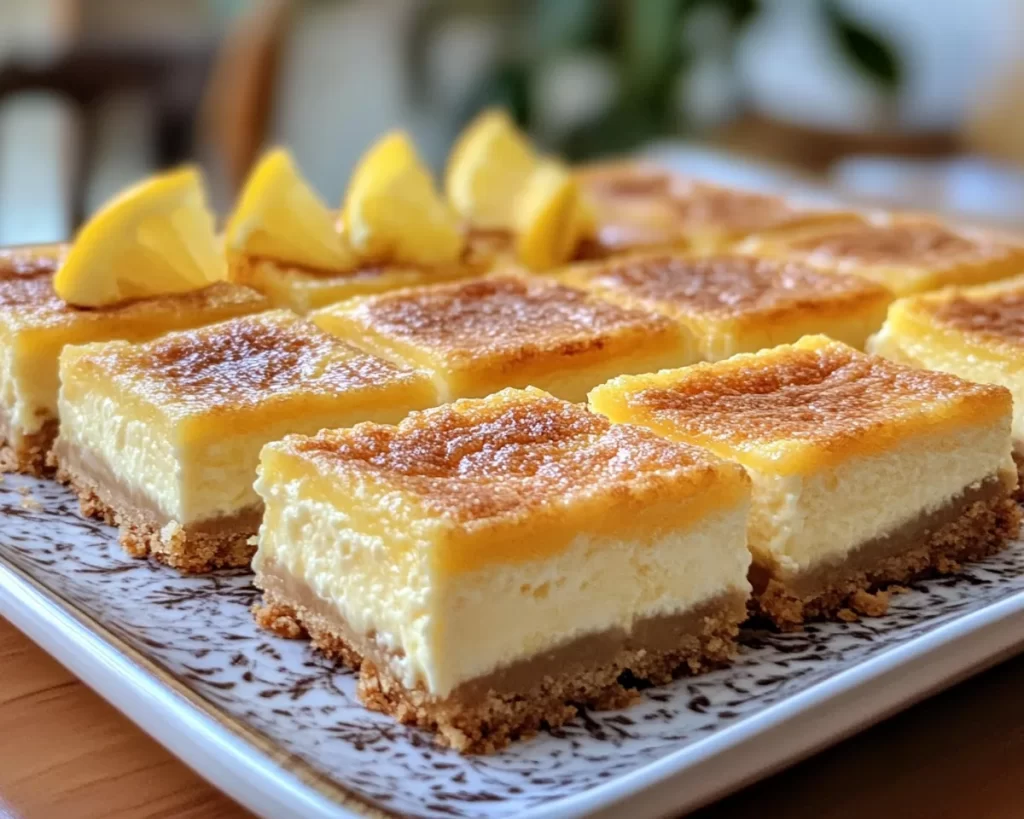
Mother’s Day Lemon Cheesecake Bars are a luscious dessert combining rich cream cheese with the bright, zesty flavor of fresh lemons. Typically cut into squares, these bars offer a wonderful balance of sweetness and tartness. The texture is creamy and smooth, making each bite a heavenly experience that melts in your mouth.
The origins of cheesecake date back to ancient Greece, but these bars add a modern twist, perfect for celebrating a day as special as Mother’s Day. The use of fresh lemon juice and lemon zest in the filling not only enhances the flavor but also adds a beautiful yellow hue, reminiscent of sunshine. These cheesecake bars are baked on a delicious graham cracker crust that contrasts beautifully with the creamy filling, making for a delightful dessert that everyone will savor.
What makes these bars truly special is their versatility. They can be served chilled or at room temperature and are perfect for picnics, family gatherings, or as a post-dinner treat. You can even dress them up with a dollop of whipped cream or serve them alongside a fresh fruit salad to enhance the experience even more.
Why You’ll Love This
You will fall in love with these Mother’s Day Lemon Cheesecake Bars for numerous reasons. Firstly, their taste is simply extraordinary; the combination of rich cream cheese and citrusy lemon creates a flavor explosion that will leave your taste buds dancing. Moreover, the recipe is easy to follow, making it accessible for beginner bakers who might find more complex desserts intimidating.
Cost-wise, making a batch of these bars is surprisingly budget-friendly. The core ingredients—cream cheese, sugar, eggs, and lemons—are often staples found in most kitchens. Additionally, they can be made ahead of time, allowing you to prepare them during a busy week leading up to Mother’s Day.
Some people might think that cheesecake is too difficult to make at home, but this recipe challenges that misconception head-on. It utilizes a straightforward technique that allows anyone, regardless of their baking prowess, to create a delightful dessert. You will find that with just a bit of patience and attention to detail, you can achieve cheesecake bars that rival any bakery’s offerings.
Ingredients You’ll Need
- Graham cracker crumbs – These form the base of your cheesecake bars. They provide a sweet, crunchy contrast to the creamy filling. If you don’t have graham crackers, digestive biscuits or shortbread cookies can work beautifully as substitutes.
- Granulated sugar – Used to sweeten the crust and the filling, enhancing the rich flavors of the dessert. You can also experiment with brown sugar for a deeper flavor.
- Unsalted butter – This adds richness to the crust. Make sure it’s melted for easy mixing. If you’re looking for a lower-fat option, you may consider using margarine.
- Cream cheese – The star of the show! Ensure it’s softened to room temperature to prevent lumps in your filling. For a lighter version, consider using Neufchâtel cheese, which has a lower fat content.
- Eggs – These help to set the cheesecake and provide creaminess. Be sure to use large eggs for accurate measurements.
- Fresh lemon juice – This is key to achieving that vibrant lemon flavor. If fresh lemons aren’t available, bottled juice can be used, but fresh is always preferable for taste.
- Lemon zest – Adds an extra punch of lemon flavor and aroma. Be careful not to zest the bitter white pith; only the bright yellow skin is tasty.
- Vanilla extract – Enhances the overall flavor of the cheesecake. Use pure vanilla extract for the best quality.
- Salt – A pinch of salt balances the sweetness and enriches the flavors.
How to Make
- Preheat the oven. Start by preheating your oven to 350°F (175°C). Preparing the oven ahead of time ensures even baking. While the oven is warming up, you can focus on preparing the crust.
- Prepare the crust. In a large mixing bowl, combine the graham cracker crumbs, granulated sugar, and melted butter. Mix until all the crumbs are coated. The mixture should resemble wet sand. Press this mixture firmly into the bottom of a greased 9×9-inch baking pan, ensuring it’s evenly distributed. A flat-bottomed glass can help achieve a smooth surface.
- Bake the crust. Place the pan in your preheated oven and bake the crust for about 10 minutes or until it’s slightly golden and set. This will create a firm base for your cheesecake. Let it cool on a wire rack while you prepare the filling.
- Make the filling. In a large bowl, beat the softened cream cheese with an electric mixer until smooth and creamy. This process should take about 2-3 minutes to achieve the right consistency. Add in the granulated sugar and continue to mix until combined.
- Incorporate eggs. Add the eggs, one at a time, making sure to blend well after each addition. This helps incorporate air into the mixture, giving your cheesecake its creamy texture. Be cautious not to overbeat, as this can introduce excess air that may cause cracks.
- Add lemon flavor. Next, blend in the fresh lemon juice, lemon zest, and vanilla extract. The mixture should be well-combined and creamy. Ensure that there are no lumps in the filling, as this will affect the final texture of your cheesecake bars.
- Pour the filling. Carefully pour the cheesecake filling over the baked crust, spreading it evenly with a spatula. This helps ensure uniform cooking and presentation once baked.
- Bake the cheesecake. Return the pan to the oven and bake for about 30 minutes or until the edges are set but the center is still slightly jiggly. This indicates it’s perfectly cooked. Remember, it will continue to firm up as it cools.
- Cool down. Once out of the oven, let the cheesecake cool at room temperature for about an hour before transferring it to the refrigerator. Chill for at least 4 hours or overnight for best results. Chilling allows the flavors to meld beautifully.
- Slice and serve. Once chilled, remove from the refrigerator, use a sharp knife to slice into bars. Wipe the knife clean between cuts for neat slices. Serve chilled or at room temperature, perhaps with a dusting of powdered sugar or a dollop of whipped cream, and enjoy!
Variations & Substitutions
Fruit Topping Variation: If you’re a fruit lover, consider adding a topping of fresh berries to your cheesecake bars after they cool. Strawberries, blueberries, or raspberries add a burst of color and flavor that complements the lemon beautifully. This variation is perfect for those who enjoy a little extra sweetness and tartness.
Gluten-Free Variation: For those following a gluten-free diet, swap out the graham cracker crumbs for gluten-free cookie crumbs or finely ground nuts like almonds or pecans. This will provide a different texture but still yield a delicious dessert. Ensure that all other ingredients are certified gluten-free as well.
Cheesecake Swirl Variation: To add an imaginative twist, layer your cheesecake with a fruity swirl. You can prepare a fruit compote using strawberries or blueberries and gently swirl it into the cream cheese mixture before baking. This creates a delightful marbled effect and adds flavor complexity.
Chocolate Lemon Variation: If you have a sweet tooth for chocolate, consider adding a layer of chocolate ganache on top after the cheesecake bars have cooled. Simply melt some chocolate with cream and pour it over the cooled cheesecake for a rich, indulgent dessert that combines chocolate and lemon.
Vegan Variation: For a dairy-free option, substitute the cream cheese for vegan cream cheese or a mix of blended silken tofu and coconut cream. Use flax eggs in place of the traditional eggs. Just be mindful that the texture and flavor may differ slightly from the original recipe, but it can still yield a delightful dessert.
Common Mistakes to Avoid
When making Mother’s Day Lemon Cheesecake Bars, several common pitfalls can lead to less-than-perfect results. One major mistake is not allowing the cream cheese to reach room temperature before mixing. Cold cream cheese can lead to lumps in your filling, resulting in an undesired texture. Always remember to leave it out for about 30 minutes prior to beginning your recipe.
Another common issue is overbaking the cheesecake. The center should still have a slight jiggle when you take it out; do not overcook it. Overbaking can lead to cracks and a dry texture. Following the baking times closely and keeping a close eye on the bars as they cook will aid in achieving the perfect consistency.
Finally, allow the bars to chill completely before cutting. Premature slicing can lead to messy edges and an unattractive presentation. Patience truly pays off with cheesecake; waiting allows the flavors to meld beautifully and makes the final product more enjoyable.
Storage, Freezing & Reheating Tips
To store your Mother’s Day Lemon Cheesecake Bars, place them in an airtight container in the refrigerator. They will last for up to 5 days, during which they will continue to firm up and develop their flavors. If you plan to make them ahead of time for a special occasion, consider chilling them overnight—the flavors are often even better the next day!
If you’d like to freeze your cheesecake bars, they can last in the freezer for up to 2 months. Ensure that the bars are completely cooled, then wrap them tightly in plastic wrap and aluminum foil or place them in a freezer-safe container. When you’re ready to enjoy them, allow them to thaw overnight in the refrigerator.
Refrigerating the bars before serving helps maintain their creamy texture. If you find them a little too thick after freezing, you can let them sit at room temperature for about 15-20 minutes to soften slightly before enjoying.
Frequently Asked Questions
Can I use bottled lemon juice instead of fresh? Yes, you can use bottled lemon juice in a pinch, but the flavor may not be as vibrant. Fresh lemon juice offers a brighter, more natural taste, which enhances the overall flavor of the cheesecake bars.
Can I double the recipe? Absolutely! If you want to make more cheesecake bars, simply double the ingredients. You may need to adjust the baking time depending on the size of the pan you use, so keep an eye on the bars as they bake.
What can I do if my cheesecake bars crack? A common cause of cracks is overbaking the cheesecake. To prevent this, make sure you remove it from the oven when the center is a bit jiggly. If cracks do appear, you can hide them with a topping, such as whipped cream or fruit, to create a beautiful presentation.
Can I use a different type of crust? Yes, feel free to experiment with different crusts! A chocolate cookie crust or a nut-based crust can also work well with the creamy filling. Just keep in mind that the flavors may change, and ensure the crust holds together properly.
How can I enhance the lemon flavor? To amplify the lemon flavor, consider adding extra lemon zest or a few more tablespoons of lemon juice. You can also experiment with adding a citrus extract, such as lemon extract, for an even stronger lemon essence.
Conclusion:
The Mother’s Day Lemon Cheesecake Bars are not just a dessert; they are a heartfelt tribute to the memories and love we share with our families. With an easy recipe and endless variations, these bars offer something for everyone to enjoy. I encourage you to try making them for a special occasion or just to indulge in a sweet treat. Customize them as per your taste or share them with friends. Whatever you choose, know that these creamy, zesty bars will leave a lasting impression and create taste memories to cherish forever!


