Prep time: 30 minutes
Cook time: 15 minutes
Total time: 45 minutes
Servings: 12 rolls
There’s something magical about the aroma of freshly baked rolls wafting through your home, evoking cherished memories of family gatherings and holiday celebrations. Imagine pulling a tray of warm, fluffy rolls from the oven, their golden crust glistening, and the irresistible scent of honey butter filling the air. This recipe for Mother’s Day Honey Butter Rolls is not just about satisfying that craving; it’s about creating a connection—with your loved ones, with tradition, and with the joy that comes from sharing something homemade. This recipe stands out because it balances sweetness, warmth, and a sense of love wrapped in each bite.
In this article, you’ll learn how to create these delightful honey butter rolls that are as comforting as they are delicious. You’ll discover essential tips to get the perfect texture and flavor, explore variations to personalize the recipe, and learn how to handle any hiccups that might occur in the kitchen. If you’ve ever been mystified by bread-making or simply want to impress your family on Mother’s Day or any gathering, keep reading!
What Is Mother’s Day Honey Butter Rolls?
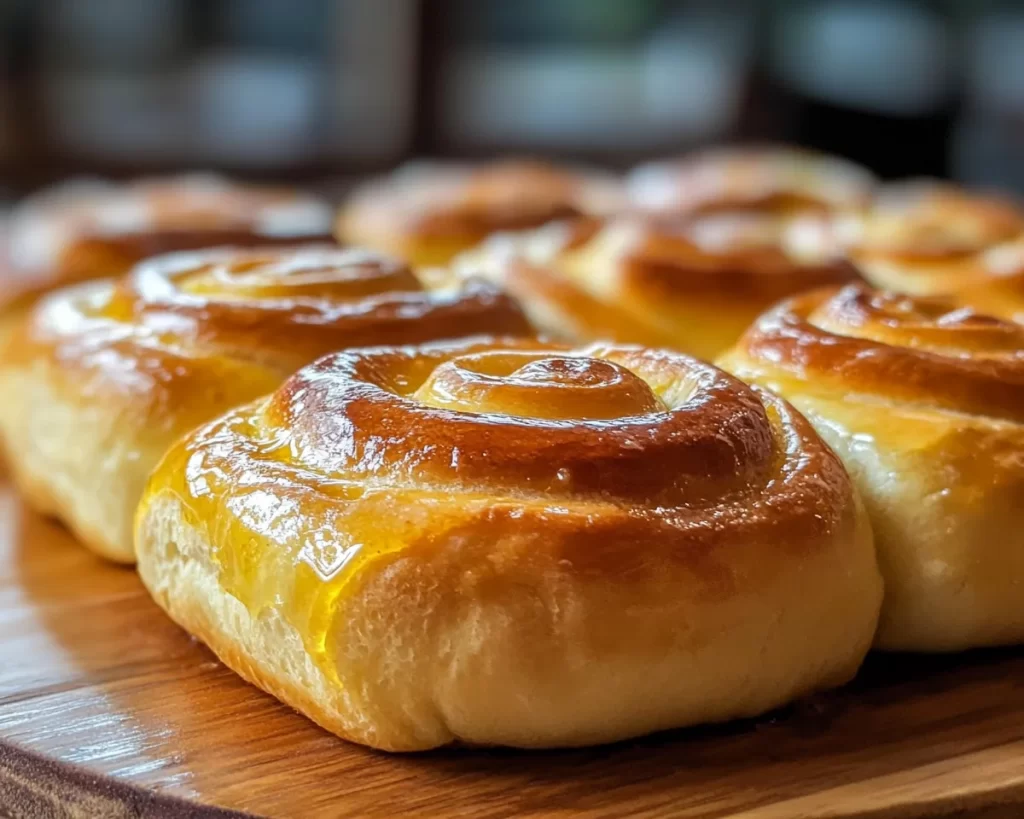
Mother’s Day Honey Butter Rolls are soft, pillowy rolls enriched with the sweet sensations of honey and creamy butter. Originating from the Southern tradition of using honey as a sweetener, these rolls embody the warmth and love often associated with home cooking. Their delightful texture is achieved through careful kneading and proofing, allowing the yeast to create those lovely air pockets that make each roll light and airy.
When you take a bite, you’ll experience a subtle sweetness contrasted with the buttery richness that envelops your palate. What sets these rolls apart is their ability to complement any meal, from a simple family dinner to elegant holiday feasts. Drenched in a mixture of honey and melted butter, they elevate any bread basket to something truly special. Imagine slathering them with even more honey butter; it’s a sensory experience that transports you back to cozy gatherings around the dinner table with laughter and stories shared, making them the perfect addition to your Mother’s Day celebration.
Why You’ll Love This
You’re going to love these honey butter rolls for several reasons. First and foremost, they are unbelievably delicious, offering a rich, soft texture combined with a subtly sweet flavor that can elevate any meal. Plus, they’re a crowd-pleaser! Whether served as a side with dinner or as part of a brunch spread, they’ll be a hit, making your table look inviting and full of warmth.
Not only are these rolls delicious, but they are also quite easy to make, even for those new to baking. With just a few ingredients and some straightforward steps, you can create these beauties at home. Many people think that baking bread is a labor-intensive process, but this recipe dispels that myth. The key is to allow the dough to rise sufficiently, which is why patience is important.
Additionally, they are cost-effective, allowing you to create gourmet flavors without breaking the bank. Finally, you can customize them with various ingredients like herbs, cheese, or even spices to match your taste or dietary needs. Whether you’re catering to vegan friends or those looking for gluten-free options, you can easily modify the recipe.
Ingredients You’ll Need
- All-purpose flour: This serves as the primary structure for the rolls. If you want a more nutritious option, you could substitute half with whole wheat flour.
- Active dry yeast: This is essential for the rise, giving the rolls their fluffy texture. Always check the expiration date for optimal results.
- Warm water: This activates the yeast; it should be around 110°F, warm but not too hot to touch to avoid killing the yeast.
- Granulated sugar: Sugar sweetens the dough and contributes to browning during baking.
- Salt: A crucial component that enhances flavor and balances the sweetness of the rolls.
- Unsalted butter: Adds richness; using unsalted allows you to control the saltiness of the recipe.
- Honey: This is the star ingredient that gives the rolls their name. It also contributes to a soft texture.
- Milk: Optional, but it adds extra moisture and richness to the dough, enhancing its flavor and texture.
Each ingredient plays a crucial role in achieving the perfect honey butter rolls, whether it’s the way the yeast is activated or how the honey sweetens the dough. Experimenting with different types of flours or sugars can also yield interesting flavors, which makes this recipe versatile.
How to Make
1. **Activate the yeast**: Begin by taking a small bowl and combining the warm water with a teaspoon of granulated sugar and the active dry yeast. Stir lightly and let it sit until it becomes frothy, usually about 5-10 minutes. This process ensures that the yeast is alive and ready to make your rolls rise.
2. **Make the dough**: In a large mixing bowl, combine the flour, remaining sugar, and salt. Create a well in the center and add the melted butter, honey, and activated yeast mixture. If you’re using milk, this is the time to add it in. Mix well with a wooden spoon or your hands until a shaggy dough forms.
3. **Knead the dough**: Transfer the dough onto a floured surface and knead for about 8–10 minutes until it becomes smooth and elastic. Proper kneading develops the gluten structure that gives the rolls their delightful chewy texture.
4. **First rise**: Place the kneaded dough into a large, greased bowl, covering it with a damp cloth or plastic wrap. Let it rise in a warm place until it doubles in size—this usually takes about 1 hour.
5. **Shape the rolls**: After the first rise, punch down the dough to release the air. Divide it into 12 equal pieces. Shape each piece into a ball by pulling the edges toward the center, creating a smooth outer layer.
6. **Second rise**: Place the shaped rolls into a greased baking dish, leaving some space between each. Cover them lightly and let them rise for another 30 minutes. This step develops flavor and ensures that the rolls are light and fluffy.
7. **Preheat oven**: While the rolls are doing their second rise, preheat your oven to 350°F (175°C). This gives you the perfect temperature for baking, allowing the rolls to achieve that beautiful golden color.
8. **Bake the rolls**: Once the rolls have risen, place them in the preheated oven and bake for about 15 minutes or until golden brown. Keep an eye on them to prevent over-browning.
9. **Brush with honey butter**: As soon as they come out of the oven, melt some butter and mix it with honey. Brush this mixture generously over the hot rolls for that extra flavor and shine.
10. **Enjoy**: Allow the rolls to cool slightly before serving. They are best enjoyed warm, so be ready to share them with your family or guests who will surely be excited to dig in!
Variations & Substitutions
Cinnamon Honey Butter Rolls: Swap out part of the honey for cinnamon in your honey butter mix. This variation not only adds a delicious warm spice but also creates a cozy, aromatic experience reminiscent of cinnamon rolls. This is perfect for anyone who enjoys a hint of warmth that pairs wonderfully with your morning coffee or tea.
Gluten-Free Honey Butter Rolls: If you’re looking for a gluten-free option, substitute the all-purpose flour with a gluten-free baking blend. Make sure your yeast and other ingredients are certified gluten-free as well. The texture might be a bit different, but using xanthan gum can help mimic the elasticity you’d get from wheat flour.
Herb-Infused Honey Butter Rolls: Incorporate fresh herbs like rosemary or thyme into the dough for an aromatic twist. This variation brings an earthy flavor, making it perfect for savory dishes or holiday dinners. The addition of herbs can elevate the rolls and pair elegantly with roasted meats.
Vegan Honey Butter Rolls: Replace the butter with a plant-based alternative and use maple syrup instead of honey. This variation ensures that everyone, regardless of dietary restrictions, can enjoy freshly baked rolls. The maple syrup will provide a unique depth of sweetness that pairs beautifully with the vegan butter.
Each variation offers unique flavors and experiences while maintaining the core components of the original recipe. Remember, a little creativity in the kitchen can lead to outstanding culinary discoveries!
Common Mistakes to Avoid
One common mistake is using water that is too hot when activating the yeast. If the water is hotter than 110°F (43°C), it can kill the yeast, resulting in denser rolls. Always make sure to check the temperature before adding yeast. A quick tip is to check it with your wrist; it’s the most sensitive area of your skin!
Another misstep is rushing through the proofing process. Skipping the rising times will give you rolls that are flat and hard, rather than fluffy and light. Patience is key here. Allow the dough to rise fully until it has doubled in size; this will create the desired texture.
Failing to measure your ingredients accurately can change the consistency of your dough, leading to disappointing results. Always use the right measuring tools for dry and wet ingredients. A kitchen scale can be a great investment for precision.
Lastly, don’t forget to brush your rolls with the honey butter as soon as they come out of the oven! This coating helps lock in moisture, adds flavor, and gives that appealing shine.
Storage, Freezing & Reheating Tips
To store your freshly baked honey butter rolls, let them cool completely, then place them in an airtight container. They can be kept at room temperature for up to 2 days. If you want to keep them longer, consider freezing them. Wrap each roll tightly in plastic wrap and then place them in a freezer bag to avoid freezer burn. They can be frozen for up to three months.
When you’re ready to use frozen rolls, simply remove them from the freezer and let them thaw at room temperature for a few hours. For the best texture, reheat them in an oven preheated to 350°F (175°C) for about 10-12 minutes. This will bring back their fluffy texture and warmth.
Always ensure that food safety practices are followed when handling and storing baked goods to avoid any spoilage.
Frequently Asked Questions
Can I use instant yeast instead of active dry yeast?
Yes, you can use instant yeast in place of active dry yeast. The main difference is that instant yeast can be mixed directly into the dry ingredients without needing to be activated first. Just decrease the amount slightly, since instant yeast is more potent.
Can I make the dough the night before?
Absolutely! You can prepare the dough the night before and place it in the fridge. Make sure it’s stored in a bowl covered with plastic wrap. When you’re ready to bake, take it out, allow it to come to room temperature, and proceed with the second rise before baking.
What should I do if my rolls don’t rise properly?
If your rolls don’t rise during the first proofing, it could be due to old yeast or the temperature being too cold. Ensure your kitchen is warm enough or try placing the dough in an oven with just the light on. If the dough is still unyielding, consider using a fresh batch of yeast.
Can I use other sweeteners besides honey?
Yes! While honey gives these rolls their signature flavor, you can use other sweeteners such as maple syrup or agave nectar. Each alternative will lend its unique taste to the rolls.
How can I make these rolls even more festive for special occasions?
To make your honey butter rolls festive, consider sprinkling sesame seeds or coarse sea salt on top before baking. Additionally, you can shape them into different forms like hearts for special occasions, adding a lovely personal touch that’s sure to impress!
Conclusion:
The Mother’s Day Honey Butter Rolls recipe is a perfect blend of tradition and comfort, wonderfully suited for family gatherings or special occasions. With their delightful sweetness, soft texture, and versatility, these rolls truly shine on any table. I encourage you to not only try this recipe but also to customize it to your family’s preferences. Whether you choose to experiment with variations or stick to the classic, these warm rolls will evoke a sense of home and love in every bite. Don’t just keep this recipe to yourself—share it with friends, and create your own cherished memories around the dinner table. Happy baking!