Prep time: 30 minutes
Cook time: 15 minutes
Total time: 45 minutes
Servings: 24 truffles
Chocolate has a magical way of bringing people together. When thinking about special occasions, especially Mother’s Day, nothing evokes the warmth and joy of the day quite like homemade Chocolate Truffles. Whether it’s a cherished family tradition or simply a sweet gesture to show appreciation, making these delectable treats can turn the ordinary into something exceptionally memorable. As you craft these rich, indulgent truffles, you’ll find that the process is simple, yet the love and thoughtfulness behind them shine through in every bite. In this article, you’ll learn about the various methods of making truffles, discover delicious variations, and master essential tips that ensure your truffles are always a hit.
What Is Mother’s Day Chocolate Truffles?
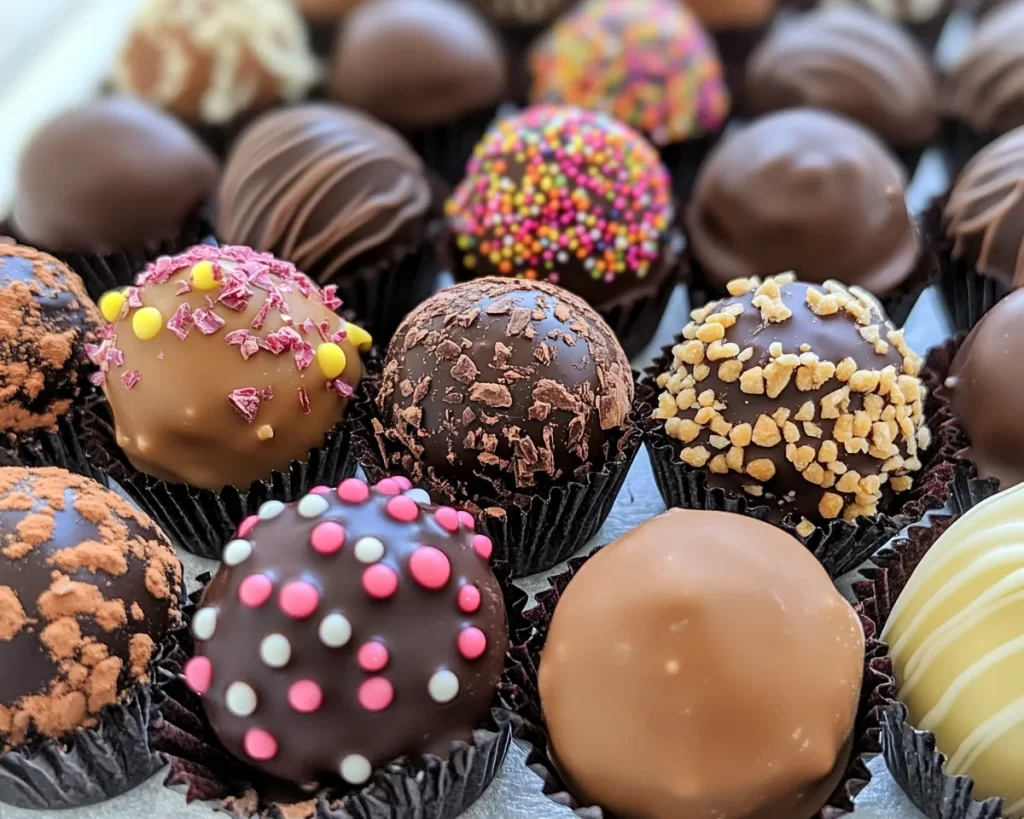
Chocolate truffles are luxurious confections made primarily from chocolate ganache, which is a mixture of chocolate and cream, often flavored or enhanced with various ingredients. The origins of truffles can be traced back to France, where they were crafted to resemble the wild truffles of the forest. Their rich, smooth texture and deep flavors make them a favorite among chocolate lovers. The outer coating can vary from crushed nuts to cocoa powder, providing a delightful contrast to the creamy filling. The allure of chocolate truffles lies in their decadence and the experience of savoring each bite, where the creamy chocolate melts away on your tongue, leaving you with a feeling of bliss.
With the base of these truffles being surprisingly simple, the real magic comes from personalizing them. You can add different flavors, such as vanilla, coffee, or even hints of citrus. This versatility allows these treats to be tailored to the preferences of your loved ones. Whether you prefer a silky dark chocolate, a sweet milk chocolate, or a luxurious white chocolate, there’s a truffle for every palate. Crafting these homemade confections is not only a heartfelt gift but also an opportunity to bond in the kitchen with loved ones, especially on a special occasion like Mother’s Day.
Why You’ll Love This
There are myriad reasons to fall in love with these Chocolate Truffles. One of the biggest highlights is the *intensely rich flavor* you can achieve, regardless of your skill level in the kitchen. The beauty of this recipe lies in its simplicity. With just a handful of quality ingredients, you can create something that feels indulgent without breaking the bank. Homemade truffles are also a testament to your love and effort, making them perfect for gifting.
Many people might shy away from attempting chocolate truffles, fearing that they may not come out as expected. However, by following a straightforward recipe, even beginners can produce truffles that rival those found at high-end chocolatiers. A common misconception is that truffles are overly complicated and require professional experience. In reality, with practice and attention to detail, anyone can master these silky delights. Adding variations, such as flavored oils or extracts, can further enhance the experience and keep the flavor fresh and exciting.
Moreover, truffles are not just for Mother’s Day; they are versatile enough to fit any occasion, from birthday parties to holiday celebrations. Each bite of a chocolate truffle melts in your mouth, bringing texture and taste that is beyond compare. The additional personalization of flavors and coatings allows you to truly customize these delights to suit any taste profile, making your truffles stand out.
Ingredients You’ll Need
- Chocolate: Choose high-quality chocolate, either dark, milk, or white, depending on your preference. Dark chocolate offers a rich, robust flavor, while milk chocolate provides sweetness and creaminess. White chocolate adds a unique sweetness that pairs well with other flavors.
- Heavy cream: This ingredient is crucial as it binds the chocolate together to create that delicious ganache. It contributes to the smooth texture that is characteristic of truffles.
- Butter: Unsalted butter adds a glossy finish to the truffles and enriches their flavor. If you’re looking for a dairy-free option, coconut oil can be substituted, but the taste will change slightly.
- Flavoring agents: Extracts such as vanilla, peppermint, or even flavored liqueurs can elevate your truffles. You can use espresso for a mocha truffle or orange zest for a citrus note.
- Cocoa powder or nuts for coating: After shaping the truffles, rolling them in cocoa powder or crushed nuts provides texture and an appealing finish. Almonds, hazelnuts, or pistachios pair wonderfully with chocolate.
These key ingredients form the backbone of your chocolate truffles. Each plays a vital role, ensuring that your end product is not just visually appealing but also rich in flavor and mouthfeel. Opting for high-quality chocolate and fresh ingredients will always yield the best results, ensuring that your truffles are cherished by all who enjoy them.
How to Make
- Prepare the chocolate: Begin by finely chopping your chosen chocolate into small pieces. This will allow it to melt evenly when combined with the hot cream. Place the chopped chocolate in a medium-sized bowl and set it aside.
- Heat the cream: In a small saucepan, pour in the heavy cream and bring it to a gentle simmer over medium heat. You should be watching it closely, as you want it to be hot but not boiling. Once it has simmered, remove the saucepan from the heat.
- Combine chocolate and cream: Pour the hot cream over the chopped chocolate in the bowl. Allow it to sit for a few minutes. This step lets the heat from the cream melt the chocolate without having to stir vigorously, which could lead to a grainy texture.
- Add butter: Once the chocolate has melted, add in the unsalted butter. Stir gently until everything is perfectly combined and you have a smooth ganache. This mixture should be glossy and thick. If you’re adding flavorings, this is the moment to mix them in until evenly distributed.
- Chill the ganache: Cover the bowl with plastic wrap and place it in the refrigerator for about 1-2 hours, or until the ganache has set firm enough to scoop. The longer you leave it, the easier it will be to shape the truffles.
- Scoop and shape: Once the ganache has properly chilled, use a melon baller or small scoop to take out portions of the ganache. Roll them quickly into balls using your hands. It can be helpful to keep your hands slightly damp or dusted with cocoa powder to prevent sticking.
- Coat the truffles: Roll each formed truffle in your desired coating, whether that’s cocoa powder, crushed nuts, or shredded coconut. Make sure each truffle is evenly coated for that stunning finish!
- Chill again: After coating, place the truffles on a baking sheet lined with parchment paper and return them to the fridge for about 30 minutes to firm up before serving. This step ensures they hold their shape when enjoyed.
Following these steps ensures that you create truffles that are perfectly smooth on the outside and decadently creamy on the inside. Take your time with each step, as this recipe is as much about patience as it is about precision.
Variations & Substitutions
Spiced Chocolate Truffles: For a festive twist, consider adding spices like cinnamon or nutmeg to your ganache. These warm spices impart a cozy flavor that’s perfect for chilly days. Just a pinch of cardamom can take these truffles to exotic new heights. Ideal for spice lovers or those looking to experiment, you can adjust the spices to your liking. The warmth of the spices, paired with rich chocolate, creates a complex flavor profile in each bite.
Nutty Chocolate Truffles: Incorporating ground nuts such as almonds or hazelnuts into the ganache creates a delightful rustic truffle experience. These nuts provide crunch and depth, ensuring every bite is satisfying. You can also roll the finished truffles in chopped nuts for added texture. This variation appeals to those who enjoy a bit of crunch and the flavor that nuts bring. It’s a fantastic way to add some healthy fats, too!
Vegan Chocolate Truffles: To cater to vegan diets, swap the heavy cream with coconut cream and the butter with coconut oil. This combination not only maintains a rich texture but also brings a hint of tropical flavor. Flavored extracts and fruit purées can be added to enhance the taste. Perfect for plant-based eaters, these truffles maintain the same luxurious feel while adhering to dietary preferences.
Citrus Zest Truffles: Adding citrus zest such as lemon, orange, or lime can brighten up the deep chocolate flavor, giving you a refreshing contrast. This variation pairs beautifully with dark chocolate, offering a satisfying balance. It’s especially appealing for those who enjoy fruity flavors combined with chocolate. Just a teaspoon or two of zest can go a long way, transforming your simple truffles into a sophisticated dessert.
Each variation offers an exciting new way to enjoy Mother’s Day Chocolate Truffles, catering to various tastes and dietary needs. Feel free to explore and tailor the recipe based on what you or your loved ones enjoy!
Common Mistakes to Avoid
One of the most common issues faced when making chocolate truffles is overheating the chocolate. This often results in a grainy texture, which can be disappointing. To prevent this, always melt the chocolate gently, using a double boiler or by allowing hot cream to do the melting as described. Additionally, avoiding any contact with moisture is crucial; even a drop of water can seize the chocolate, ruining your ganache.
Another mistake is not allowing the ganache to set long enough. If you attempt to scoop it while it’s still too soft, you’ll find it nearly impossible to roll into perfect shapes. Patience is key; if the ganache is too gooey, simply let it chill longer in the refrigerator.
Lastly, be cautious with coating methods. Sometimes, people skip the coating step or don’t apply it evenly. A well-coated truffle not only looks appealing but adds texture to the overall experience. Ensure you roll the truffles in your chosen coating thoroughly to maximize flavor and presentation.
Understanding these pitfalls will help you create the rich, silky Chocolate Truffles you envision!
Storage, Freezing & Reheating Tips
To maximize the freshness of your Chocolate Truffles, store them in an airtight container in the refrigerator. They should last for about 1–2 weeks, although they are best enjoyed fresh. Ensure the container is not overcrowded, as this can cause the truffles to stick together or lose their shape.
If you want to extend their life, consider freezing your truffles. To do this, place them in a single layer on a baking sheet lined with parchment paper and freeze until firm. Once frozen, transfer them to a freezer-safe container or bag, where they can be kept for up to three months. When you’re ready to enjoy them, simply remove them from the freezer and let them thaw in the fridge before indulgence to restore their creamy texture.
Remember to avoid reheating truffles, as this will affect their quality. They are best served chilled or at room temperature. Following these storage methods ensures that your truffles retain their flavor and texture, making each bite as delightful as the first.
Frequently Asked Questions
Can I use milk chocolate instead of dark chocolate for truffles?
Absolutely! You can use milk chocolate, dark chocolate, or even white chocolate, depending on your flavor preference. Milk chocolate will yield a sweeter truffle, while dark chocolate offers a richer, more intense flavor. Experimenting with different chocolate types can lead to exciting taste combinations.
What can I use instead of heavy cream for a dairy-free option?
Coconut cream is an excellent substitute for heavy cream in chocolate truffles, especially if you prefer a vegan version. The creaminess of coconut complements the richness of the chocolate without compromising the texture. You can also consider nut milk for a lighter version but be aware that it may alter the truffle’s consistency.
How do I know when my truffles are properly set?
Your truffles are properly set when they are firm to the touch and hold their shape when rolled. If the ganache feels too soft after chilling, give it additional time in the refrigerator. It should feel slightly firm yet still pliable for easy rolling.
Can I add flavorings to my truffles?
Yes! Adding extracts like vanilla, mint, or orange zest can elevate the flavor profile of your truffles. Just make sure to balance the quantity so it doesn’t overpower the chocolate. Start with small amounts and adjust according to your taste.
Do I need to temper the chocolate for truffles?
No, tempering is not necessary for truffles as they are made with ganache and not meant to have a hard shell. Tempering is usually reserved for chocolate decorations or coatings for a shiny and crisp finish. Your truffles will still be delicious and creamy without this additional step.
Conclusion:
In summary, Mother’s Day Chocolate Truffles are a delightful way to celebrate the special women in your life. With their rich taste and velvety texture, these homemade confections offer both luxury and heartfelt sentiment. The good news is that they are easy to make and can be customized to fit everyone’s taste preferences. As you try out this recipe, feel free to make it your own by experimenting with various flavors and coatings. Don’t hesitate to involve family members in the process, as bonding in the kitchen creates treasured memories. Give these truffles a try, and share them with loved ones — you might just start a beloved tradition!


