Prep time: 15 minutes
Cook time: 10 minutes
Total time: 25 minutes
Servings: 12 sandwiches
Imagine warm, homemade cookies filled with smooth, creamy goodness, each bite melting in your mouth. If you’re searching for a delightful treat to satisfy a sweet tooth, look no further than Milk Cookies: Soft Milk Cookie Sandwiches. This recipe is not just a simple dessert; it’s a comforting throwback to childhood, where cookies were often the highlight of the day. You’ll learn how to make these tender sandwiches, perfect for celebrating special occasions, sharing with loved ones, or indulging during quiet evenings at home.
The beauty of these cookies lies not just in their taste but in their texture—a soft, pillowy experience that hugs the sweet filling. Each component, from the milky base of the cookie dough to the rich, velvety cream inside, works in perfect harmony. Whether you’re a busy parent juggling meal prep, a novice in the kitchen needing an easy-going recipe, or someone simply looking for budget-friendly desserts, this one fits perfectly into your lifestyle.
In this article, we will delve into the history of milk cookies, why they stand out in the vast landscape of desserts, the ingredients used, how to make them, potential variations, and even solutions to common baking pitfalls. Get ready for a whirlwind baking adventure that will leave your kitchen smelling heavenly!
What Is Milk Cookies: Soft Milk Cookie Sandwiches?
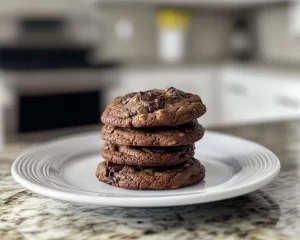
Milk Cookies: Soft Milk Cookie Sandwiches have their origin rooted in nostalgic baking traditions. A harmonious blend of soft cookies crafted with rich milk and a creamy filling, this dessert offers a balance of flavors that resonate with both young and old. The cookies themselves are generally made with simple ingredients like flour, sugar, butter, and, most importantly, milk—hence their name. This gives them a distinctive, moist texture that sets them apart from other cookies.
The most appealing aspect of this cookie sandwich is its dual nature. The outer cookies are gently sweet, with a melt-in-your-mouth quality, while the filling provides a contrasting texture. It can range from creamy frosting to velvety ganache, depending on your choice. As you bite into one, the soft cookie gives way, revealing an explosion of flavor that captures the palate. The combination of flavors—from the smooth creaminess of milk to the subtle sweetness of sugar—creates a delightful experience with every bite.
These cookie sandwiches invite creativity, accommodating various fillings and textures. You can easily customize them to suit your tastes, making them suitable for any occasion—be it a birthday celebration, a family gathering, or just a cozy night in.
Why You’ll Love This
You will fall in love with Milk Cookies: Soft Milk Cookie Sandwiches for many reasons. Firstly, they are incredibly **easy to make**. Whether you’re a baking novice or an experienced home cook, you will appreciate the straightforward steps involved. With simple ingredients found in your pantry, you can whip up this delightful treat quickly, making them the perfect solution for last-minute gatherings or cravings.
Another compelling factor is **cost-effectiveness**. These cookies utilize readily available ingredients like flour, sugar, and plug in some nutrients with the addition of milk. Additionally, they can be made in large batches, perfect for meal prep or involving the kids in the kitchen.
Moreover, the **versatility** of these cookie sandwiches cannot be overstated. You can experiment with different fillings to make them vegan, gluten-free, or even sugar-free. For added flair, consider incorporating flavors like vanilla, almond, or cocoa powder to enhance the cookies or filling further.
Lastly, let’s talk about taste! You are in for an unforgettable flavor journey that balances sweetness and creaminess perfectly. The comforting aroma wafting through your kitchen will have everyone begging for a taste before they even cool off, while their soft texture will leave a lasting impression.
Ingredients You’ll Need
For your delicious Milk Cookies: Soft Milk Cookie Sandwiches, gather the following ingredients:
- 2 ½ cups all-purpose flour: This is the foundation of the cookie, providing structure. You can substitute with gluten-free flour for a gluten-free option.
- 1 teaspoon baking powder: This will help the cookies rise, giving them that soft, pillowy texture.
- 1 teaspoon baking soda: This is essential for a perfect cookie texture, ensuring your cookies are not too dense.
- ½ teaspoon salt: A pinch of salt balances the sweetness and enhances flavors.
- 1 cup unsalted butter, softened: Butter adds richness and creates the desired softness in your cookies. Margarine can be used as a substitute if necessary.
- 1 cup granulated sugar: This adds sweetness and crispness to the edges of your cookies.
- 1 cup brown sugar, packed: This gives depth of flavor and moisture to the cookies.
- 2 large eggs: Eggs bind the ingredients together and add to the texture.
- 2 teaspoons vanilla extract: This elevates the flavor profile, adding a warm, fragrant note to the cookies.
- ¾ cup milk: The star of your cookies! This not only adds moisture but enhances the overall flavor.
- 1 cup heavy cream: For the filling. It can be whipped or mixed with flavorings of your choice.
- Powdered sugar, to taste: This fluffy sweet powder can be used to sweeten your filling.
Each ingredient plays a crucial role in ensuring the success of your Milk Cookies. Either stick closely to the recipe or feel free to be adventurous with your select substitutes to achieve different flavors and textures according to your dietary needs or personal preference.
How to Make
Follow these simple steps to create your Milk Cookies: Soft Milk Cookie Sandwiches.
- Preheat your oven: Before you begin mixing your ingredients, preheat your oven to 350°F (175°C). This ensures that your cookies bake evenly from the moment they hit the oven, becoming perfectly golden brown and just the right texture.
- Mix the dry ingredients: In a medium bowl, whisk together the all-purpose flour, baking powder, baking soda, and salt until well combined. This step is vital in making sure that your leavening agents are evenly distributed, ensuring every cookie rises perfectly.
- Cream the butter and sugars: In a large bowl, use a hand mixer or stand mixer to cream the softened butter, granulated sugar, and brown sugar together on medium speed until the mixture is light and fluffy. This usually takes around 3-5 minutes. Properly creaming your butter and sugars will create air pockets that result in a light and tender cookie.
- Add the eggs and vanilla: Beat in the eggs, one at a time, ensuring each one is fully incorporated before adding the next. Stir in the vanilla extract, giving your cookie dough a deliciously sweet aroma. The eggs will help create the desired texture, adding structure and moisture.
- Combine wet and dry ingredients: Gradually mix in the flour mixture to the butter and sugar mixture, alternating with the milk. Start and end with the dry ingredients to prevent overmixing. This step is crucial as it creates your cookie dough—mix until just combined to maintain the soft texture.
- Chill the dough: After mixing, cover the dough with plastic wrap and let it chill in the refrigerator for at least 30 minutes. Chilling the dough helps prevent the cookies from spreading too much and enhances the flavors.
- Shape and bake: Using a cookie scoop or a spoon, drop rounded tablespoons of dough onto a parchment-lined baking sheet, leaving enough space between each cookie to allow for spreading. Bake in the preheated oven for about 10-12 minutes or until the edges are golden but the centers still look soft. Remove from the oven and let them cool on the baking sheet for a few minutes before transferring them to a wire rack to cool completely.
- Prepare the filling: While the cookies cool, whip your heavy cream in a mixing bowl until soft peaks form. Gradually add powdered sugar to taste, mixing until you achieve a smooth and creamy filling. Feel free to add flavorings such as vanilla or cocoa powder to customize to your liking.
- Assemble the sandwiches: Once the cookies are completely cool, take one cookie and spread a generous amount of the whipped filling on the bottom side. Top with another cookie, pressing gently to create a sandwich. Continue with the remaining cookies and filling until they are all assembled.
- Enjoy: Your Milk Cookies: Soft Milk Cookie Sandwiches are ready to be devoured! Serve them fresh, or store them in an airtight container for up to a week for a delightful treat whenever the craving hits.
Your homemade cookie sandwiches will be a hit among family and friends! The experience of creating them, smelling them bake, and ultimately devouring them is an enriching journey that everyone should embark upon.
Variations & Substitutions
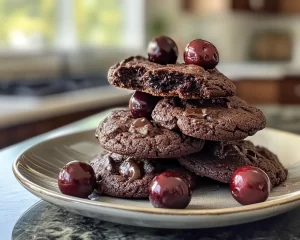
Chocolate Milk Cookies: If you’re a chocolate lover, you can easily switch to cocoa powder! Substitute half a cup of flour with cocoa powder for a rich chocolate flavor. This version will deliver a delightful change, perfect for those who crave that chocolatey goodness. You can also fill them with chocolate ganache or almond cream for a decadent treat.
Nut-Free Option: If allergies are a concern, you can easily eliminate any nut-based ingredients by ensuring your butter and cream are free of cross-contamination. Don’t forget to check your food labels! This variation will make these Milk Cookies accessible for those with nut allergies without losing any of their deliciousness.
Vegan Version: To make these cookies vegan, replace the eggs with flaxseed meal (1 tablespoon of flaxseed meal mixed with 2.5 tablespoons of water equals one egg), use dairy-free butter, and swap heavy cream for coconut whipped cream. You can enjoy all the wonderful flavors without the use of animal products!
Gluten-Free Cookies: Switching to a gluten-free all-purpose flour blend facilitates enjoying these cookies for those avoiding gluten. Look for a blend that contains xanthan gum as a binding element. This slight change will help maintain the soft, chewy texture of the cookies.
Filled with Fruit Preserves: Instead of the traditional creamy filling, consider using fruit preserves or jam for a fruity twist. Raspberry or strawberry preserves can offer a refreshing taste that contrasts perfectly with the sweetness of the cookies. Plus, this option adds an extra fruity punch that can be delightful during warmer months.
Common Mistakes to Avoid
When making Milk Cookies: Soft Milk Cookie Sandwiches, even experienced bakers can encounter issues. One common mistake is not allowing the dough to chill long enough. If the dough is too warm when it goes into the oven, your cookies may spread too thin, ruining their soft texture. Always ensure you’ve chilled the dough for at least 30 minutes!
Another critical cooking warning is **overmixing** the dough. When you add the flour, mix it just until combined. Overmixing activates gluten, resulting in denser, tougher cookies rather than the desired soft texture.
Lastly, make sure your oven temperature is calibrated correctly. An oven that is too hot can lead to cookies that are overly browned or even burned on the edges while remaining raw in the center. Using an oven thermometer can help ensure accurate baking temperatures.
Storage, Freezing & Reheating Tips
Proper storage is essential for maintaining the freshness of your Milk Cookies: Soft Milk Cookie Sandwiches.
For short-term storage, keep them in an airtight container at room temperature. They will typically last for about a week. To keep them soft and prevent them from becoming stale, you can include a slice of bread in the container—this will help keep the cookies moist.
If you’d like to prepare them ahead, freezing is an excellent option! You can freeze the cookie dough before baking or freeze the assembled sandwiches. To freeze the dough, scoop out balls of dough and place them on a parchment-lined baking sheet. Once frozen, transfer them to a zip-top freezer bag for up to 3 months. When you’re ready to bake, simply adjust the baking time by a few minutes.
If you prefer to freeze the assembled cookies, wrap each sandwich individually in plastic wrap or aluminum foil before placing them in freezer-safe containers. Thaw them in the refrigerator or at room temperature before enjoying.
For reheating, simply place the sandwiches in the microwave for 10-15 seconds to soften them up again. But beware—overheating can lead to a melty mess, so keep an eye on them!
Frequently Asked Questions
Can I use margarine instead of butter?
Yes, you can substitute margarine for butter, but keep in mind that this may alter the flavor of your cookies. Choosing a reputable brand ensures a similar creamy consistency, keeping your Milk Cookies delicious.
Can I substitute milk for a non-dairy alternative?
Absolutely! Non-dairy milk like almond milk, soy milk, or oat milk works well in this recipe. Just note that some non-dairy options may add a slight flavor, so select one you enjoy.
What can I do with leftover filling?
If you have leftover filling, it can be used as a dip for fruits or spread on toast or pancakes. Being creative with your extras means nothing goes to waste!
How can I thicken my filling?
If you find your filling is too runny, adding more powdered sugar will help thicken it. You can also chill it for a short time or consider adding a bit of cornstarch to the mixture to achieve the desired consistency.
Can I make these cookies ahead of time?
Definitely! You can make the cookie dough in advance and store it in the refrigerator for up to 3 days or in the freezer for up to 3 months. Assemble the cookies when you are ready to serve for maximum freshness.
Conclusion:
Making Milk Cookies: Soft Milk Cookie Sandwiches is not just about baking; it’s about creating memories. With their delightful texture and customizable fillings, these cookies can be modified to fit any flavor profile or dietary requirement, ensuring that everyone gets to enjoy them. Whether you’re hosting a gathering, prepping for the week ahead, or simply treating yourself, these cookies are an excellent choice. We encourage you to roll up your sleeves, get creative, and try this amazing recipe! Don’t forget to share your baking experience and final creations with others, because who wouldn’t want to share the joy of such delicious treats? Happy baking!