### Prep time: 30 minutes
### Cook time: 10 minutes
### Total time: 40 minutes
### Servings: 24 cookies
There’s something undeniably magical about the holiday season, especially when it comes to baking. As the weather outside turns chilly and the festive spirit fills the air, Melted Snowman Cookies emerge as the perfect sweet treat to bring joy and laughter to your gatherings. These delightful cookies not only embody the whimsy of the winter season, but they also serve as a creative canvas for both kids and adults to express their inner artist.
Imagine a soft, chewy cookie topped with a smooth layer of royal icing, adorned with candy decorations that create charming, melted snowmen. They are fun to make, and everyone, from busy parents to beginner bakers, can partake in the process. In this article, you’ll learn everything you need to know about making these festive cookies, including tips for success, variations, and ways to avoid common mistakes. So, roll up your sleeves and get ready to whip up a batch of these adorable treats that are sure to steal the show at any holiday gathering!
What Are Melted Snowman Cookies?
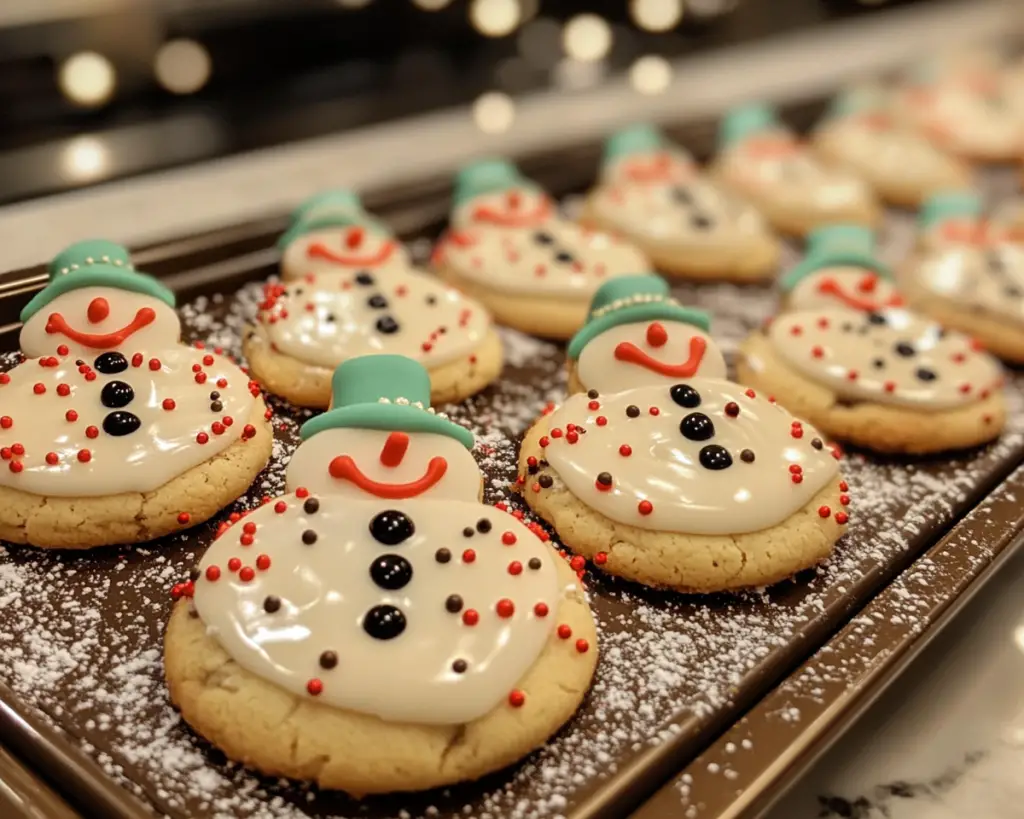
Melted Snowman Cookies are whimsical holiday treats that combine soft, chewy cookies with royal icing to create a fun and festive look of melting snowmen. These cookies have a rich buttery flavor, soft texture, and are often made from a comforting sugar cookie or gingerbread base, which compliments the sweetness of the icing. The creativity involved in decorating these cookies makes them a beloved project during the winter months, particularly around the holidays.
The original concept of melted snowman cookies likely stemmed from the desire to celebrate the joy of winter while incorporating the fun of baking. By utilizing simple, often-store-bought ingredients—like cookie dough and icing—this treat allows for customizable decorations that can suit all taste preferences. The playful decorations lead to delightful conversations among friends and family, making them not just a dessert but an activity that brings everyone together.
The beauty of these cookies lies in their adaptability; you can choose to feature cute little snowmen adorned with classic accessories like a scarf and buttons, or go wild with your creativity using a variety of candy additions. The result is a melt-in-your-mouth cookie that captures the holiday spirit perfectly, combining fun, flavor, and a touch of nostalgia.
Why You’ll Love These Melted Snowman Cookies
There are plenty of reasons why Melted Snowman Cookies will soon become your go-to holiday treat! Here’s what makes them so special:
– **Taste**: The combination of soft, buttery cookies with the sweetness of royal icing creates a lovely flavor profile that will delight the palate. Each bite is rich and satisfying without being overly sweet.
– **Ease of Preparation**: This cookie recipe is simple enough for kids to join in on the fun, making it a wonderful family baking project. Even beginner bakers can successfully pull these cookies off with minimal fuss.
– **Versatility**: Melted Snowman Cookies can be made with different cookie bases, such as sugar cookie, gingerbread, or even chocolate. You can also get creative with the icing and toppings, using whatever candies you have on hand or your favorite sprinkle combinations.
– **Fun for Everyone**: Not only are these cookies scrumptious, but decorating them can be a creative outlet for all ages. You can unleash your artistic side with different designs and decorations, making every cookie uniquely yours.
– **Perfect for Gifting**: Pack them up in cute holiday boxes or tins, making them an adorable gift for neighbors, teachers, or friends. Who wouldn’t love receiving a batch of melted snowmen to brighten their day?
However, like any popular recipe, there can be misconceptions. Some people might think that cookie decorating is too tricky or time-consuming, but I’m here to say that with just a bit of patience and practice, you can create stunning and mouthwatering masterpieces!
Ingredients You’ll Need
To make these Melted Snowman Cookies, here’s a list of what you’ll require, along with explanations for each ingredient and potential substitutions to suit your dietary needs:
– **2 ½ cups all-purpose flour**: This is the primary structure of the cookie. You can substitute with gluten-free flour blends if needed, but ensure it contains a binding agent like xanthan gum.
– **1 tsp baking powder**: This ingredient helps the cookies rise and attain a light and fluffy texture.
– **1 cup unsalted butter (softened)**: The fat in butter adds moisture and flavor to cookies. For a dairy-free version, you could utilize coconut oil or vegan butter.
– **1 cup granulated sugar**: Provides sweetness and contributes to the cookie’s chewy texture.
– **1 large egg**: Binds the ingredients together. You can replace this with ¼ cup of unsweetened applesauce or a flax egg (1 tablespoon of ground flaxseed mixed with 2.5 tablespoons of water) for a vegan option.
– **1 tsp vanilla extract**: Enhances the overall flavor of the cookies. Feel free to swap it for almond extract for a different flavor profile!
– **Royal icing**: You’ll need powdered sugar, meringue powder, and water to create royal icing, which hardens beautifully and allows for piping snowmen designs.
– **Candy decorations**: Use mini chocolate chips, orange candy or fondant for noses, pretzel pieces for arms, and colorful sprinkles for scarves.
How to Make Melted Snowman Cookies
Now that you’ve gathered your ingredients, let’s dive into the simple step-by-step process of making your delicious Melted Snowman Cookies:
1. **Prepare the Cookie Dough**: In a mixing bowl, combine the flour and baking powder. In another bowl, cream together the softened butter and granulated sugar until light and fluffy, about 2-3 minutes. Add in the egg and vanilla extract, mixing until fully incorporated. Gradually add the flour mixture to the wet ingredients, mixing until just combined. Avoid overmixing, as it can lead to tough cookies.
2. **Chill the Dough**: Form the dough into a ball and wrap it in plastic wrap. Chill in the refrigerator for about 30 minutes. Chilling helps control spread and ensures your cookies will maintain their shape while baking.
3. **Preheat the Oven**: While the dough chills, preheat your oven to 350°F (175°C) and line a baking sheet with parchment paper for easy cookie removal.
4. **Roll and Shape the Cookies**: Take the chilled dough and roll it into 1.5-inch balls. Place them spaced out on the prepared baking sheet, about 2 inches apart, as they will spread while baking. Gently press each ball to flatten slightly, giving them a more cookie-like shape.
5. **Bake the Cookies**: Bake in the preheated oven for about 8–10 minutes or until the edges are lightly golden. Be cautious not to overbake; they will continue to firm up once removed from the oven. Let them cool on the baking sheet for a few minutes before transferring them to a wire rack to cool completely.
6. **Prepare the Royal Icing**: While the cookies cool, start making your royal icing. In a mixing bowl, combine 4 cups of powdered sugar with 3 tablespoons of meringue powder and about 5 tablespoons of water. Beat on medium speed until it reaches a thick yet spreadable consistency. You can adjust the water content for a thinner icing if needed.
7. **Decorate the Cookies**: Once the cookies are completely cooled, it’s time to get creative! Spread a generous layer of royal icing on each cookie, allowing it to drape over the edges to create the “melted” effect. While the icing is still wet, place your decorations—mini chocolate chips for eyes, orange candies for noses, pretzel arms, and sprinkles for scarves. Use your imagination to create unique snowmen designs!
8. **Let Icing Set**: Allow the decorated cookies to sit at room temperature until the royal icing hardens completely. This can take anywhere from a couple of hours to overnight, depending on humidity levels.
5 Variations & Substitutions
There are countless ways to make these cookies uniquely yours. Here are five variations and substitutions you can try:
1. **Gingerbread Base**: Swap out the sugar cookie dough for gingerbread dough to add a delightful spice and warmth to your cookies. Top the gingerbread with the same royal icing and decorations, and you’ll have a holiday classic with a twist.
2. **Chocolate Melted Snowman Cookies**: Substitute half of the all-purpose flour with unsweetened cocoa powder to create a rich chocolate cookie base. Pair this with white chocolate royal icing for an indulgent treat that will satisfy any chocolate lover.
3. **Vegan Option**: Replace the butter with vegan butter and substitute the egg with applesauce or a flax egg as previously mentioned. Using a plant-based meringue powder can also ensure the icing is vegan-friendly.
4. **Nut-Free Version**: To eliminate any allergy concerns, ensure that any chocolate or candy decorations are nut-free. Additionally, use a nut-free flour blend for the cookie base.
5. **Use of Edible Glitter or Shimmer Dust**: For a sparkly festive touch, drizzle some edible glitter or shimmer dust over the royal icing before it sets. This will create a magical “snow” effect that elevates the visual appeal of your melted snowmen.
Common Mistakes to Avoid
Even the most seasoned baker can make mistakes, so here are a few common pitfalls to look out for when making Melted Snowman Cookies:
– **Overworking the Dough**: When mixing together your cookie dough, it’s essential to avoid overmixing. This can lead to tough cookies rather than the soft and chewy texture you desire. Do just until combined and no longer.
– **Using Warm Ingredients**: Ensure that the butter is softened, not melted. Using melted butter can change the texture of your cookies, making them overly greasy. Stick with softened for the best results.
– **Not Chilling the Dough**: Skipping the chilling step can lead to overly spread cookies. Chilling firms up the dough, helping it to maintain its shape during baking. If you’re in a hurry, about 15–20 minutes in the freezer can work too.
– **Not Letting Cookies Cool Completely**: If you attempt to decorate your cookies while they are still warm, the royal icing will melt instead of creating the desired aesthetic. Make sure your cookies are cool to the touch before applying icing.
– **Ignoring Icing Consistency**: Achieving the right consistency for royal icing is crucial. It should be thick enough to coat the cookies without dripping off too quickly but thin enough to spread smoothly. Practice with small batches until you find your perfect balance.
Storage, Freezing & Reheating Tips
To enjoy your Melted Snowman Cookies even after the holiday season, proper storage techniques are essential:
– **Storing Cookies**: Store them in an airtight container at room temperature for up to one week. Make sure to separate layers of iced cookies with parchment paper to avoid any sticking.
– **Freezing Unbaked Dough**: If you’ve made a batch of dough and want to bake them later, you can freeze the cookie dough. Simply wrap individual cookie dough balls in plastic wrap and then place them in a freezer bag. When you’re ready to bake, just add an extra minute or two to the baking time when placing them directly from the freezer to the oven.
– **Freezing Decorated Cookies**: While the royal icing can potentially freeze, it’s best to consume decorated cookies fresh. However, if you must freeze them, place them in a single layer in an airtight container lined with parchment paper. Allow time for thawing at room temperature.
– **Reheating**: If you’d like to soften a cookie that has become a little hard, you can quickly pop it in the microwave for about 5-10 seconds. This will help restore a bit of that fresh-baked gooeyness.
Frequently Asked Questions
1. **Can I use store-bought cookie dough for this recipe?**
Absolutely! Using store-bought cookie dough can save time, especially during the busy holiday season. Just be sure to follow cooking instructions based on the thickness of your cookie shapes, as they may vary.
2. **How can I make royal icing without meringue powder?**
If you don’t have meringue powder, you can make royal icing using egg whites instead. For every cup of powdered sugar, use two egg whites. Ensure that the egg whites are pasteurized for safety, especially if serving to children.
3. **What if I can’t find certain decorations?**
Get creative! Use alternative candies that you have at home, such as mini marshmallows, gummy candies, or licorice for scarves. Be imaginative in your design; your melted snowmen will still look adorable!
4. **Can I make these cookies gluten-free?**
Yes! Use a gluten-free flour blend that contains xantham gum to help replicate the structure and texture of regular all-purpose flour. Complete the recipe as specified, and you’ll achieve gluten-free Melted Snowman Cookies.
5. **How long does it take for the royal icing to dry?**
Royal icing can take anywhere from a couple of hours to overnight to dry completely, depending on the thickness of the layer applied. For even quicker results, keep your cookies in a cool, dry place, away from humidity.
In conclusion, Melted Snowman Cookies are a sweet celebration of the winter season that delight both the eyes and the taste buds. This whimsical treat can become a cherished family tradition, bridging generations through laughter and creativity. The ability to customize the flavor and decorations allows everyone to engage in the fun, making these cookies not only delicious but also a source of happy memories.
So next time you’re looking for a fun activity during the holiday season or want to impress guests at a winter gathering, gather your ingredients and give these Melted Snowman Cookies a try. You won’t just be baking cookies; you’ll be crafting smiles! Happy baking!


