Prep time: 15 minutes
Cook time: 1 hour 15 minutes
Total time: 1 hour 30 minutes
Servings: 4
Imagine walking into your home and being enveloped by the irresistible aroma of perfectly roasted chicken, accompanied by hints of garlic and fresh herbs. There’s something incredibly comforting and satisfying about a rotisserie chicken that transcends mere flavor. It’s not just a meal; it’s a nostalgic experience that evokes family gatherings, Sunday dinners, and cozy weeknight meals.
This recipe for I’M Officially Addicted To This Perfect Rotisserie Chicken! is everything you’ve dreamed of and more. You’ll learn how to prepare a juicy, tender chicken with golden, crispy skin that rivals what you find at your local grocery store or deli. Whether you’re busy juggling work and kids or looking for a delicious meal prep option, this recipe is designed for you.
As you dive into this culinary journey, you’ll discover the simplicity of preparing rotisserie chicken at home, the freedom of customizing flavors, and the joy of enjoying wholesome food without spending hours in the kitchen.
What Is I’M Officially Addicted To This Perfect Rotisserie Chicken!?
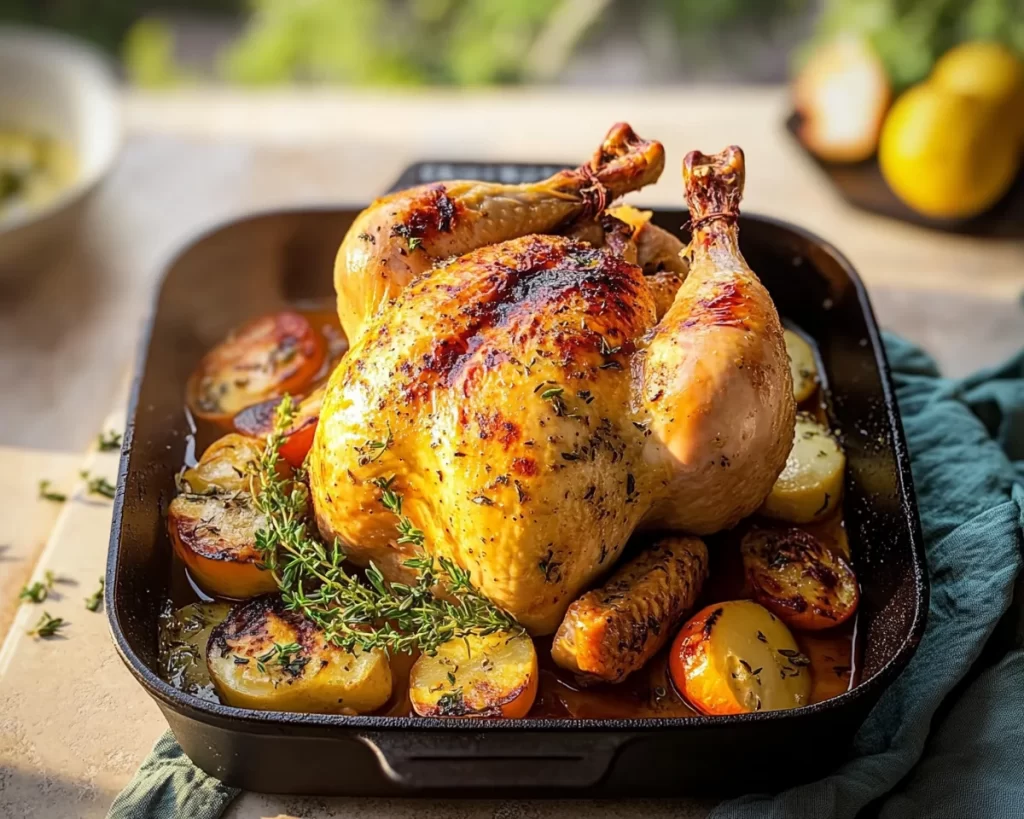
I’M Officially Addicted To This Perfect Rotisserie Chicken! is a savory, succulent dish featuring a whole chicken seasoned to perfection and roasted until the skin is crispy and golden brown. This style of cooking originates from methods used by street vendors and local markets, where chickens are often spiced and slowly roasted on a spit. The result is a tender, juicy interior coupled with a delightful crunch on the outside.
The *beauty* of this recipe lies not only in its flavor but also in its simplicity. You’ll find that the key ingredients are things you may already have on hand – herbs, spices, and a touch of lemon to brighten the profile of the chicken. Each bite offers a medley of textures and flavors that awaken your taste buds. The aroma, as it fills your kitchen, will make it hard for you to wait until the chicken is ready.
Beyond being a delicious choice for a home-cooked meal, this dish becomes a versatile component in your weekly menu. Whether eaten straight from the oven, shredded for salads, or served alongside starches and vegetables, rotisserie chicken can adapt to various dishes and cuisines, making it a staple for guilt-free indulgence.
Why You’ll Love This
There are countless reasons to adore this Perfect Rotisserie Chicken! First and foremost, the taste is *outstanding*. With an explosion of flavor from the carefully selected spices and herbs, this dish will quickly go from a recipe you tried to one you’ll crave regularly.
The ease of preparation is another major draw. In a world where we are sometimes short on time, this recipe allows you to have a delightful home-cooked meal ready in just over an hour, without spending the entire day in the kitchen. All you’ll need is a little bit of *prepping* and a pinch of patience as the chicken roasts to perfection.
Also, this recipe is cost-effective. Purchasing a whole chicken is often less expensive than buying individual cuts, and it’s a great way to feed a family on a budget. With the flavors and satisfaction it provides, it’s hard to believe you can serve a dish that tastes so *decadent* without breaking the bank.
Additionally, there’s a growing trend towards healthier eating, and this recipe embraces that. By roasting your chicken with minimal added fats and preservatives, you can control what goes into your meal. This rotisserie chicken is not only full of flavor but also a healthy choice for those looking to maintain a balanced diet.
Ingredients You’ll Need
- 1 whole chicken (about 4–5 pounds) – The star of the dish; ensures juiciness and flavor.
- 2 tablespoons olive oil – Adds moisture and helps the skin become crispy.
- 2 teaspoons kosher salt – Enhances flavor; you can reduce if watching sodium intake.
- 1 teaspoon black pepper – Adds a bit of heat and depth.
- 1 teaspoon garlic powder – Infuses a savory essence; fresh garlic can be used as well.
- 1 teaspoon onion powder – Complements the flavors with a sweet note.
- 1 tablespoon paprika – Gives a beautiful color and smoky flavor.
- 1 lemon – Adds acidity; cut in half for aromatics and flavor.
- 1 teaspoon dried thyme or rosemary – For an herbal note; can also use fresh herbs.
- Optional vegetables (carrots, onions, potatoes) – Can be roasted in the same dish to absorb flavors.
Each ingredient in this dish plays a *critical role*. The whole chicken serves as the base, with its skin trapping moisture and flavor as it cooks. Olive oil works as a wonderful carrier for spices and aids in crisping. The seasoning mix – including salt, black pepper, garlic powder, onion powder, and paprika – will provide a robust flavor profile that complements the natural deliciousness of the chicken.
If you’re looking for substitutions, skin-on boneless chicken breasts or thighs can work in a pinch, but the cooking method will need to be adjusted accordingly. You can also explore *herb variations*, using fresh parsley or dill for a unique twist on flavor.
How to Make
1. **Prepare the Chicken**: Start by preheating your oven to 425°F (220°C). Remove the chicken from its packaging, and use paper towels to pat it dry. Removing excess moisture will help with achieving a crispy skin. Once dried, place the chicken in a roasting pan or a cast-iron skillet.
2. **Season Generously**: Drizzle the olive oil all over the chicken, ensuring to cover every inch. Sprinkle the kosher salt, black pepper, garlic powder, onion powder, paprika, and dried herbs evenly on the skin and inside the cavity. For an added layer of flavor, squeeze the juice from half of the lemon inside.
3. **Add Aromatics**: Place the squeezed lemon halves inside the cavity of the chicken. These will not only impart a refreshing citrus flavor but also keep the chicken moist during roasting. If you’re using any additional vegetables, place them around the chicken in the roasting pan.
4. **Roast in the Oven**: Insert the pan into the preheated oven, and roast the chicken for about 1 hour and 15 minutes, or until an internal thermometer reads 165°F (74°C) at the thickest part of the breast. The cooking time may vary based on the size of the chicken, so keep an eye on it for perfect timing.
5. **Rest and Serve**: Once cooked, remove the chicken from the oven and allow it to rest for at least 10-15 minutes. This allows the juices to redistribute for maximum juiciness. Carve the chicken and serve, ensuring to catch any juices that collect in the pan for basting.
6. **Enjoy the Leftovers**: If you have leftovers, consider shredding the chicken to use in salads, sandwiches, or wraps throughout the week. It can be stored in the fridge for up to four days, making it a fantastic option for meal prep.
Variations & Substitutions
Herb-Infused Variation: For a twist on the traditional flavor, consider using fresh herbs like rosemary, thyme, or parsley. Instead of dried, use a handful of chopped fresh herbs mixed into the oil before rubbing it onto the chicken. The fresh herbs will give the chicken a vibrant flavor profile, particularly if they are in season, and also an aromatic fragrance as it roasts.
Spicy Variation: If you enjoy a bit of heat, this variation is for you. Add cayenne pepper or chili powder to your seasoning mix for a spicy kick. You may adjust the level of spice according to your preference. Serve the chicken with a side of cool ranch salad or avocado for balance.
Honey-Lemon Glaze Variation: For a sweet and tangy twist, create a honey-lemon glaze. Mix honey with olive oil and lemon juice, brushing it generously onto the chicken during the last 20 minutes of cooking. This will create a caramelized, shiny finish on the outside while the inside remains juicy and flavorful.
Asian-Inspired Variation: Think soy sauce, ginger, and sesame oil. Marinate the chicken in a blend of these ingredients, along with garlic and scallions, for at least 30 minutes before roasting. This variation leans towards an aromatic and savory dish, perfect when paired with Asian-style vegetables or rice.
Common Mistakes to Avoid
One of the most common mistakes is not allowing the chicken to rest after cooking. This critical step ensures the juices redistribute, leading to a drier piece of meat if skipped. Always allow your chicken to sit for at least 10–15 minutes after removing it from the oven.
Another mistake is overcrowding the roasting pan. If you add too many vegetables or use a pan that’s too small, the chicken will steam rather than roast properly. Ensure there is adequate space for *air circulation*.
A third pitfall is failing to season the chicken well. Don’t be stingy with your chosen spices; they need to penetrate the skin for ultimate flavor. Remember, seasoning isn’t just for the outside; be sure to apply it generously inside the cavity as well.
Storage, Freezing & Reheating Tips
When storing leftover rotisserie chicken, allow it to cool completely before wrapping it tightly in plastic wrap or aluminum foil. Alternatively, you can use airtight containers for better preservation. Properly stored, it will last in the refrigerator for up to four days.
If you wish to extend its shelf life, consider freezing the chicken. Place it in a heavy-duty freezer bag, squeezing out as much air as possible to prevent freezer burn. When properly sealed, cooked chicken can last for up to four months in the freezer.
When reheating, avoid high temperatures that will dry out the meat. Instead, gently reheat the chicken in the oven at a low temperature (around 350°F or 175°C) covered with foil to retain moisture. Alternatively, microwave it in short intervals, without a cover, until warmed through.
Frequently Asked Questions
Can I use a frozen chicken for this recipe?
While it is highly recommended to use a thawed chicken for the best results, you can cook a frozen chicken in a pinch. However, ensure to adjust your cooking time significantly, potentially doubling it. The chicken should reach an internal temperature of 165°F (74°C) to be considered safe.
What should I serve with my rotisserie chicken?
You have lots of options! Pair it with roasted vegetables, a fresh salad, or mashed potatoes to round out your meal. Additionally, whole grains such as quinoa or brown rice complement the chicken beautifully, providing a satisfying and balanced plate.
How do I know when the chicken is done cooking?
To ensure the chicken is thoroughly cooked, invest in a meat thermometer. Insert it into the thickest part of the breast without touching the bone. The safe internal temperature for chicken is 165°F (74°C).
Can I make this recipe in a slow cooker?
Yes, you can absolutely use a slow cooker! Season the chicken as you would for roasting, then cook on low for 6-8 hours or high for 4-5 hours until the meat is tender and reaches the safe internal temperature.
Is it safe to eat the skin of rotisserie chicken?
While many people enjoy the crispy skin, it’s generally higher in fat and calories. If you’re following a specific dietary plan, feel free to skip the skin, but remember that it contributes significantly to the flavor and overall appeal of the dish.
Conclusion:
This Perfect Rotisserie Chicken is not just a delight to your taste buds, but also an easy and adaptable option for any home cook, whether you’re seasoned in the kitchen or just starting out. With its crispy exterior and juicy meat, it stands as a testament to the beauty of home-cooked, wholesome meals. I encourage you to try this recipe, customize it to suit your preferences, and perhaps even share it with someone who might need a comforting meal. Cooking should always be an enjoyable experience, so don’t hesitate to experiment with flavors until you find your personal favorite!


