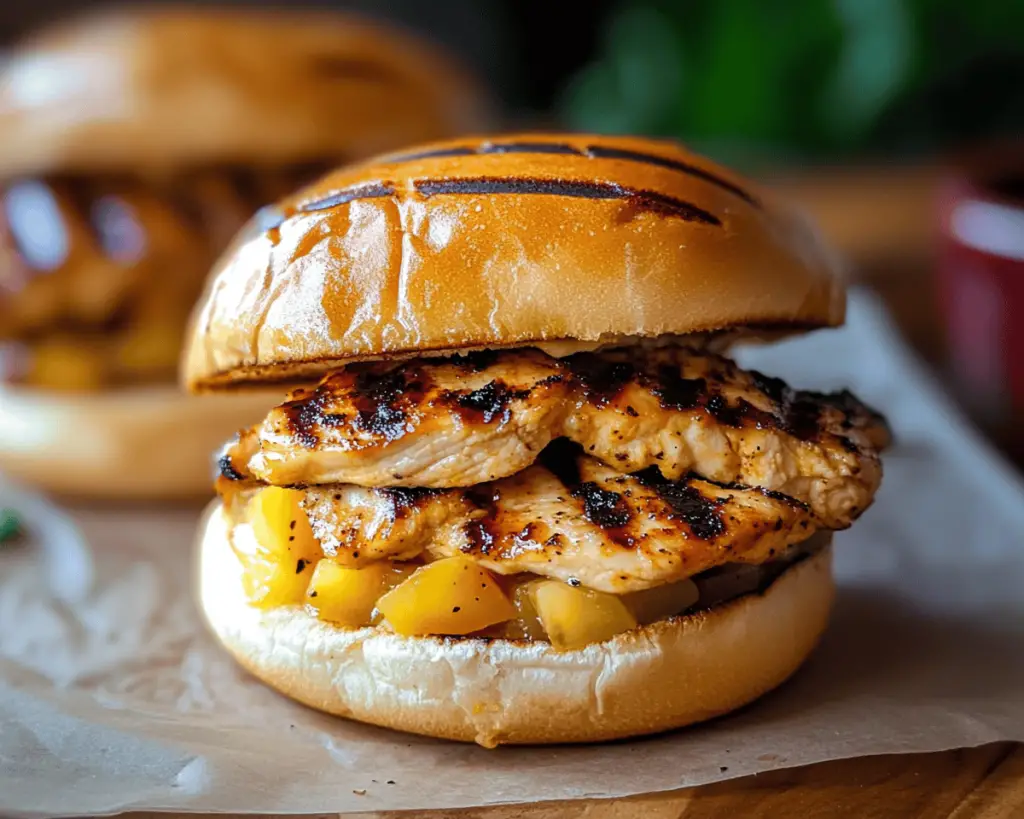
I remember the first time I had a Grilled Hawaiian Chicken Sandwich. It was one of those sunny Saturday afternoons, the kind where the aroma of grilling meat wafts through the neighborhood and pulls everyone outdoors. I was at a friend’s backyard BBQ, and while the burgers were great, that sandwich caught my eye and stole my heart. Juicy, marinated chicken, slathered with BBQ sauce, and topped with sweet, caramelized pineapple—it was a flavor explosion in every bite. It was love at first bite, and I knew I had to recreate that magic in my own kitchen.
Over the years, I’ve tweaked the recipe here and there, adding my flair, which I’m eager to share with you. This Grilled Hawaiian Chicken Sandwich brings back that memory every time I prepare it. It’s more than just a meal; it’s a nostalgic trip to summers filled with laughter, family, and long days spent on the grill. I swear, there’s something about the combination of flavors that feels like a warm embrace from the tropics, right in the comfort of your own home.
Since it’s a bit outside the box, I know you might have some reservations about putting pineapple on a sandwich. But trust me, it’s the perfect sweet counterpart to the savory grilled chicken! You know what I mean? The juicy pineapple, with its hint of tropical sweetness, makes every bite feel special. Let’s dive into this recipe and make some magic happen together.
What Goes Into Grilled Hawaiian Chicken Sandwiches?
Let’s break down the ingredients because each one plays a vital role in this symphony of flavors. Here’s what you’ll need:
Boneless Chicken Breasts: These are your stars! Choose better-quality chicken for maximum juiciness. I always suggest organic, free-range chicken if it’s within your budget—trust me, the flavor is richer, and it just feels better. Honestly, who wants to chew on rubbery chicken?
Pineapple Slices: Fresh pineapple is your best bet here, but if fresh isn’t available, canned works too. Just make sure to pat them dry! There’s something about the grilled pineapple that caramelizes and brings out the sweetness, making the whole sandwich pop.
BBQ Sauce: Use your favorite! I’m partial to a homemade version, but there are fantastic store-bought options if you’re pressed for time. Be adventurous—try a mango barbecue sauce for an extra tropical twist!
Brioche Buns: Oh, the buns! They should be soft and slightly sweet. There’s nothing worse than a bun that crumbles when you pick it up. Sometimes I use hamburger buns in a pinch, but brioche elevates the whole experience.
Red Onion: It’s not just for decoration! The sharpness of red onion contrasts beautifully with the sweeter elements of the sandwich. A little bite here and there makes all the difference.
Leafy Romaine or Butter Lettuce: This adds a nice crunch. I swear by adding a fresh element to the mix. You can also use arugula for a peppery kick if you’re feeling fancy.
Mayonnaise (optional): I like to spread it on the bun, as it gives a creamy element, which pairs well with all those robust flavors. Feel free to mix it up with some lime juice or hot sauce for a kick!
Alright, now that we have our ingredient list, let’s address the cooking process. I promise you, it’s straightforward.
Is Grilled Hawaiian Chicken Sandwich Actually Good for You?
Okay, let’s get real. This sandwich does lean on the indulgent side, mostly because of the BBQ sauce and brioche buns. But hey, life’s all about balance, right? Here’s the deal: grilled chicken is a solid source of lean protein. Pair that with the sweet, nutrient-rich pineapple, and you’ve got yourself a hefty serving of vitamins and antioxidants. The red onion brings in a dose of health benefits as well, like promoting heart health.
And let’s not forget about those greens! Adding fresh lettuce means you’re getting a bit more fiber and nutrients, which always feels good. Would I eat this sandwich every day? Maybe not. But every once in a while, embracing the deliciousness with a side of sweet potato fries makes for a memorable meal.
Here’s What You’ll Need
– 4 boneless chicken breasts (about 1.5 lbs total)
– 4 fresh pineapple slices (or canned, but fresh is better!)
– 1 cup barbecue sauce (homemade or your favorite store-bought)
– 4 brioche buns
– 1 red onion, thinly sliced
– 1 head of romaine or butter lettuce
– Mayonnaise (optional)
– Olive oil for grilling
– Salt and pepper to taste
Serves: 4
How to Make Grilled Hawaiian Chicken Sandwiches Step-by-Step
1. **Marinate the Chicken:** In a bowl, combine the chicken breasts with about half a cup of your BBQ sauce, a drizzle of olive oil, and a sprinkle of salt and pepper. Let it marinate for at least 30 minutes, though if you can do a few hours or overnight, even better! I often make this the night before—a little prep goes a long way.
2. **Preheat the Grill:** Fire up that grill to a medium-high heat. If you have a charcoal grill, let those coals become ashen and glowing. You want a hot surface to get that lovely char on the chicken and pineapple.
3. **Prep the Pineapple and Buns:** While the grill is heating, brush your pineapple slices lightly with a bit of oil so they don’t stick. If you like a little grill char on your buns (and I know I do), lightly brush those on one side too.
4. **Grill the Chicken:** Once your grill is hot, place the marinated chicken on the grate. Grill each side for about 6-7 minutes, or until you see yummy grill marks and the chicken’s fully cooked through (165°F internal temp is key!). Don’t forget to slather a bit more BBQ sauce on the chicken in the last minute of grilling for extra flavor.
5. **Grill the Pineapple:** Toss those pineapple slices on the grill for about 2-3 minutes per side. You just want enough time to get them caramelized and warm—nobody wants mushy pineapple!
6. **Toast the Buns:** If you’re doing the bun thing, add them to the grill for the last minute too, cut side down. Keep an eye on them! They go from golden to charred in a blink.
7. **Assemble Your Sandwiches:** Here’s where the magic happens—grab a bun, spread a little mayo (if using), then layer down a piece of grilled chicken, a slice of caramelized pineapple, a few slices of red onion, and a handful of lettuce. Top it off with another bun. Do you see it? Our sandwich—isn’t it a beauty?
8. **Dig In:** Now, here’s the most crucial step: take a moment to admire your creation. Snap a picture (I won’t judge, we all do it). Then take a bite. Close your eyes, and enjoy the burst of flavors.
Little Extras I’ve Learned Along the Way
Here are some little quirks and variations I’ve picked up over the years that you might find useful:
– **Use a Meat Thermometer:** Okay, this might sound nerdy, but I swear by this gadget. It takes out all the guesswork for cooking chicken. No more dry chicken misadventures, thank you very much.
– **Try Different Toppings:** Feel free to jazz this up with sliced avocados or a mango salsa if you’re feeling adventurous! Or swap the BBQ for a teriyaki sauce—who says you can’t play around, right?
– **Make It a Feast:** Pair these sandwiches with some homemade coleslaw or sweet potato fries for a proper picnic-style meal. And if you’re having people over, a big batch of tropical fruit salad is a refreshing kick to round out the feast.
– **Leftovers Magic:** If you somehow have leftovers (which almost never happens), shred the chicken and serve it over a salad or in tacos the next day. Just because it’s a sandwich doesn’t mean it can’t play multiple roles!
This one means a lot to me. It’s just a simple chicken sandwich, but it carries all those warm, sunny memories for me. I would love to hear your twist if you try it! Don’t forget to send a photo or comment on what your experience was like. Happy grilling!


