Prep time: 30 minutes
Cook time: 10 minutes
Total time: 40 minutes
Servings: 12 servings
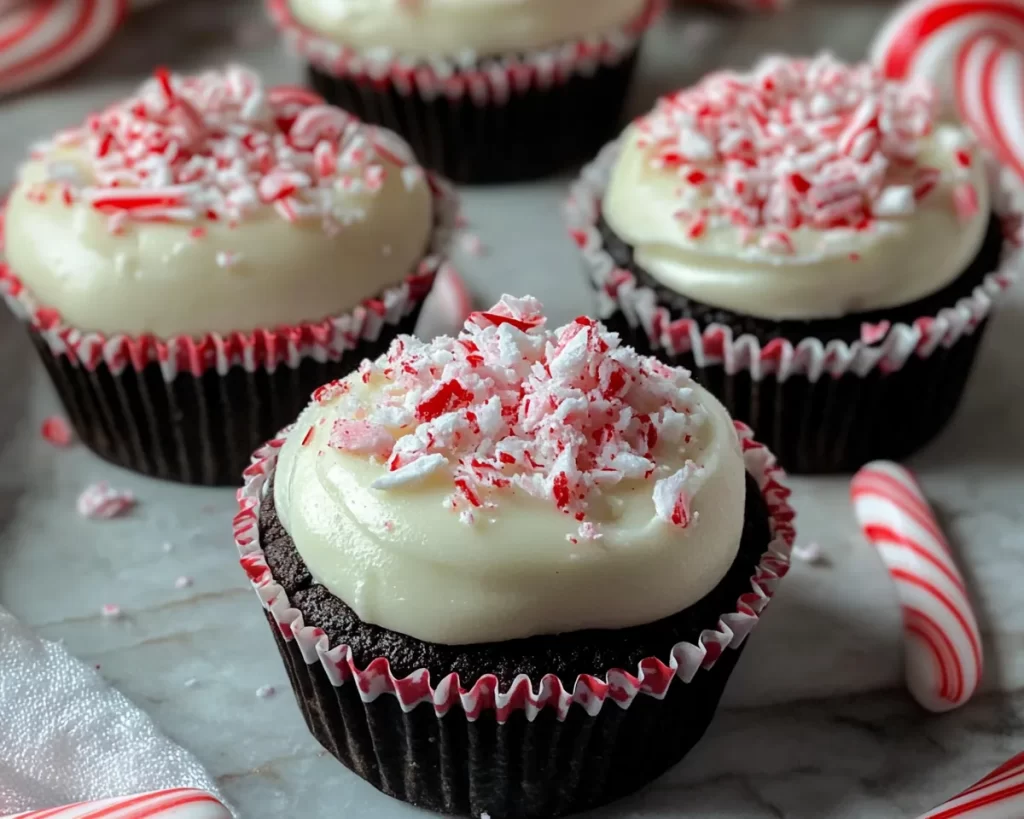
As the holiday season approaches, few treats encapsulate the joyful spirit quite like the Festive Peppermint Oreo Cups. Imagine a delicious blend of creamy chocolate and refreshing peppermint, perfectly wrapped in a crunchy Oreo base. These delightful cups are not merely a dessert; they are a celebration of festive flavors that evoke the warmth of family gatherings and cozy nights by the fire. You’ll love how easy they are to whip up, making them the perfect addition to any holiday dessert table.
In this article, you’ll learn the ins and outs of crafting these delightful treats from scratch. From understanding the key ingredients to mastering the step-by-step process, every detail will be covered. Whether you’re a novice in the kitchen or an experienced cook, you’ll find everything you need to make these flavorful cups a hallmark of your festive celebrations.
What Is Festive Peppermint Oreo Cups Recipe?
The Festive Peppermint Oreo Cups are a mouth-watering dessert that combines the rich, chocolatey goodness of Oreo cookies with a lush peppermint filling, all dipped in even more chocolate for an irresistible finish. These treats are often associated with the winter holidays, imbued with flavors that evoke memories of warm fires, twinkling lights, and laughter around the dinner table. Their texture is equally enchanting; the crunchy cookie base contrasts beautifully with the silky, cream-filled interior and the smooth chocolate coating.
This recipe embodies the spirit of the holidays not just in taste but also in its versatility. You can customize the filling based on your taste preferences. The refreshing hint of peppermint brings a familiar festive aroma that fills your kitchen, inviting everyone within the vicinity to join in on the fun. With various options for presentation, such as festive sprinkles on top or seasonal baking cups, these Oreo cups can be both visually stunning and utterly delicious.
Why You’ll Love This
There are numerous reasons to fall head over heels for Festive Peppermint Oreo Cups. First and foremost, the flavor combination of chocolate and peppermint offers a unique yet familiar taste that many enjoy during the holiday season. The ease of preparation cannot be overlooked; despite looking like a gourmet dessert, these cups require minimal effort, allowing you to spend more time enjoying the festivities with family and friends.
Another benefit to this recipe is its cost-effectiveness. Using staple ingredients like Oreos, cream cheese, and chocolate makes it accessible for those on a budget. Additionally, the versatile nature of this recipe means you can easily adapt it to fit dietary needs. For example, you can swap out regular Oreos for gluten-free versions or replace the cream cheese with a dairy-free alternative.
It’s also common for people to think that no-bake desserts can lack flavor or be overly simple; however, that’s far from the case with these Oreo Cups. The balance of textures—from the crunch of the cookie to the creaminess of the filling—along with the festive aroma will have everyone believing you spent hours in the kitchen crafting these gourmet delights.
Ingredients You’ll Need
- Oreos: The base of this recipe, Oreos provide the perfect crunch and chocolate flavor. Substitute with gluten-free Oreos if needed.
- Cream cheese: This ingredient brings a rich, creamy texture to the filling. For a lighter option, consider using a low-fat cream cheese.
- Powdered sugar: This sweetener creates a smooth filling and balances the richness of the cream cheese.
- Extract of peppermint: A must-have to impart that quintessential peppermint flavor. Be cautious with the amount; a little goes a long way.
- Chocolate chips: Used for coating the cups, chocolate chips provide a rich flavor that ties everything together. Choose semi-sweet or dark chocolate for an intense flavor punch.
- Red and green sprinkles: Optional, but they add a festive touch to your holiday cheat treats.
These ingredients will come together to create the perfect combination of flavors. Be mindful of the role each plays in achieving the texture and taste of your finished product, and feel free to experiment with substitutes that suit your dietary preferences.
How to Make
- Prepare the Oreo crust: Start by putting the Oreos in a food processor and crushing them into fine crumbs. This will create the base for your cups. You can also do this by placing them in a zip-top bag and crushing them with a rolling pin if you don’t have a food processor. Once you have a fine crumb texture, transfer the crumbs into a mixing bowl.
- Add melted butter: Melt about a half-cup of unsalted butter; this will serve as the binding agent for the cookie crust. Pour the melted butter into the bowl of crushed Oreos and mix until evenly combined. You want to ensure the crumbs are moist but not overly wet; they should feel like wet sand.
- Mold the crust: Line a muffin tin with cupcake liners. Using about a tablespoon of the Oreo mixture, press it firmly into the bottom of each liner. Make sure to create a solid base; if it feels loose, add a touch more melted butter. If you have any mixture left over, you can use it to make a few mini cups.
- Chill the crust: Place the muffin tin in the fridge for about 10-15 minutes. This step is crucial because it helps the crust set and hold its shape when you add the filling.
- Prepare the filling: While the crust is chilling, in a large bowl, combine softened cream cheese, powdered sugar, and peppermint extract with an electric mixer. Beat the mixture until it’s smooth and creamy; you should see no lumps remaining. Taste it, and feel free to add more peppermint extract if you desire a more potent flavor. You want this filling to be rich and comforting.
- Fill the cups: Once the crust has set, take the muffin tin out of the fridge. Spoon the peppermint filling into each Oreo crust, filling it until just about even with the top of the crust. Smooth the top with the back of a spoon or a small spatula. Pop this back into the fridge to firm up while you melt your chocolate.
- Melt the chocolate: In a microwave-safe bowl, add your chocolate chips and heat in 30-second intervals until completely melted, stirring between each interval. Be cautious not to overheat the chocolate; it’s better to do this slowly. If the chocolate is too thick, you can add a teaspoon of vegetable oil to thin it out slightly.
- Coat the cups: Once the chocolate is melted and your filling has set, remove the cups from the refrigerator. Using a fork, dip each cup into the melted chocolate, ensuring it’s fully coated. Lift the cup out and let the excess chocolate drip off before placing it back into the muffin tin. This will create a beautiful outer layer.
- Decorate and chill: If you wish, sprinkle some red and green sprinkles on top of the cups while the chocolate is still wet. This step adds color and festivity to your treats. Return the muffin tin to the fridge for at least 15-20 minutes to let the chocolate harden.
- Serve and enjoy: Once the chocolate coating has set, carefully remove each cup from the muffin tin and serve them on a festive plate. They can be stored in the refrigerator for later enjoyment. Serve them as a sweet treat during holiday gatherings or as gifts for loved ones.
These step-by-step instructions ensure that even beginners will find success with this delectable recipe. Pay attention to each step, as they all contribute to the final texture and taste of your peppermint Oreo cups.
Variations & Substitutions
Gluten-Free Variation: If you or your guests are avoiding gluten, you can easily make these Oreo cups gluten-free. Switch out regular Oreos for gluten-free versions, which are readily available in most grocery stores. Keep in mind that the flavor and texture may vary slightly, but the spirit of the festive peppermint treat remains intact. Additionally, always double-check your other ingredients for gluten-free labeling to ensure everyone can enjoy your delightful dessert.
Chocolate Mint Variation: For those who crave an extra kick, consider enhancing the chocolate flavor by making your filling a chocolate peppermint blend. Add about two tablespoons of cocoa powder to your cream cheese mixture. This small adjustment creates a deeper chocolate flavor that pairs beautifully with the peppermint extract. If you prefer a richer experience, sprinkle in some mini chocolate chips for an added texture boost.
Dairy-Free Variation: If you’re catering to a dairy-free crowd, replace the cream cheese with vegan cream cheese or a whipped coconut cream blend for a lighter filling. Ensure that your chocolate chips are dairy-free as well. The mintiness will shine through with this substitution, delivering a delightful flavor experience while being considerate of dietary needs.
Peanut Butter Variation: For a unique twist, substitute some of the cream cheese with peanut butter to create a Peanut Butter Peppermint Oreo Cup. Combine equal parts cream cheese and peanut butter, ensuring the mixture remains smooth and manageable. This variation creates a delicious contrast between the sweet peppermint and the nutty flavor of the peanut butter, especially appealing to anyone who loves this classic combination.
Miniature Cups Variation: Want to make these treats suitable for smaller bites? Use a miniature muffin tin instead of a standard size. You can also adjust cooking time as needed, reducing both the chilling and cooling times. Miniature cups are ideal for parties where you want people to grab and go, plus they add an adorable aspect to your dessert spread.
Each variation offers a new twist on the classic Festive Peppermint Oreo Cups, allowing you to cater to different dietary needs and taste preferences while keeping the spirit of the original recipe.
Common Mistakes to Avoid
Mistakes can happen in any kitchen, especially when trying out new recipes like the Festive Peppermint Oreo Cups. One common issue is overmixing the filling, which can lead to a grainy texture. Ensure that you mix until just combined; the smoother the mix, the creamier the filling will be.
Another mistake is using chocolate that isn’t suited for melting, such as regular chocolate bars or chocolate with a high sugar content. Not all chocolates melt well, and some can seize up if overheated. Stick to chocolate chips designed for melting; they will give you the best consistency for coating your cups.
Make sure to firm up the crust adequately before adding the filling. If the crust isn’t set, it may crumble when you try to fill it. A firm crust will hold up better, so be patient and allow enough chilling time.
Lastly, be cautious with the amount of peppermint extract you use. It is very potent, and adding too much can lead to an overwhelming mint flavor. Start with a smaller amount, taste as you go, and adjust to your preference, but remember that it’s easier to add more than it is to remove excess mintiness.
Storage, Freezing & Reheating Tips
Storing your Festive Peppermint Oreo Cups can be simple and straightforward. These treats can be kept in the refrigerator in an airtight container for up to a week. The cold temperature helps maintain their fresh taste while preventing the chocolate from melting.
If you’re looking to make your cups well in advance, consider freezing them. To do this, place the filled cups in a single layer on a baking tray and freeze until solid. Once frozen, you can transfer them to a freezer-safe container, separating layers with parchment paper, and store them for up to three months. Thaw them in the fridge before serving for the best texture and flavor.
Remember the golden rule when it comes to food safety: always check for signs of spoilage, especially if stored for an extended time. Properly made and stored, these cups should retain their taste and texture for days or even months!
Frequently Asked Questions
Can I use a different cookie instead of Oreos?
Absolutely! While Oreos provide a classic base, feel free to experiment with other cookies. Chocolate wafer cookies or even brownie crusts could work well. Keep in mind that different cookies will alter the overall flavor and texture, so choose something you enjoy!
Is it necessary to use cream cheese in the filling?
While cream cheese creates a velvety texture, you can substitute it with alternatives like mascarpone cheese for a lighter option. If you’re looking for a dairy-free option, using whipped coconut cream or vegan cream cheese can successfully replicate the creamy filling.
How do I know when the chocolate coating is done?
The chocolate coating should appear shiny and smooth once it’s evenly coated around each cup. If it starts to dull or thicken, it may have cooled too much. Lightly reheating in the microwave or on the stove at a low temperature can help restore its fluidity.
Can I make these Oreo Cups in advance?
Yes, in fact, they are perfect for making in advance! Prepare them a day ahead for gatherings, and store them properly in the fridge or freezer to retain their freshness and flavor.
What can I do if the filling is too soft?
If you find your peppermint filling is too soft to hold its shape, consider adding more powdered sugar to thicken it. This adjustment will contribute sweetness and stabilize the filling without compromising the flavor.
Conclusion:
The Festive Peppermint Oreo Cups are more than just a dessert; they’re an invitation to share sweet moments with loved ones during the holiday season. With their delightful combination of flavors and easy preparation, anyone can whip up a batch of these treats. Feel free to get creative with variations and substitutions until you find the perfect balance that fits your preferences!
So, why not try the recipe today? Customize it, share it with family and friends, and immerse yourself in the joy it brings! Happy baking!


