**Prep time:** 10 minutes
**Cook time:** 5 minutes
**Total time:** 15 minutes
**Servings:** 12 clusters
There’s something magical about the combination of **peanuts** and **marshmallows** that brings back fond memories of snacking after school or indulging during family gatherings. Imagine the satisfying crunch of peanuts enveloped in a layer of soft, gooey marshmallows, all held together by a sweet, melt-in-your-mouth coating. Today, I’m excited to share an **Easy Peanut Marshmallow Clusters** recipe that strikes a perfect balance between quick preparation and delightful taste!
With only a handful of ingredients, this dessert couldn’t be easier to whip up. Whether you’re a busy parent trying to get a sweet treat ready for your kids, a beginner in the kitchen seeking a straightforward recipe, or just someone who loves a delicious dessert, this recipe is for you! Throughout this article, we will delve into the simple steps you require to master this treat, plus some variations to please any palate.
What Are Easy Peanut Marshmallow Clusters?
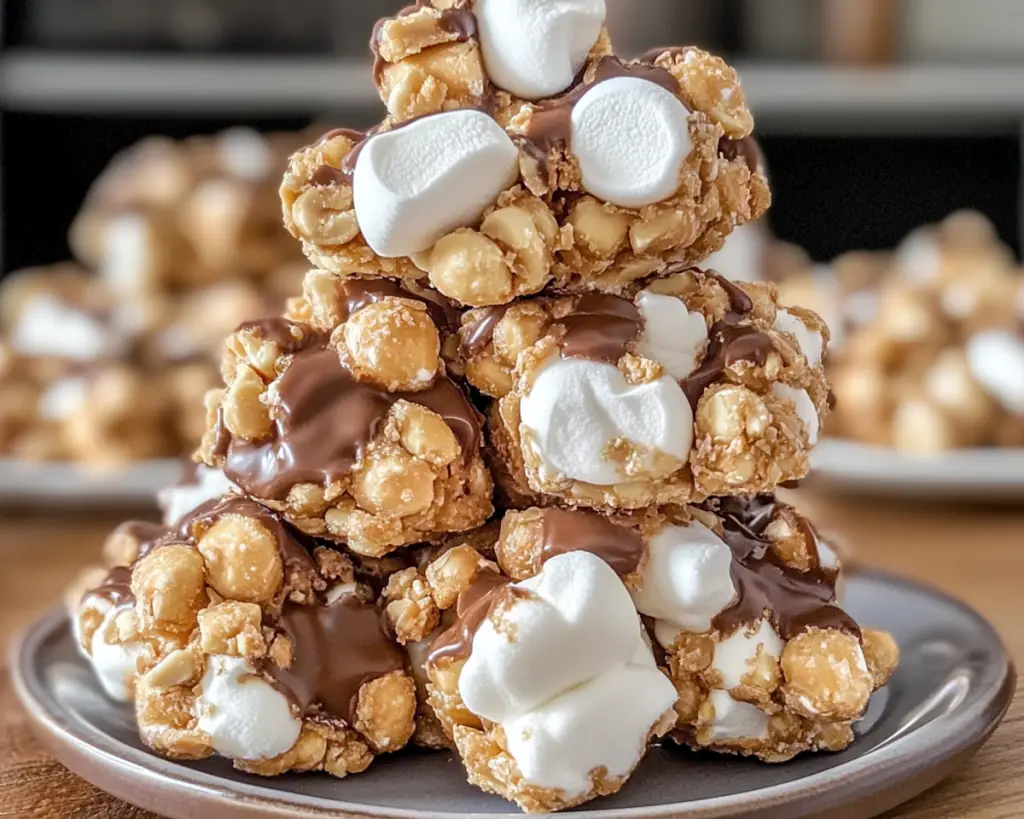
**Peanut Marshmallow Clusters** are a classic no-bake treat, perfect for any occasion. Originating from the combined love for **sweet snacks and the crunch of nuts**, these clusters typically involve melting chocolate and combining it with **peanuts** and **mini marshmallows**. The result is a delightful combination of textures and flavors—you’ll experience the creamy richness of chocolate, the crunchiness of the peanuts, and the soft chewiness of the marshmallows.
These clusters are often categorized as **treats** or **snack foods**, and you can find them adorning dessert platters during holidays or special gatherings. The beauty of this recipe lies in its simplicity and versatility since you can adjust the sweetness by experimenting with different types of chocolate or adding extras like dried fruit or coconut.
In terms of texture, the clusters are satisfying to bite into with a delightful crunch. The flavors meld beautifully, making them incredibly delicious and addictive. It’s a treat that’s guaranteed to bring smiles and delight to anyone who tries it!
Why You’ll Love This Easy Peanut Marshmallow Clusters Recipe
This **Easy Peanut Marshmallow Clusters** recipe has a lot to offer:
– **Quick and Simple**: In just 15 minutes, you can have a batch ready to serve. It’s perfect for last-minute gatherings or when you need a sweet fix.
– **Deliciously Satisfying**: The flavors of **peanuts**, **marshmallows**, and chocolate create a treat that’s both satisfying and crave-worthy. Each bite packs a punch of sweetness and texture that you’ll love.
– **Versatile and Customizable**: You can easily modify the recipe by using different types of nuts, chocolates, or adding your favorite mix-ins. The possibilities are endless, allowing you to personalize it to your taste.
– **No-Bake Convenience**: You won’t need your oven for this recipe, making it ideal during hot weather or when you want to avoid kitchen heat.
Furthermore, this recipe is forgiving for beginners. A little extra chocolate or nuts won’t ruin the outcome, and the mixture can be adjusted to your liking. You can also store these clusters for later enjoyment, making them perfect for meal prep or as a snack for busy days!
Ingredients You’ll Need
To create these delicious peanut marshmallow clusters, gather the following ingredients:
– **2 cups unsalted peanuts**: You can use roasted, raw, or even honey-roasted peanuts, depending on your taste preference. Peanuts provide the crucial crunch and flavor. If you have allergies or dietary restrictions, you can substitute with sunflower seeds or any other nut you prefer.
– **2 cups mini marshmallows**: These marshmallows add sweetness and softness, blending perfectly with the rest of the ingredients. You can use regular-sized marshmallows, but cutting them into smaller pieces would be necessary. For a fun twist, consider using colored or flavored mini marshmallows.
– **2 cups chocolate chips**: Semi-sweet chocolate chips are a popular choice for this recipe, as they offer the right balance of sweetness. However, if you’re a fan of dark chocolate, feel free to substitute for a richer flavor. Milk chocolate or white chocolate can also work well, depending on your preference.
– **1 tablespoon of butter (optional)**: A small amount of butter can enhance the smoothness of the melted chocolate, giving it a lovely sheen. You can use vegan butter for a dairy-free version if you prefer.
How to Make Easy Peanut Marshmallow Clusters
Now, let’s get into the step-by-step instructions for making these delightful clusters. Keep this guide handy, and you’ll be on your way to creating your treats in no time!
1. **Prepare Your Workspace**: Start by gathering all your ingredients and equipment. You’ll need a large mixing bowl, a saucepan or microwave-safe bowl, a spatula for stirring, and a baking sheet lined with parchment paper or wax paper for cooling your clusters.
2. **Melt the Chocolate**: In a saucepan over low heat (or using a microwave in 30-second intervals), melt the chocolate chips and optional butter together. Stir continuously to ensure that the chocolate melts evenly and does not burn. The mixture should turn smooth and glossy. If you’re melting in the microwave, be cautious and stir after each interval to avoid overheating.
3. **Mix in Peanuts**: Once the chocolate is fully melted, remove it from the heat. Quickly stir in the unsalted peanuts until they are fully coated with chocolate. The heat from the chocolate will help melt a tiny bit, leading to a delectable combination.
4. **Add Marshmallows**: Gently fold in the mini marshmallows, being careful not to crush them. You want to ensure they’re evenly distributed throughout the mixture without turning mushy. The marshmallows are what give these clusters their delightful texture, so they should remain recognizable.
5. **Form Clusters**: Using a spoon or your hands, scoop out small portions of the mixture and drop them onto the lined baking sheet. You can form them into mounds or balls, depending on how you prefer the final look. Aim for about 1 to 2 tablespoons of the mixture for each cluster.
6. **Let Them Set**: Allow the clusters to sit at room temperature for about 30 minutes, or until they harden. For faster results, you can place them in the refrigerator for about 15 minutes. As the chocolate cools, it will solidify and create those perfect clickable clusters.
7. **Serve and Enjoy**: Once set, you can serve your peanut marshmallow clusters immediately or store them for later. They make delightful snacks for lunches, parties, or just an every day sweet treat!
5 Variations & Substitutions
While the classic peanut marshmallow clusters are absolutely delicious, you can try these fun variations to add a unique twist to your treats!
1. **Chocolate Variations**: Experiment with different types of chocolate! Use **dark chocolate** for a richer flavor or **white chocolate** for a creamier, sweeter alternative. You can also drizzle melted chocolate on top of the clusters after they have set for a decorative touch.
2. **Nut-Free Version**: If you or someone you know has a nut allergy, consider substituting the peanuts with **sunflower seeds** or **pumpkin seeds**. These alternatives keep the crunch while being allergy-friendly. You could also consider using **crispy rice cereal** to add crunch without nuts.
3. **Add Dried Fruit**: For added flavor and texture, mix in some **dried fruit** such as cranberries, raisins, or chopped apricots. This sweet and chewy element can complement the clusters nicely. Adding about 1 cup of dried fruit will give you that added zing.
4. **Coconut Crunch**: Add a tropical twist by mixing in **sweetened shredded coconut**. About half a cup should be enough to enhance the flavor without overpowering the original recipe. The coconut adds a nice chew and complements the chocolate beautifully.
5. **Flavored Marshmallows**: For an extra layer of flavor, use **flavored mini marshmallows**. Whether it’s strawberry, vanilla, or any other favorites, these marshmallows can offer a twist and make your clusters even more special. This is a fun suggestion for festive occasions or kids’ parties!
Common Mistakes to Avoid
While making Easy Peanut Marshmallow Clusters is straightforward, here are some common mistakes to avoid:
– **Burning the Chocolate**: One of the biggest pitfalls when melting chocolate is burning it. Always melt at low heat, and stir frequently. If using a microwave, remember to heat in small intervals to keep the chocolate from seizing. If it does become grainy, adding a small amount of vegetable oil can help salvage it.
– **Overmixing the Marshmallows**: When folding the mini marshmallows into the mixture, do so gently! Overmixing can crush the marshmallows and create an undesirable texture. The goal is to keep them fluffy, so use a light touch.
– **Not Allowing Enough Cooling Time**: Patience is key! Allow the clusters sufficient time to set. If you try to move them before they are fully cooled, they may fall apart. Use the fridge if you’re in a time crunch, but letting them cool at room temperature will yield a better texture.
– **Using the Wrong Sizes of Nuts or Marshmallows**: Ensure that you use **mini marshmallows** or chop regular-sized marshmallows into smaller pieces, as the ratio and texture will alter if you use too large of marshmallows. Similarly, if you’re using peanuts, stick to either whole or roughly chopped.
– **Underestimating Storage Conditions**: Properly store your clusters to ensure they remain fresh. You can use an airtight container at room temperature for short-term storage, but if they’ll be around for a week or more, consider refrigeration. Just know the cold will harden the chocolate a bit more.
Storage, Freezing & Reheating Tips
Storage for your Easy Peanut Marshmallow Clusters is simple:
1. **Room Temperature**: Keep the clusters in an **airtight container** at room temperature for up to a week. The chocolate will remain pliable, and they will hold their shape well.
2. **Refrigeration**: If you want to extend their shelf life, store them in the refrigerator for up to two weeks. The chocolate will harden a bit more, but they will still be delicious and crunchy.
3. **Freezing**: To enjoy these clusters even later, you can freeze them! Place the clusters in a single layer on a baking sheet until frozen solid, then transfer them to a freezer-safe bag or container. They can last for up to 3 months. When you’re ready to enjoy them, move them to the fridge to thaw or leave out at room temperature for about 30 minutes.
4. **Avoiding Moisture**: Ensure the container is airtight to prevent moisture from getting in, which could cause the chocolate to seize or the clusters to melt together. When storing at room temperature, keep them away from direct sunlight and heat sources.
Frequently Asked Questions
**1. Can I use other nuts besides peanuts?**
Absolutely! Feel free to customize the recipe by using your favorite nuts such as almonds, cashews, or walnuts. Each nut type will lend its unique flavor and texture to the clusters, creating a delightful treat that is tailored to your taste.
**2. How do I store leftover clusters?**
Store any leftover clusters in an airtight container at room temperature for up to a week. If you want to keep them longer, you can refrigerate them for up to two weeks or freeze them for up to three months. Just make sure they are fully set before storing to avoid them sticking together.
**3. What if my clusters become too hard?**
If your clusters turn out harder than expected, you might have let them cool in the fridge for too long. While it doesn’t affect the taste, you can allow them to sit at room temperature for a bit before enjoying. Additionally, you could add a teaspoon of coconut oil or melting butter when melting the chocolate to keep the clusters softer.
**4. Can I make these clusters dairy-free?**
Definitely! To make dairy-free clusters, simply use dairy-free chocolate chips and substitute regular butter with a plant-based alternative. This way, you can still enjoy the treat while accommodating dietary preferences!
**5. Can these be made ahead of time for events?**
Yes! These clusters are wonderfully convenient for making ahead. You can prepare them days in advance, store them properly, and serve them fresh at your event. They’re perfect for party platters or as a quick dessert option for larger gatherings.
In closing, these Easy Peanut Marshmallow Clusters offer an effortless way to satisfy your sweet tooth with minimal fuss. They are an excellent recipe for any home cook, whether a beginner or a seasoned professional. With a handful of ingredients and just about 15 minutes of your time, you can whip up a delightful treat that is perfect for sharing with family and friends, or simply keeping all to yourself! Don’t hesitate to customize the recipe to your preferences and enjoy the deliciousness that follows!
So, what are you waiting for? Grab those peanuts and marshmallows and get started on your sweet adventure today! Happy cooking!


