**Prep Time:** 20 minutes
**Cook Time:** 0 minutes
**Total Time:** 2 hours 20 minutes (includes chilling)
**Servings:** 8-10
There’s something extraordinary about a No Bake Peanut Butter Pie, especially when it comes with a delicious Oreo crust. This dessert is a dream come true for peanut butter lovers. Creamy, rich, and oh so indulgent, this pie doesn’t require any baking or complicated steps. Just mix, pour, chill, and enjoy! Whether you’re hosting a gathering, celebrating a special occasion, or just treating yourself, this pie is bound to impress. Throughout this article, I’ll share everything from the ingredients you’ll need to step-by-step instructions, variations you can try, and even tips for making this pie a success.
What Is Easy No Bake Peanut Butter Pie with Oreo Crust?
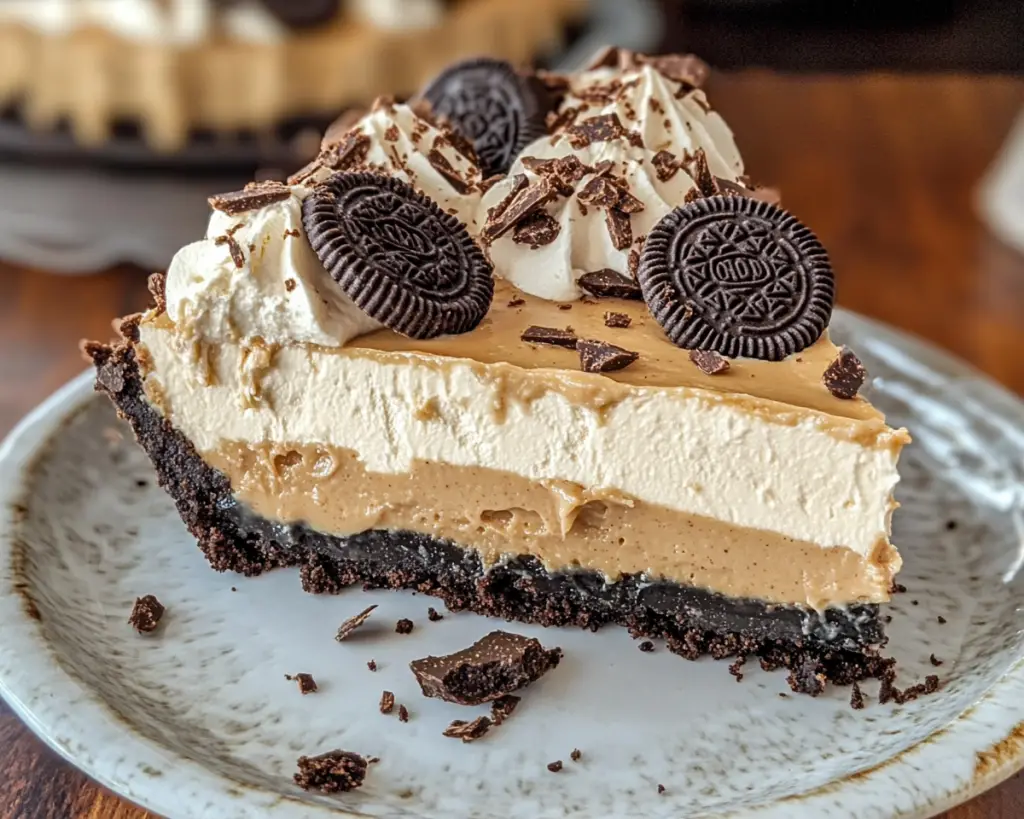
This delightful dessert is a no-bake pie that features a luscious filling made from peanut butter, cream cheese, whipped cream, and sugar, sitting snugly in a crust made from crushed Oreo cookies. The combination of flavors creates a perfect balance between creamy sweetness and the subtle bitterness of chocolate, making each bite irresistible. Traditionally, peanut butter pie has its origins in classic American desserts, celebrated for being rich and satisfying. The Oreo crust adds a pleasant crunch that contrasts beautifully with the velvety creamy filling, making it a textural delight.
The filling is remarkably easy to prepare. Using only a few simple ingredients, it comes together quickly without any need for baking. This pie is not only delicious, but it’s also versatile, allowing you to experiment with various toppings or mix-ins according to your taste. It’s a dessert that feels indulgent yet is effortless to prepare, earning its spot as a favorite in countless homes.
Why You’ll Love This Easy No Bake Peanut Butter Pie with Oreo Crust
There are several reasons why this recipe is beloved by families and friends alike. First and foremost, the taste is simply divine. The rich and nutty flavor of peanut butter combined with the sweetness of sugar and cream creates a harmonious balance that is utterly delectable. The Oreo crust introduces a chocolatey crispiness, which complements the softness of the filling perfectly.
Beyond flavor, this pie is incredibly easy to make. In just a few minutes, you can prepare the filling and the crust, pop it into the fridge, and let it chill. This makes it an excellent option for busy parents or anyone looking for a sweet treat without the hassle of baking. Additionally, the pie is quite budget-friendly, as it requires minimal ingredients that you may already have on hand.
For those who might be hesitant about making desserts, this peanut butter pie is a fantastic starting point. There are no eggs or raw ingredients that require cooking, so you can whip it up without the usual baking anxiety. You’ll be amazed at how easy it is to impress your friends and family with this absolutely scrumptious dessert.
Ingredients You’ll Need
Here’s a detailed list of the ingredients required to make this easy no-bake peanut butter pie with an Oreo crust:
– **Oreo cookies** (24 cookies): The base of your pie crust, identifiable by their distinct chocolate flavor and cream filling. You can substitute with any brand of chocolate wafer cookies if preferred.
– **Butter** (1/2 cup, melted): It helps bind the crushed cookies together, creating a firm crust. Unsalted butter is preferred to control the salt level.
– **Cream cheese** (8 oz, softened): This adds a rich creaminess to your pie filling and provides structure. You can use a low-fat version if you’re looking for a lighter option.
– **Smooth peanut butter** (1 cup): The star ingredient that gives the pie its signature flavor and creamy texture. If you prefer crunchy peanut butter, feel free to use it for added texture.
– **Powdered sugar** (1 cup): This sweetens the filling and helps achieve a smooth consistency. Don’t substitute with granulated sugar, as it won’t dissolve properly in the mixture.
– **Cool Whip** (8 oz): A convenient whipped topping that adds lightness to the filling. You can substitute with homemade whipped cream for a more authentic taste.
– **Chocolate chips** (for garnish, optional): These can be used to sprinkle on top for added decadence and visual appeal. Use mini or standard chocolate chips based on your preference.
How to Make Easy No Bake Peanut Butter Pie with Oreo Crust
Making this no-bake peanut butter pie is as easy as pie (pun intended)! Follow these step-by-step instructions:
1. **Prepare the Oreo Crust**: Start by placing the Oreo cookies in a food processor. Pulse until they turn into fine crumbs. If you don’t have a food processor, you can place the cookies in a zip-top plastic bag and crush them with a rolling pin. Once you have fine crumbs, transfer them to a mixing bowl.
2. **Mix the Butter**: Pour the melted butter over the Oreo crumbs. Use a fork to mix until all the crumbs are evenly coated and resemble wet sand. This binds the crust together.
3. **Press into Pie Dish**: Transfer the crumb mixture into a 9-inch pie dish. Using your fingers or a flat-bottomed glass, firmly press the mixture to form an even layer. Ensure the crust is compacted well to prevent it from crumbling once chilled. Set aside while you prepare the filling.
4. **Make the Filling**: In a large mixing bowl, use an electric mixer to beat the softened cream cheese until smooth and creamy. This should take about 2-3 minutes. Add the peanut butter and powdered sugar, continuing to mix until well combined and creamy.
5. **Fold in the Whipped Topping**: Gently fold in the Cool Whip using a spatula. Be careful not to overmix as you want to maintain the lightness of the whipped topping.
6. **Fill the Crust**: Spoon the peanut butter filling into the prepared Oreo crust. Spread it evenly using a spatula, ensuring it reaches the edges.
7. **Chill**: Cover the pie with plastic wrap or aluminum foil and place it in the fridge. Chill for at least 2 hours, allowing the pie to firm up.
8. **Serve**: Once chilled, remove the pie from the fridge. For added flair, you can top it with mini chocolate chips or a drizzle of chocolate syrup. Slice it into wedges and serve!
5 Variations & Substitutions
– **Chocolate Peanut Butter Pie**: To make a chocolate version, replace half of the peanut butter with melted dark chocolate or chocolate hazelnut spread. This will give the pie a rich chocolate flavor.
– **Nut-Free Option**: If you need to accommodate nut allergies, you can use sun butter or soy nut butter in place of peanut butter. Both alternatives work well and still provide a satisfying taste.
– **Vegan Peanut Butter Pie**: For a dairy-free version, use vegan cream cheese, non-dairy whipped topping, and make sure your Oreos are suitable for a vegan diet. Coconut cream is also a great substitute for the whipped topping.
– **Mint Chocolate Variation**: For a refreshing twist, add a few drops of peppermint extract to the filling and top the pie with crushed mint chocolate candies or Andes mints.
– **Fruit Topping**: Fresh bananas or strawberries on top add a refreshing contrast to the rich filling. Just place sliced fruit on top of the pie before serving to maximize flavor and freshness.
Common Mistakes to Avoid
Creating the perfect no-bake peanut butter pie is simple, but here are some common mistakes to avoid for the best results:
– **Not Softening the Cream Cheese**: Using cold cream cheese straight from the fridge can lead to a lumpy pie filling. Always allow the cream cheese to soften at room temperature for at least 30 minutes beforehand, or microwave it for about 10-15 seconds to achieve the right consistency.
– **Overmixing the Filling**: While it’s essential to combine everything well, overmixing the filling after adding the whipped topping can deflate it, resulting in a denser pie. Gently fold the whipped topping to keep the mixture light and airy.
– **Skipping the Chill Time**: Patience is key. Letting the pie set for the full two hours ensures that it firms up properly. Cutting it too soon may result in a runny filling.
– **Not Compacting the Crust**: If the Oreo crust isn’t compacted enough, it can fall apart when served. Use a flat-bottomed glass to press the crust firmly into the pie dish for stability.
– **Using Low-Quality Ingredients**: Since this pie uses a few key ingredients, opting for lower-quality peanut butter or whipped toppings can affect the flavor and overall experience. Invest in good-quality peanut butter for a more pronounced and rich taste.
Storage, Freezing & Reheating Tips
Storing your peanut butter pie properly will ensure it stays fresh and delicious:
– **Storage**: Cover any leftover pie tightly with plastic wrap or aluminum foil. It will stay fresh in the fridge for about 4-5 days.
– **Freezing**: If you need to make this pie in advance, it freezes exceptionally well. Once fully set, cover it tightly and freeze for up to 2 months. To thaw, simply place the pie in the refrigerator for a few hours before serving.
– **Reheating**: There’s no need to reheat a no-bake pie, as it’s meant to be served chilled. However, if you want to serve it warm for a different experience, briefly microwave a slice for 10-15 seconds, but be careful not to overheat.
Frequently Asked Questions
1. **Can I use crunchy peanut butter instead of creamy?**
Absolutely! Using crunchy peanut butter adds texture and a delightful crunch to your pie. However, keep in mind that it may slightly alter the smoothness of the filling, which some may find appealing.
2. **Why is my pie filling not thickening?**
If your filling seems runny, it could be due to not chilling it long enough. Make sure to let it set in the fridge for at least 2 hours or longer for optimal firmness. Additionally, check that the cream cheese was adequately softened and not overly whipped after folding in the whipped topping.
3. **Can I use a different type of cookie for the crust?**
Yes, feel free to get creative with your crust! While Oreos lend an iconic taste, you can use any chocolate wafer cookies, graham crackers, or even other flavored cookies like double-stuffed Oreos, which create a unique twist.
4. **How do I know when the pie is done chilling?**
The pie is ready after it has chilled for at least 2 hours. You’ll know it’s set when the filling no longer jiggles when you gently shake the pie dish and maintains its shape when sliced.
5. **Can I add toppings before chilling?**
It’s best to wait until just before serving to add any toppings, such as chocolate chips or whipped cream, to ensure they stay fresh and appealing. If you prefer, you can garnish the pie with the toppings before chilling but be mindful that they may not look as fresh when served.
In conclusion, this Easy No Bake Peanut Butter Pie with Oreo Crust is a must-try treat for anyone who loves peanut butter. Its simplicity, combined with its rich flavors and creamy texture, makes it perfect for any occasion. Feel free to experiment with the variations and customize it to fit your taste. I encourage you to make this pie soon, as you’re in for a real treat. Enjoy every delicious bite and tell me about your experience in the comments below. Happy baking!


