**Prep time:** 10 minutes
**Cook time:** 0 minutes
**Total time:** 10 minutes
**Servings:** 12 cookies
Every baker has a go-to icing recipe, and for those of us who love cookies, **Easy Glace Icing** is a dream come true. Just think of soft, chewy sugar cookies topped with a smooth, glossy icing that hardens perfectly—not too thick, not too thin. Whether you’re baking for a holiday, a birthday, or just because, this icing elevates your sugar cookies into something truly special.
In this article, you’ll discover how to make Easy Glace Icing from scratch with minimal ingredients and effort. You’ll learn about its unique features, including its versatility and how it can be customized with colors and flavors to suit any occasion. Get ready to master this simple yet satisfying frosting!
What Is Easy Glace Icing?
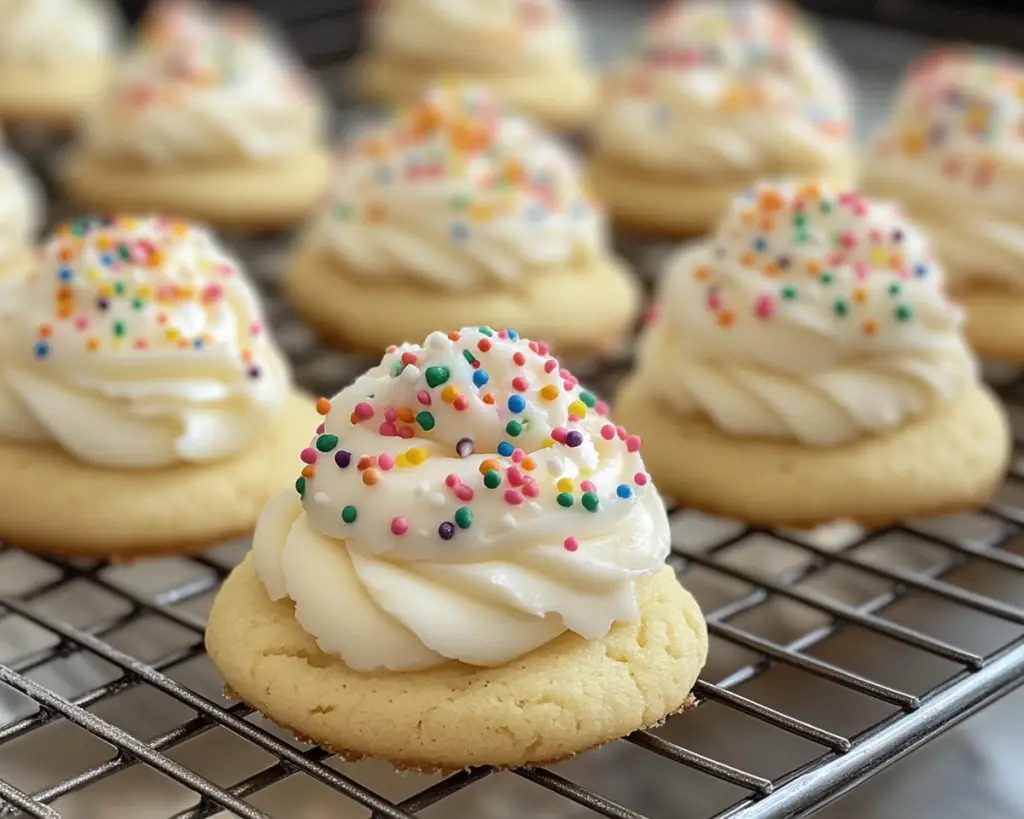
**Easy Glace Icing**, often referred to as **royal icing** in some baking circles, is a thin icing that hardens upon cooling, providing a beautiful sheen to your cookies. Unlike buttercream, which is rich and creamy, glaze icing has a lighter texture that allows for a more delicate finish. The primary ingredients are **powdered sugar**, water, and a dash of lemon juice or corn syrup, which helps it achieve that desired gloss.
This icing is ubiquitous in cookie decorating, especially around the holidays or during special events. Its origins can be traced back to classic bakery practices, where its smooth coating would enhance both the flavor and visual appeal of pastries. One taste, and you’ll understand why it’s a favorite among both novice and experienced bakers alike!
Why You’ll Love This Easy Glace Icing
There are plenty of reasons to love Easy Glace Icing! Here are just a few:
– **Ease of Preparation**: Using just a few basic ingredients, you can whip up this icing in mere minutes. Perfect for busy bakers or beginners! No special tools or equipment are needed—just a bowl and a whisk.
– **Versatility**: This icing can be customized in multiple ways. You can easily color it with food coloring for various occasions, or even add flavors like vanilla or almond extracts to enhance the taste.
– **Quick Drying Time**: Unlike some other icings, which may remain sticky, Easy Glace Icing dries quickly, allowing you to stack cookies or package them without worrying about smudging. You can typically handle your cookies within a couple of hours.
– **Budget-Friendly**: With only a handful of ingredients, this recipe is economical. You likely have most of the ingredients in your pantry already, making it perfect for spontaneous baking sessions!
Lastly, many home bakers may feel intimidated by the thought of icing cookies. But fear not! This recipe allows beginners to create beautiful designs and decorations while avoiding common pitfalls like runny or overly thick icing.
Ingredients You’ll Need
To make your Easy Glace Icing, gather the following ingredients:
– **2 cups powdered sugar**: This is the base for your icing. It provides sweetness and will give the icing its characteristic velvety texture. If you’re short on powdered sugar, you can make your own by blending granulated sugar in a blender or food processor until fine.
– **2-3 tablespoons of water**: Water is crucial for adjusting the icing’s consistency. Start with less and gradually add until you reach your desired thickness. It’s essential to ensure your water is at room temperature for better mixing.
– **1/2 teaspoon vanilla extract (optional)**: This is optional but can add a lovely flavor to your icing. Feel free to substitute it with other extracts like almond or lemon for a personalized touch.
– **1/2 teaspoon corn syrup (optional)**: Corn syrup helps create a glossy finish and can enhance the icing’s flow. If you’re aiming for precision decorating, this is a good addition!
– **Food coloring (optional)**: Use gel or liquid food coloring to tint your glaze. Remember that a little goes a long way with gel colors, so start with a drop or two and mix until you achieve your desired shade.
How to Make Easy Glace Icing
Making Easy Glace Icing is incredibly straightforward! Follow these step-by-step instructions to create your delicious glaze:
1. **Combine Ingredients**: In a medium mixing bowl, add 2 cups of powdered sugar. This is the foundation of your icing! Next, add 2 tablespoons of water. Be sure to use room temperature water for better blending.
2. **Mix the Icing**: Using a whisk or a spatula, blend the sugar and water until they are well combined. The mixture should appear smooth and free of lumps. If the icing seems too thick for your liking, gradually add more water, one teaspoon at a time, until you reach your desired consistency. It should be fluid enough to spread but thick enough to hold its shape.
3. **Flavor Enhancement (optional)**: If you’re using vanilla extract as an optional flavoring, add it now and mix well. The aroma will enhance your overall baking experience.
4. **Incorporate Corn Syrup (optional)**: For a shine and a glossy finish, stir in the corn syrup if you chose to use it. This step will also help the icing flow smoothly when piped onto cookies.
5. **Adjust Consistency**: Remember that you want a “flood” consistency for covering cookies—this means it should flow easily when poured over the edges but not be too watery. If the icing is too thin, simply add more powdered sugar. Conversely, if it’s too thick, add a bit more water until it’s just right.
6. **Color Your Icing**: If you’re planning to color your icing, divide the icing into separate bowls for each color. Use a toothpick to add a little food coloring to each portion, then mix until evenly colored. Adjust the color until you’re satisfied.
7. **Decorate Your Cookies**: Using a piping bag or squeeze bottle, pipe the icing onto the cooled sugar cookies. Start with the outline, and then “flood” the inner area with more icing. Use a toothpick or skewer to spread the icing if needed.
8. **Let It Set**: Allow the decorated cookies to sit at room temperature for at least 1-2 hours to let the icing harden completely. Once dry, you can stack your cookies or store them in an airtight container without fear of smudging.
3 Variations & Substitutions
1. **Chocolate Glaze Icing**: If you’re a chocolate lover, consider making a chocolate version of this icing! Simply replace 1/4 cup of powdered sugar with unsweetened cocoa powder, and follow the original recipe as instructed. This variation adds a rich flavor that pairs exceptionally well with vanilla or almond cookies. Just make sure to add a touch more water to achieve the desired consistency since cocoa can thicken the icing.
2. **Lemon Glaze Icing**: Give this icing a refreshing twist by substituting the water with freshly squeezed lemon juice. It adds a tangy flavor that pairs beautifully with sugar cookies. Additionally, you can increase the vanilla extract to 1 teaspoon to balance the tartness. This glaze is perfect for summer gatherings or when you want to brighten up your baking.
3. **Royal Icing**: For a more stable icing ideal for intricate designs, consider making a royal icing version. Substitute the water for pasteurized egg whites (or meringue powder mixed with water) in a 1:2 ratio instead of using plain water. Royal icing sets firmer and provides the durability necessary for detailed decorations. Just keep in mind that it may take a little longer to loosen when you’re ready to use it.
Common Mistakes to Avoid
One of the most common mistakes when making Easy Glace Icing is **getting the consistency wrong**. If your icing is too thick, it won’t spread out smoothly on your cookies, resulting in uneven patches. Too thin, and it will run off the edges, making a mess of your beautiful decorations. To get it right, always start with less water, and add more only a tiny bit at a time!
Another pitfall is **under-mixing**. Always whisk your icing thoroughly until it is completely smooth and fluffy before using it. Undermixed icing can lead to clumps that affect the final look, leaving you with a less polished cookie.
Timing is also crucial. If you allow the icing to sit too long before decorating, it may dry out or form a crust, making it difficult to create smooth designs. Make sure to decorate your cooled cookies right after mixing the icing for seamless results.
Lastly, ensure your cookies are completely **cool** before icing. Applying icing to warm cookies will cause it to melt and not set correctly. Wait for your cookies to cool on a wire rack covered with parchment paper or wax paper to catch any drips.
Storage, Freezing & Reheating Tips
Storing leftover Easy Glace Icing is easy! Place it in an airtight container at room temperature, where it can last for up to a week. To avoid a crust from forming, press plastic wrap directly onto the surface of the icing before sealing the container.
If you want to freeze the icing for future use, pour it into a sealable freezer bag and push out as much air as possible before sealing. It can be stored in the freezer for up to three months. When ready to use, thaw it overnight in the refrigerator, and then let it come to room temperature before stirring. If it thickens, add a few drops of water to loosen it back up.
Keep in mind that once your decorated cookies are fully set and dried, you should store them in an airtight container at room temperature (not in the fridge, as it can cause the icing to become sticky). They’ll generally last for up to a week—if they last that long!
Frequently Asked Questions
1. **Can I substitute regular sugar for powdered sugar in this recipe?**
No, powdered sugar is essential for achieving the smooth texture and desired sweetness of glace icing. Granulated sugar will not dissolve correctly and may lead to an unpleasant grainy texture in your icing.
2. **How can I adjust the thickness of my icing?**
To achieve your desired icing consistency, start by using 2 tablespoons of water and gradually increase as needed. If you find it too thick, add water a teaspoon at a time. If it becomes too thin, just mix in a bit more powdered sugar until you reach the right consistency.
3. **What’s the best way to pipe icing onto cookies?**
Using a piping bag with a small round tip (size 2 or 3) is ideal for fine detailing. Alternatively, you could use a squeeze bottle for a more controlled flow. For flood icing, consider using a larger tip or cutting the end off of a disposable piping bag to create an opening that allows the flow to spread easily.
4. **Can I add color to my glace icing without affecting the consistency?**
Yes! Just make sure to use gel food coloring as it is less likely to thin your icing compared to liquid versions. Add a small amount of gel food coloring to your icing and gently mix until the color is uniform, checking the consistency as you go to ensure it remains smooth.
5. **How can I make my cookies look more decorated?**
For added visual interest, consider using edible glitter or sprinkles immediately after applying the icing. This way, it will stick to the wet icing. You can also think about using different piping techniques, like adding outlines or layering colors, to enhance the overall design of your cookies.
In conclusion, mastering the art of Easy Glace Icing opens up a world of creativity in cookie decorating. Whether you’re preparing for a special occasion or simply indulging in a sweet treat at home, this icing is quick, versatile, and sure to impress. Don’t hesitate to experiment with flavors and colors to make your cookies truly unique. So gather your ingredients, unleash your inner baker, and enjoy the delightful results of your hard work—your cookies are going to be the talk of the town! Feel free to share this recipe with friends and family or customize it to suit every festive gathering—happy baking!
[Read also: Easy Dessert Recipes for Beginners]


