Prep time: 30 minutes
Cook time: 15 minutes
Total time: 45 minutes
Servings: 24 pops
Every year, as the flowers bloom and the sun shines a little brighter, we know it’s time for Easter celebrations. One of the most cherished memories I have from childhood is gathering in the kitchen with family to create delightful treats that not only filled our stomachs but also our hearts. This brings us to the charming world of Easter Vanilla Cake Pops. These delightful bites are a perfect blend of flavor and joy, making them a festive addition to any Easter gathering. Imagine taking a bite into a soft, moist cake enveloped in creamy white chocolate. That’s what these cake pops deliver—a burst of sweet nostalgia that is both fun to make and even more enjoyable to eat.
In this article, I’ll take you through everything you need to know to successfully create these delicious pops of joy. We’ll explore their origins, the ingredients that make them special, and I’ll provide you with tried-and-true steps to ensure your cake pops turn out perfectly every time. Expect to pick up a few tips along the way, and I’ll even throw in some variations for those who want to mix things up. Whether you’re a busy parent looking for a fun project with the kids or an individual wanting to impress at your Easter brunch, this recipe is for you!
What Is Easter Vanilla Cake Pops?
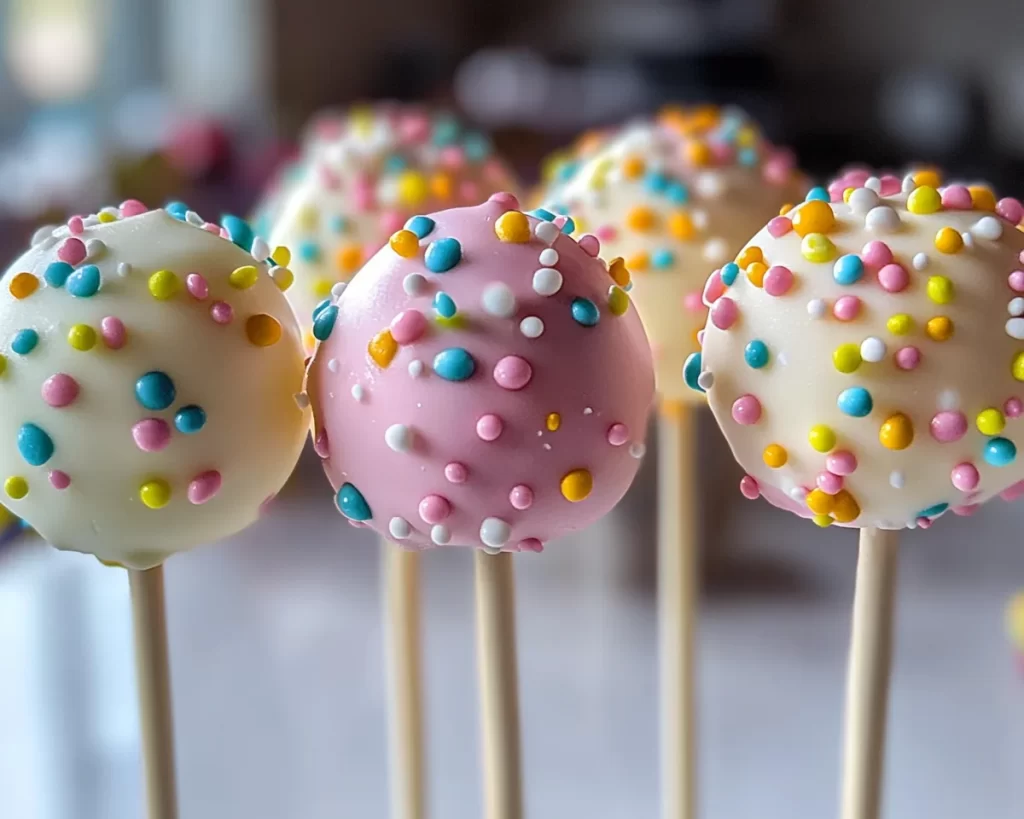
Easter Vanilla Cake Pops are delightful, bite-sized treats made by crumbling vanilla cake mixed with frosting, rolling them into balls, and coating them with chocolate. The origins of cake pops are relatively recent; they became popular in the United States in the early 2000s. Traditionally, they are used to celebrate special occasions, and Easter is the perfect time to enjoy these festive bites.
The texture of Easter Vanilla Cake Pops is a wonderful contrast—soft and moist cake inside, paired with a hard chocolate shell that adds a delightful crunch. The flavor profile is subtly sweet, with vanilla taking the lead. These pops can also be decorated in a multitude of ways, incorporating bright colors and sprinkles that symbolize the joy of Easter. The process of making them can be incredibly engaging, especially when you involve family or friends—turning a simple dessert into a delightful activity.
Why You’ll Love This
You’ll be enamored with Easter Vanilla Cake Pops because they are supremely versatile. They can cater to various dietary needs, including gluten-free and dairy-free options, making them perfect for guests with restrictions. Moreover, their bite-sized nature makes them an ideal treat for any occasion—be it Easter brunch, birthday parties, or even just a sweet snack to share with loved ones.
A common misconception about making cake pops is that they are challenging and time-consuming. In reality, once you grasp the basic steps, the process becomes seamless and fun. You might even find that you enjoy experimenting with different flavors and decorations. Additionally, cake pops are budget-friendly; most of the ingredients are pantry staples, and they can be made with leftover cake, demonstrating those effective budget meal-prepping skills.
Ingredients You’ll Need
- Vanilla Cake: The foundation of your cake pops, a light and fluffy vanilla cake is crucial to achieving that melt-in-your-mouth experience. You can also substitute with a boxed cake mix to save time.
- Buttercream Frosting: This adds moisture and binds the crumbled cake together. Feel free to use store-bought or homemade. Cream cheese frosting can also be a delightful alternative for those who enjoy a tangy flavor.
- White Chocolate (or Candy Melts): The perfect coating for your pops; its sweetness complements the cake. You may use dark chocolate for a richer flavor or colored melting chocolates for a playful approach.
- Sprinkles: Adding these gives your cake pops a festive touch, representing the colors of spring. Use themed sprinkles for added charm.
- Lollipop Sticks: These are essential for holding your pops. They can be found in baking supply stores or online.
- Vegetable Oil: When melting your chocolate, adding a small amount of oil helps achieve a smooth and glossy finish.
Each of these ingredients plays a crucial role in crafting your Easter Vanilla Cake Pops, elevating them to a delightful treat your family and friends will adore.
How to Make
Follow these detailed steps to create your delightful Easter Vanilla Cake Pops:
- Bake the vanilla cake: Preheat your oven to 350°F (175°C). In a large mixing bowl, combine flour, sugar, baking powder, and salt. In another bowl, whisk together eggs, milk, and melted butter. Gradually combine the wet and dry ingredients, mixing until smooth. Pour the batter into a greased cake pan and bake for about 25–30 minutes, or until a toothpick comes out clean. Allow it to cool completely before proceeding to the next step.
- Crumble the cooled cake: Once the cake has cooled, remove it from the pan and crumble it into a large bowl using your hands. Ensure there are no large chunks remaining; you want even crumbs that will hold together with the frosting.
- Add the frosting: Pour in about 1 cup of buttercream frosting and mix it into the crumbled cake until everything is well combined. The mixture should be moist but not overly wet. If it’s too dry, add a bit more frosting, a tablespoon at a time, until you achieve the desired consistency.
- Shape the cake pops: With clean hands, scoop portions of the mixture and roll them into 1-inch balls. Place them on a parchment-lined baking sheet. This step is perfect for involving children—let them have fun rolling the cake into pops!
- Chill the cake balls: Cover the baking sheet with plastic wrap and place it in the fridge for at least 30 minutes. Chilling helps to firm them up, making it easier for them to hold onto the lollipop sticks later.
- Prepare the coating: While the cake pops chill, melt your white chocolate or candy melts in a microwave-safe bowl. Heat it in 30-second intervals, stirring in between until smooth. Adding a teaspoon of vegetable oil can help the chocolate to become more liquid and easy to work with.
- Insert the sticks: Dip the tip of each lollipop stick into the melted chocolate and then into the center of each cake ball. This helps the stick to adhere better as it sets. Place the cake pops back onto the baking sheet after inserting the sticks.
- Coat the cake pops: Once all the cake pops have sticks, dip each pop into the melted chocolate, ensuring they are completely covered. Allow any excess chocolate to drip off. You can use a spoon to help coat them evenly.
- Add decorations: Before the chocolate hardens, sprinkle your desired toppings and sprinkles on top. Be creative! You can also drizzle different colored chocolate over them for aesthetic appeal.
- Let them set: To keep the cake pops upright for setting, get a piece of foam or a block of styrofoam and insert the sticks into it. Let the chocolate harden completely, which usually takes about an hour at room temperature. For quicker results, you can place them in the fridge.
With these steps, you’ll not only create delicious cake pops but also engage in a fun, sensory experience that often brings everyone together during Easter festivities.
Variations & Substitutions
Chocolate Cake Variation: If you’re a chocolate lover, why not switch things up with a chocolate cake base instead of vanilla? The deep flavor of a rich chocolate cake combined with a chocolate coating intensifies the taste experience. This variation works well with chocolate or cream cheese frosting, adding another layer of decadence. Just follow the same steps as outlined, and you’ll have chocolate cake pops that are sure to satisfy.
Dairy-Free Version: For those who are lactose intolerant or following a dairy-free diet, substituting the butter and milk in the cake with plant-based alternatives, like almond or oat milk, and using vegan buttercream frosting can create a delicious cake pop without sacrificing flavor. Use dairy-free chocolate or candy melts for coating to ensure the dessert stays dairy-free. This way, everyone can indulge without worry!
Gluten-Free Option: Making gluten-free cake pops is a breeze! Simply swap out regular flour for a gluten-free blend, ensuring it is a 1:1 substitute for the best results. You can also opt for almond flour for a different flavor profile. The key is ensuring that all ingredients, including sprinkles and frosting, are labeled gluten-free. You won’t miss out on taste or texture with this variation!
Mini Easter Egg Surprise: To make your Easter Vanilla Cake Pops even more festive, consider hiding a small chocolate egg inside each pop. Shape a bit of cake around a mini chocolate egg before coating. This provides a delightful surprise when someone takes a bite. It’s an excellent way to create an interactive treat that embodies the Easter spirit.
Common Mistakes to Avoid
One of the most common mistakes when making cake pops is having a mixture that is either too dry or too wet. The consistency should allow you to form balls without them falling apart. If your mixture is too crumbly, add more frosting gradually, while if it’s too wet, incorporate more cake crumbs.
Another frequent error is dipping the pops before they are adequately chilled. If the cake pops are warm, they will fall apart in the chocolate, resulting in a messy coating. Always allow the cake balls to chill for at least 30 minutes before adding the lollipop sticks.
Additionally, be mindful of the temperature when melting chocolate. If it’s overheated, it can become clumpy and unusable. Therefore, always melt the chocolate in short intervals and stir frequently to maintain a smooth consistency. Remember, patience pays off when making these treats.
Storage, Freezing & Reheating Tips
To store your Easter Vanilla Cake Pops, keep them in an airtight container at room temperature for up to a week. If you live in a warm climate, it’s better to store them in the refrigerator, which will help maintain the integrity of the chocolate coating. Allow them to reach room temperature before serving for the best flavor and texture.
If you’re planning ahead or simply have leftover cake pops, you can freeze them! Place the pops on a parchment-lined baking sheet and freeze until solid, then transfer them to a freezer-safe container. When you’re ready to enjoy, simply remove a few pops and let them thaw in the refrigerator overnight.
It’s crucial to make sure that your cake pops are completely cooled before freezing, as excess moisture can damage the coating upon thawing. Also, never reheat cake pops once they’ve been coated, as this can lead to undesirable results in texture and taste.
Frequently Asked Questions
Can I use a boxed cake mix for this recipe?
Absolutely! Using a boxed cake mix can save you time and still yield delightful cake pops. Just follow the package directions for baking and then proceed with the rest of the recipe. It’s a great way for beginner bakers to create an impressive treat without any added stress.
What can I use instead of lollipop sticks?
If you don’t have lollipop sticks on hand, you can use sturdy straws or even wooden skewers cut to size. Just ensure whatever you choose is safe to eat and can support the weight of the cake ball without breaking.
Can I make these cake pops ahead of time?
Certainly! Cake pops can be made ahead and stored for a week at room temperature or up to three months in the freezer. Just make sure they are in an airtight container to keep them fresh. This makes them an excellent option for busy schedules or last-minute gatherings.
How do I make my cake pops look more festive?
Get creative! You can drizzle them with colored melts, add edible glitter, or use assorted sprinkles and toppings to make them more visually appealing. Consider using a combination of textures and colors to embody the Easter vibe and make them pop on your dessert table.
Why are my cake pops falling off the sticks?
If your cake pops are detaching from their sticks, they may not have been chilled properly before dipping. Alternatively, if the chocolate or coating is too thick, it can add weight that causes them to slide off. Ensuring a proper chill and a smooth chocolate coating can remedy this issue.
Conclusion:
In conclusion, Easter Vanilla Cake Pops are more than just a treat; they create lasting memories and bring people together in celebration. They are approachable, delicious, and adaptable to suit any occasion or dietary need. So roll up your sleeves, gather your ingredients, and embark on a delightful baking adventure with family or friends. Customize them however you’d like, and don’t hesitate to share your creations with others. Enjoy the joy that these little treats can bring, and remember, the process is just as enjoyable as the outcome! Happy baking!


