Prep time: 30 minutes
Cook time: 25 minutes
Total time: 2 hours 55 minutes (including rising time)
Servings: 12 buns
The aroma of freshly baked bread wafting through your home can evoke different feelings—nostalgia, warmth, and comfort. For many, Easter Hot Cross Buns are not just a delightful treat; they symbolize the **joy of sharing** food with family and friends. This recipe stands out as it merges rich history with deliciousness, making it perfect for celebrations. In this article, you will learn all about these wonderfully spiced buns that bring together warm spices, sweet currants, and their distinctive cross. You will discover how to bake them to perfection, explore variations to suit different tastes, and find tips to avoid common pitfalls in the kitchen.
What Is Easter Hot Cross Buns?
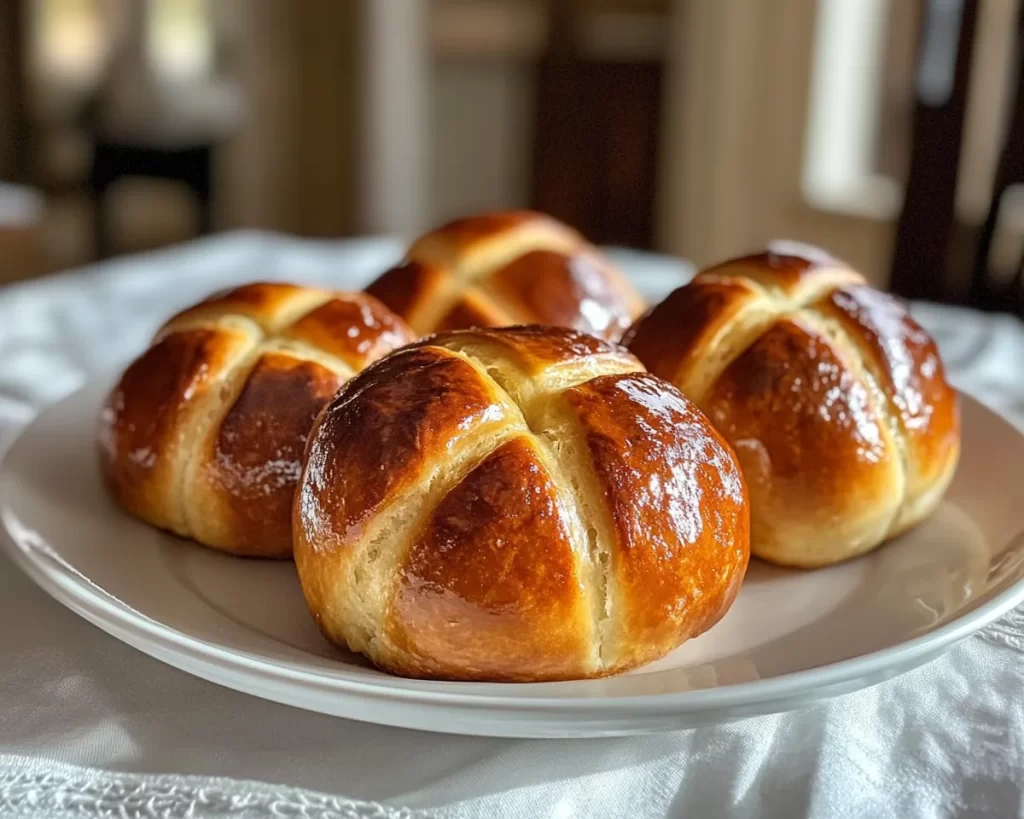
Easter Hot Cross Buns are sweet, spiced buns typically made with **currants or raisins**, and they are traditionally eaten during the Easter season. Their origins date back to England, where they were believed to have been made by monks in the 12th century. Over the years, these delightful buns became associated with the Christian Holy Week, specifically Good Friday, because of the **cross** that adorns their tops, symbolizing the crucifixion of Jesus Christ.
These buns are not only rich in flavor but also in texture. When baked to perfection, the exterior is golden-brown and slightly crusty, providing a beautiful contrast to the soft, pillowy interior. The combination of **cinnamon, nutmeg, and allspice** creates a warm spice blend that fills the home with an inviting aroma as they bake. The sweetness of the dried fruit enhances the overall taste, making each bite a delightful experience. Regardless of the origin, these buns have made their way into many families’ Easter celebrations worldwide, embodying a culinary tradition that brings people together.
Why You’ll Love This
This recipe for Easter Hot Cross Buns is truly special for several reasons. Firstly, the taste is undeniably rich and satisfying, with a perfect balance of sweetness and spice. The bread comes out incredibly fluffy, making it a delightful treat for breakfast or as a snack. Additionally, the buns are cost-effective to make at home, allowing you to whip up a generous batch without breaking the bank. This makes them a great option for families or for those who want to share with friends and neighbors.
While some may think that baking their own bread is daunting, especially for beginners, this recipe breaks down each step to make it approachable. The key is allowing the dough to rise adequately, which creates a light and airy texture. Comparing store-bought options, homemade buns will undoubtedly shine in flavor and freshness, making every bite worth the effort. Don’t miss out on the chance to **customize** these buns to fit your palate, whether with different fruits or additional spices. The versatility of this recipe makes it a favorite among both beginners and experienced bakers alike.
Ingredients You’ll Need
- All-purpose flour: This forms the base of your buns, providing the necessary structure. You can substitute with bread flour for a chewier texture.
- Active dry yeast: Essential for leavening the dough, making it light and fluffy. Ensure it’s fresh for best results.
- Granulated sugar: Adds sweetness to the buns. Honey or brown sugar can be used as alternatives, but they may slightly change the flavor.
- Milk: Serves to activate the yeast and enrich the dough. Feel free to use plant-based milk if you want a dairy-free option.
- Butter: Provides richness and tenderness. For a dairy-free version, use margarine or coconut oil.
- Salt: Enhances the overall flavor. Do not skip this, as it balances the sweetness of the buns.
- Cinnamon, nutmeg, allspice: These spices give the buns their characteristic warm flavor. Adjust the quantities to suit your taste.
- Dried currants or raisins: These add sweetness and texture; you can also use cranberries or chopped dried apricots if preferred.
- Egg: This is used in the dough for richness and to achieve a beautiful golden color when baking. You can omit it for a vegan version.
- Powdered sugar: Used for making the glaze that tops the buns. This can also be skipped if you prefer a simpler finish.
How to Make
- In a small bowl, mix together active dry yeast, granulated sugar, and warm milk. Allow it to sit for about 5 to 10 minutes until it becomes foamy. This step ensures that the yeast is active and ready to leaven your dough.
- In a large mixing bowl, combine all-purpose flour, spices (cinnamon, nutmeg, allspice), and salt. Create a well in the center and pour in the foamy yeast mixture along with melted butter and beaten egg. Stir until the dough starts to come together.
- Now, knead the dough on a floured surface for about 8-10 minutes until it becomes smooth and elastic. If you find the dough is too sticky, add a bit more flour. Kneading develops the gluten, giving the buns their structure.
- Transfer the kneaded dough to a greased bowl, cover it with a kitchen towel, and allow it to rise in a warm place until it has doubled in size, which should take about 1-2 hours.
- Once the dough has risen, punch it down gently to release the air. Add in the dried currants or raisins, kneading them into the dough until evenly distributed.
- Shape the dough into equal-sized balls and place them on a baking tray lined with parchment paper. Make sure to leave enough space between each bun for further rising. Cover them with a towel and let them rise again for about 30-45 minutes.
- Preheat your oven to 375°F (190°C). While the oven is heating, prepare the cross by mixing flour and water to form a thick paste. Transfer this paste to a piping bag or a plastic bag with the corner snipped off, then pipe a cross over each bun.
- Bake the buns in the preheated oven for about 20-25 minutes until they are golden brown. You will know they are ready when they sound hollow when tapped on the bottom.
- While the buns are baking, prepare the glaze using powdered sugar and water. Once the buns are out of the oven, brush the glaze over them while they are still warm, allowing it to soak in for extra sweetness.
- Allow the buns to cool slightly before devouring them fresh out of the oven. These can be enjoyed warm or toasted with a pat of butter. Don’t forget to share with your loved ones!
Variations & Substitutions
Chocolate Chip Hot Cross Buns: If you’re a chocolate lover, incorporating chocolate chips into your hot cross buns can elevate the flavor to new heights. Adjust the recipe to replace some of the dried fruit with semi-sweet or dark chocolate chips. This version is delightful for kids and those with a sweeter tooth. Ensure to keep an eye on the baking time, as the chocolate may melt faster than the bread cooks.
Gluten-Free Hot Cross Buns: For those on a gluten-free diet, you can achieve a similar texture using gluten-free all-purpose flour. Ensure the flour blend you choose contains xanthan gum, as this will help bind the ingredients and mimic the elasticity of regular flour. The flavor remains rich and indulgent, making it a wonderful alternative for everyone to enjoy during Easter.
Vegan Hot Cross Buns: To make a vegan version of these delightful buns, simply omit the egg and substitute dairy milk with any plant-based milk, such as almond or oat milk. Replace the butter with coconut oil or vegan margarine. The buns will still come out soft and delicious, while also accommodating dietary preferences.
Fruit Mix Hot Cross Buns: Experiment with your choice of dried fruit! While currants and raisins are traditional, you can also try dried cranberries, apricots, or even figs. Mixing different fruits can introduce varying flavors and textures, enhancing your buns’ appeal. It’s a fantastic way to utilize leftover dried fruit in your pantry.
Common Mistakes to Avoid
When making Easter Hot Cross Buns, several common mistakes can jeopardize your delicious endeavors. One key issue is not allowing the dough enough time to rise, which can result in dense and heavy buns. It is crucial to be patient during the rising stages; the longer you let it rise, the fluffier your buns will be.
Another common problem is using cold ingredients, especially milk or butter. Activating the yeast requires warmth, so always ensure that your ingredients are at room temperature before mixing. If you add cold ingredients, the yeast may not activate properly, leading to less rise and a denser texture.
Additionally, overworking the dough can be problematic. Kneading is essential, but once the dough is smooth and elastic, stop. Over-kneading can result in tough buns instead of the desired tender texture. Remember to monitor the baking time as well; check for that golden brown color, but also perform the hollow sound test to ensure they are done.
Storage, Freezing & Reheating Tips
Storing your Easter Hot Cross Buns properly is essential for maintaining their freshness. Once they have cooled completely, you can store them in an airtight container at room temperature for up to 2 days. If you wish to keep them longer, consider freezing them. To do this, wrap each bun individually in plastic wrap and place them in a freezer-safe bag. They can be stored this way for up to 3 months.
When you’re ready to enjoy, simply remove the desired number of buns from the freezer and let them thaw at room temperature. For a freshly baked taste, you can reheat them in an oven preheated to 350°F (175°C) for about 10-15 minutes. This will restore that delightful softness and warmth.
For food safety, always ensure that any leftovers are kept in a cool, dry place to prevent mold growth. You can also slice the buns and toast them for a delicious breakfast option or snack.
Frequently Asked Questions
Can I make the dough ahead of time? Yes, you can prepare the dough a day in advance. After kneading, cover and refrigerate it. Let it come to room temperature and rise before shaping. This allows for deeper flavor development.
What can I use instead of raisins or currants? You can substitute raisins or currants with other dried fruits such as apricots, cranberries, or cherries. Each will bring its unique flavor to the buns, enhancing the overall taste and moisture.
How do I prevent my buns from being dry? To prevent dry buns, ensure your dough has sufficient moisture. Avoid overbaking them, and check for doneness early, keeping in mind that they continue to cook slightly once removed from the oven.
Can I use instant yeast instead of active dry yeast? Absolutely! If you choose to use instant yeast, you can mix it directly into your dry ingredients without proofing it in warm milk. This will save you a little time during the preparation.
How long do leftovers last? When stored properly in an airtight container, Hot Cross Buns can last up to 2 days at room temperature. They can be stored in the freezer for up to 3 months, and a quick reheating will restore their fresh taste.
Conclusion:
This Easter Hot Cross Buns recipe combines delightful flavors and a rich history that will surely become a cherished tradition in your home. From the comforting scent of spices to the soft, pillowy texture, these buns will bring joy to your family gatherings. Don’t hesitate to customize them to fit your preferences, or share them with friends and loved ones to spread the love. Your journey in baking doesn’t end here; it’s just the beginning. So roll up your sleeves, gather your ingredients, and let the delightful journey of making Hot Cross Buns start. Happy baking!