Prep time: 10 minutes
Cook time: 10 minutes
Total time: 20 minutes
Servings: 4
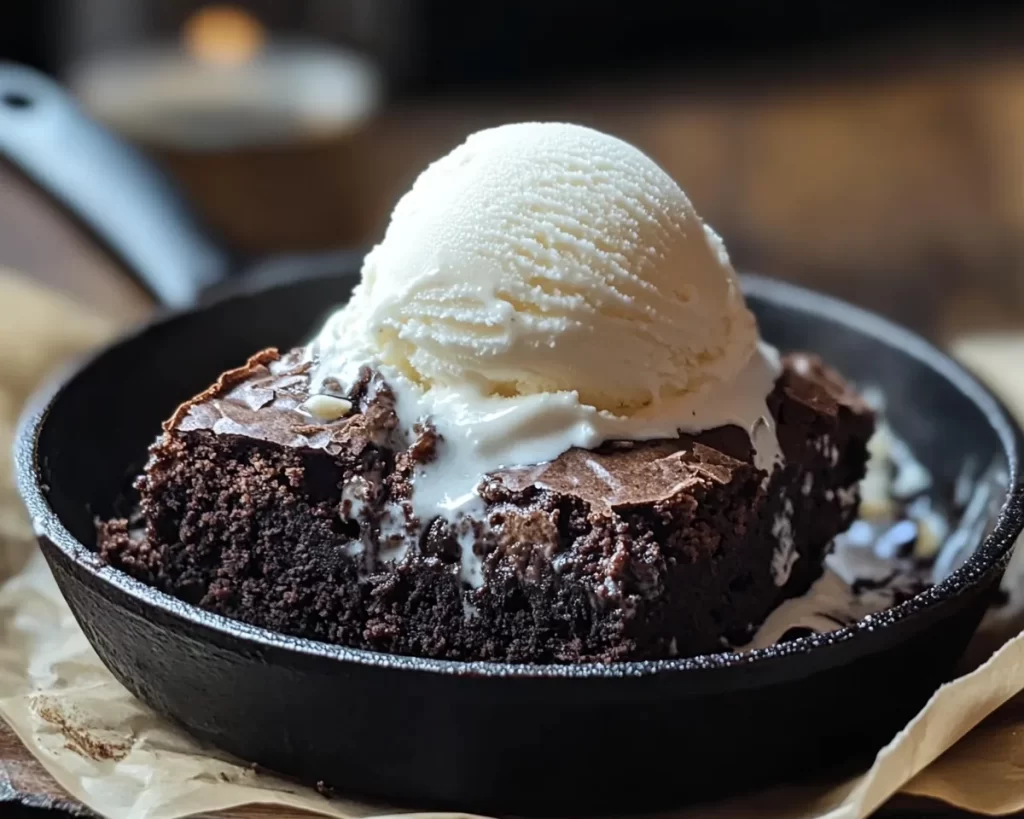
Indulging in a rich, fudgy brownie topped with a scoop of creamy vanilla ice cream is a universal pleasure that can bring joy to anyone’s day. This dessert recipe is not just swift; you can whip up this delightful Skillet Brownie with Vanilla Ice Cream in just 20 minutes, making it perfect for busy families or those spontaneous moments when you crave something sweet yet simple. With a few basic ingredients and straightforward steps, you’ll have a warm dessert that balances the richness of chocolate with the lightness of ice cream, creating a heavenly combination.
What Is Dessert Recipes: Skillet Brownie With Vanilla Ice Cream in 20 Minutes?
The Skillet Brownie is an easy yet indulgent dessert that is prepared directly in a skillet, allowing for a crispy outer layer and a soft, gooey interior. The concept of a skillet brownie combines two elements of nostalgia: the rich, buttery flavors of homemade brownies and the comforting touch of a warm dessert served straight from the pan. This recipe simplifies the traditional brownie-making process while providing the added flair of serving with a generous scoop of vanilla ice cream, allowing the heat of the brownie to melt the ice cream just a bit, creating a luscious experience in every bite.
Why You’ll Love This
You’ll adore this dessert for several reasons. First, it’s incredibly quick to make—perfect for when unexpected guests arrive or when you just can’t wait to satisfy your sweet tooth. Second, the flavors meld beautifully, making each forkful an explosion of sweet, chocolatey goodness complemented by the creamy texture of the ice cream. The flexibility of this recipe also allows for various toppings or mix-ins such as nuts, chocolate chips, or even a drizzle of caramel, so you can easily tweak the recipe to suit your tastes or use what you have on hand. Plus, the beauty of baking in a skillet provides a charming presentation that is sure to impress.
Ingredients You’ll Need
- 1/2 cup (1 stick) unsalted butter: This is the foundation of the richness in your brownie, giving it a moist and fudgy texture.
- 1 cup granulated sugar: Sweetens the brownie perfectly, balancing the deep chocolate flavor.
- 2 large eggs: Eggs help bind the ingredients together and add to the gooey texture.
- 1 teaspoon vanilla extract: Adds a wonderful aromatic flavor that enhances the sweetness.
- 1/3 cup unsweetened cocoa powder: This is what gives the brownie its chocolatey depth. Use good-quality cocoa for a rich flavor.
- 1/2 cup all-purpose flour: Flour adds structure to the brownie, so it isn’t too dense.
- 1/4 teaspoon salt: A pinch of salt balances out the sweetness and enhances all the flavors.
- 1/4 teaspoon baking powder: This ingredient helps the brownie rise slightly, contributing to a nice texture.
- Vanilla ice cream (for serving): A classic accompaniment that pairs divinely with warm brownies.

How to Make
- Preheat your oven to 350°F (175°C). While it’s heating, place a cast-iron skillet on the stove over low heat. Adding the butter to melt it slightly will help infuse it with flavor.
- Add in the granulated sugar and stir continuously until combined with the melted butter. This mixing will create a creamy base; it should only take a couple of minutes.
- Remove the skillet from the heat and allow it to cool slightly. Whisk in the eggs, one at a time, followed by the vanilla extract. The mixture will become glossy as you blend it.
- In a separate bowl, mix together cocoa powder, flour, salt, and baking powder. Gradually add this dry mixture to the wet ingredients in the skillet, folding gently until just combined. Avoid over-mixing to keep the brownies soft.
- Once your batter is well-mixed, spread it evenly across the skillet. Place it in the preheated oven and bake for about 10 minutes. Keep an eye on it—the brownie is done when a toothpick inserted into the center comes out with a few moist crumbs.
- After removing the skillet from the oven, let it cool for a few minutes before serving. Top each slice with a scoop of vanilla ice cream, allowing the heat of the brownie to slightly melt the ice cream for a delightful contrast of temperatures.
Variations & Substitutions
Nutty Chocolate Brownie: For a nutty twist, add 1/2 cup of chopped walnuts or pecans to the brownie batter before baking. This not only adds texture but also a delightful crunch that complements the softness of the brownie. Ensure the nuts are finely chopped to distribute evenly and create a beautiful harmony in flavors.
Mint Chocolate Brownie: If you’re a fan of mint, consider adding a teaspoon of peppermint extract along with the vanilla. You could also fold in a handful of mint chocolate chips into the batter to enhance the freshness while keeping the richness of chocolate intact.
Gluten-Free Brownie: To make this brownie gluten-free, you can substitute the all-purpose flour with an equal amount of almond flour or a gluten-free all-purpose blend. It gives the brownie a unique flavor and texture, making it just as delicious.
Vegan Brownie: Replace the butter with coconut oil, the eggs with flax eggs (1 tablespoon of ground flaxseed mixed with 3 tablespoons of water per egg), and use a plant-based milk for a dairy-free version that is equally scrumptious and satisfying.
Common Mistakes to Avoid
One of the most common mistakes is overmixing the batter once the flour is added. Overmixing can lead to a dense and tough brownie rather than a fluffy and fudgy one. Another pitfall is baking the brownie too long; it’s crucial to remember that the brownie will continue to cook slightly even after being removed from the oven. Additionally, neglecting to let it cool for a bit before serving can result in a messy experience; patience is key to achieving that perfect slice.
Storage, Freezing & Reheating Tips
To store leftover brownies, cover the skillet with plastic wrap or transfer slices to an airtight container. They can stay fresh at room temperature for about 3 days. For longer storage, you can freeze the brownies. Wrap them individually in plastic wrap and then place them in a freezer bag or container. They will keep well for up to 3 months. When reheating, place the frozen brownie in the microwave on medium power for 20-30 seconds, or until warmed through. Just be careful not to overheat them to keep that gooey texture intact.
Frequently Asked Questions
Can I use a different type of pan instead of a skillet?
Absolutely! If you don’t have a skillet, you can use an 8×8 inch baking pan. Just be mindful that the baking time may vary slightly; keep an eye on it to achieve the perfect consistency.
What can I do if my brownie is too dry?
If you find that your brownie has turned out too dry, it might be due to overbaking. To remedy this texture issue in future batches, try reducing the baking time by a minute or two. For a quick fix, you can serve it warm with a scoop of ice cream, which adds creaminess and offsets any dryness.
Can this recipe be doubled?
Yes! Doubling the ingredients is an excellent way to serve more people without altering the flavor. Just ensure that the skillet or pan you choose can accommodate the larger batch; you may need to increase the baking time slightly.
Is it possible to make these brownies ahead of time?
Yes! You can prepare the batter ahead of time and store it in the refrigerator for up to 24 hours before baking. When you’re ready, simply pour the batter into the skillet and bake as directed. This makes it convenient for gatherings or last-minute dessert needs.
Are there any variations for special diets?
Yes, this recipe is versatile for various dietary needs. You can easily make it gluten-free using almond flour or a gluten-free flour blend, and for vegans, substitute the butter and eggs with plant-based alternatives, ensuring everyone can enjoy this delicious dessert.
Conclusion: With this quick and easy Skillet Brownie with Vanilla Ice Cream recipe, you can enjoy a decadent dessert that caters to the busy lifestyle. It’s rich in flavor, beautifully textured, and can be customized to suit various dietary needs. You’ll be creating delightful treats that will satisfy cravings and impress guests in no time. So gather those ingredients and get ready to indulge!