Prep time: 20 minutes
Cook time: 35 minutes
Total time: 55 minutes
Servings: 12
Indulging in a rich, decadent dessert is one of life’s simple pleasures. Imagine sinking your teeth into a fudgy brownie that harmoniously combines layers of smooth chocolate and crunchy peanut butter. These Decadent Chocolate Peanut Butter Crunch Brownies are not only a treat for the taste buds but also a time-saver for busy home cooks. You may find yourself craving this dessert for special occasions or simply a weeknight indulgence. As you read through, you’ll discover not just the recipe but also tips to make it your own, variations to delight family and friends, and answers to the questions often posed about this dessert.
What Is Decadent Chocolate Peanut Butter Crunch Brownies?
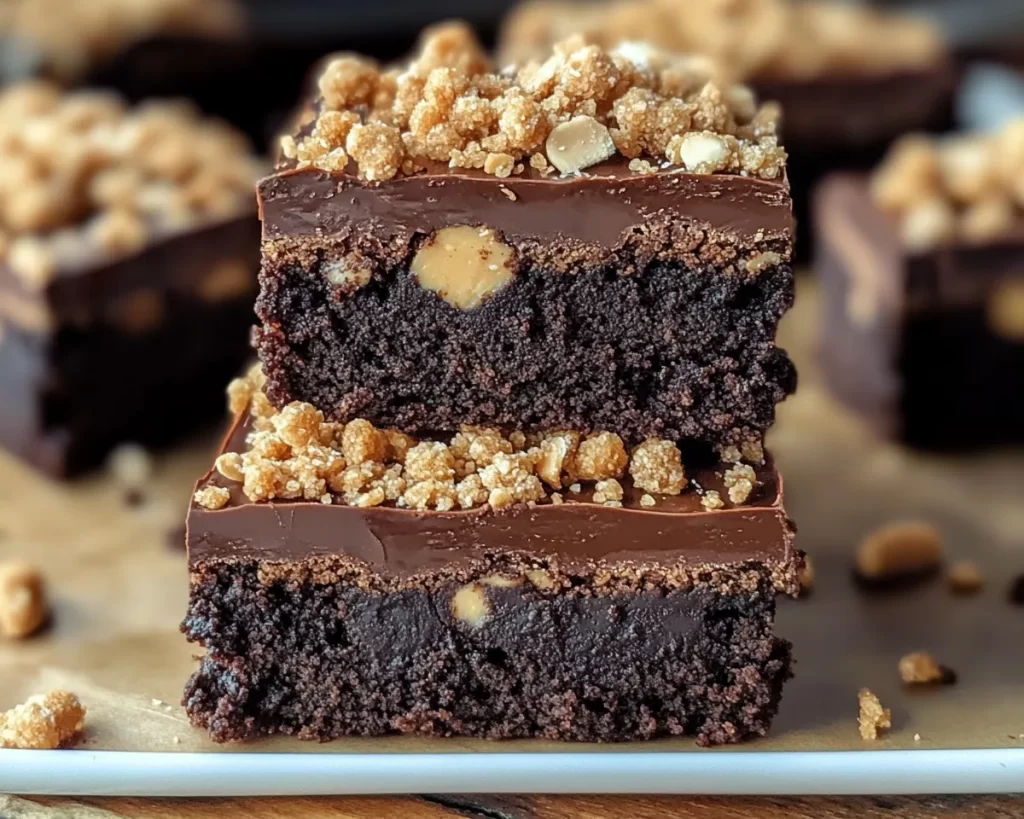
Decadent Chocolate Peanut Butter Crunch Brownies are a luscious blend of textures and flavors that create an irresistibly satisfying dessert experience. Originating from the classic brownie concept, these brownies are infused with **rich dark chocolate** and a delightful crunch brought in by **peanut butter** and **crispy rice cereal**. The brownies boast a glossy top layer that gives way to a fudgy interior, making each bite a melange of **sweet, salinity**, and **crunch**.
The first time you take a bite, you’ll notice how the smooth **peanut butter layer** complements the dense brownie base. As you chew, the texture of the crispy topping adds an exciting crunch, which contrasts beautifully with the moistness of the brownie. The recipe makes these brownies incredibly versatile; you can serve them warm with a scoop of vanilla ice cream for an ultimate treat or enjoy them cold as a satisfying sweet snack.
Overall, this dessert is more than just a brownie; it represents a culinary journey where the kitchen transforms into a haven for **comfort food**. Whether for a family gathering or a cozy night in, these brownies elevate the occasion with their enchanting flavors.
Why You’ll Love This
There are countless reasons to adore these Decadent Chocolate Peanut Butter Crunch Brownies. Firstly, the taste is nothing short of heavenly; the combination of **chocolate** and **peanut butter** evokes a rich, comforting flavor that many find nostalgic. As you savor each bite, the sweetness of the chocolate mingles with the saltiness of the peanut butter, creating a symphony of tastes that dance on your palate.
From a practical standpoint, this recipe is **easy to follow**, making it suitable for both novice and experienced cooks. With just a few ingredients and minimal equipment required, you can create this dessert without breaking a sweat. Furthermore, it’s a budget-friendly option that allows you to impress your loved ones without spending a fortune. A mixture of staple pantry items like flour, eggs, and chocolate comes together to create a treat that looks and tastes elegant.
There’s also room for creativity in this recipe, as you can easily customize it to cater to various dietary preferences. If you’re dairy-free or gluten-free, you can substitute certain ingredients without sacrificing flavor. Moreover, these brownies are perfect for meal-prepping during busy weeks, ensuring you always have a delicious treat on hand to satisfy your cravings.
Ingredients You’ll Need
- Unsalted Butter: Using unsalted butter allows you to control the saltiness in your recipe. It also helps achieve a fudgy brownie texture.
- Dark Chocolate: Choose high-quality dark chocolate to enhance the flavor. Semi-sweet chocolate can also work if you prefer a sweeter brownie.
- Granulated Sugar: This adds sweetness to the brownie base and balances the rich chocolate flavor.
- Brown Sugar: The brown sugar introduces moisture and a rich caramel flavor that complements the chocolate and peanut butter.
- Large Eggs: Eggs provide structure and moisture, helping to bind the ingredients together.
- All-Purpose Flour: This ingredient is essential for structure. For gluten-free variations, almond flour or gluten-free all-purpose flour can be excellent substitutes.
- Peanut Butter: Use creamy peanut butter for smooth brownie layers or crunchy peanut butter for added texture. If you’re seeking nut-free options, **sunflower seed butter** can be a great substitute.
- Crispy Rice Cereal: This adds the delightful crunch element. You can use unsweetened varieties to maintain balance.
- Vanilla Extract: A dash of vanilla extract enhances the overall flavor, elevating your brownies to new levels.
- Salt: A pinch of salt heightens the flavors of the other ingredients, making the chocolate and peanut butter stand out.
Each ingredient plays a crucial role in crafting your delicious creation, and substituting them carefully can yield fantastic results.
How to Make
- Preheat your oven to 350°F (175°C). Preheating your oven is crucial for an even bake. While the oven is warming up, prepare a 9×13-inch baking pan by lining it with parchment paper or greasing it with butter. This step ensures easy removal of the brownies after baking.
- Melt the butter and dark chocolate together. In a medium saucepan, combine the unsalted butter and chopped dark chocolate over low heat. Stir frequently until both are completely melted and smooth. This process should take about 5 minutes. Remove from heat and let it cool slightly. This step is vital, as adding eggs to hot chocolate can scramble them.
- Whisk in the sugars. Once the chocolate mixture has cooled slightly, add both granulated sugar and brown sugar. Use a whisk to combine until the mixture is glossy and smooth. The sugars will help create a shiny crust on the brownies.
- Add the eggs and vanilla. Incorporate the eggs, one at a time, whisking thoroughly after each addition. Mix in the vanilla extract. The eggs will provide structure and moisture to your brownies; so make sure they are mixed well.
- Fold in the flour and salt. Gently sift in the all-purpose flour and salt into the chocolate mixture. Use a spatula to fold the dry ingredients into the wet ones, being careful not to overmix. Overmixing can lead to tough brownies.
- Prepare the peanut butter layer. In a separate bowl, take creamy peanut butter and add in a bit of sugar if desired, for sweetness. You can also mix in crispy rice cereal at this stage if you’d like a crunchy texture. This layer adds a delightful contrast to the soft brownie base.
- Assemble the brownies. Pour half of the brownie batter into the prepared pan and spread it evenly. Gently dollop spoonfuls of the peanut butter mixture over the brownie base. Use a knife to swirl the peanut butter into the brownie batter, creating a marbled effect.
- Top with the remaining brownie batter. Carefully spread the remaining brownie batter on top of the peanut butter layer. Make sure to cover it completely to avoid any peanut butter burning during baking. This step adds another layer of decadence to your brownies.
- Bake the brownies. Place the baking pan in your preheated oven and set your timer for 25-30 minutes. Once baked, a toothpick inserted into the center should come out with a few moist crumbs—not completely clean. This indicates that the brownies are fudgy and perfect.
- Let them cool. After baking, remove the pan from the oven and let the brownies cool in the pan for about 15 minutes. Then transfer them to a wire rack to cool completely. Cooling is crucial because it allows the brownies to set properly, making slicing and serving much easier.
- Slice and serve. Using a sharp knife, cut the cooled brownies into squares or rectangles. Serve them as is or warm them up slightly and add a scoop of vanilla ice cream for an indulgent dessert. Your decadent brownies are now ready to delight your family and friends!
As you follow these steps, you will notice captivating scents wafting through your kitchen, drawing everyone into your baking success. Don’t hesitate to taste the batter along the way—it’s too good not to!
Variations & Substitutions
Gluten-Free Variation: If you or your friends are gluten-sensitive or celiac, you can easily make these brownies gluten-free without losing any of their rich flavor. Substitute regular flour with a gluten-free flour blend or almond flour. Be sure to check if the other ingredients, like chocolate and peanut butter, are labeled gluten-free as well.
Healthier Option: For those looking to indulge in a slightly healthier version, consider using coconut oil instead of butter and substituting applesauce for half of the sugar. This way, you’ll still enjoy delicious brownies while cutting down on refined sugars and unhealthy fats. Using whole grain or oat flour can also provide additional nutrients.
Nut-Free Alternative: If you have nut allergies, swap out the peanut butter with sunflower seed butter or any other nut-free alternative. This will give you a similar texture without the nut content, ensuring that everyone can enjoy the brownies safely.
Custom Add-Ins: If you’d like to get creative, consider incorporating add-ins like crushed Oreos, chocolate chips, or even mint extract for a unique twist on flavor. These additions can elevate your brownies, making them a talking point at gatherings. Just remember to adjust the sweetness based on what you add.
Vegan Brownies: If plant-based options are more your style, substitute traditional eggs with flaxseed meal (1 tablespoon of flaxseed meal mixed with 2.5 tablespoons of water replaces one egg) and use dairy-free chocolate and nut butter. You can also try incorporating black beans, which provide a fudgy texture while adding protein.
Experimenting with these variations can enhance not just how the brownies taste but also how they fit into various dietary needs and preferences. Feel free to explore and discover what works best for you!
Common Mistakes to Avoid
When you’re making brownies, a few common pitfalls can turn a potentially amazing dessert into a disaster. One of the biggest issues is **overbaking**. It’s crucial to keep a close eye on your brownies in the oven. If they bake too long, they can become dry and lose their delicious fudgy quality. Always start checking a few minutes before the recommended baking time. A toothpick inserted into the center should come out with a few moist crumbs for that ideal texture.
Another common error is **not letting the brownies cool before cutting.** While it may be tempting to dig in right away, cutting warm brownies can lead to messy edges and an unfinished appearance. Allowing them to cool appropriately ensures cleaner cuts and a more enjoyable presentation.
Lastly, be cautious about the proportions of **peanut butter to chocolate.** Too much peanut butter can overpower the chocolate flavor you’re aiming for and potentially disrupt the brownie structure. Stick closely to the recipe’s guidelines for the best results.
Being mindful of these pitfalls can make all the difference, ensuring your brownies turn out as tempting and delicious as you envision.
Storage, Freezing & Reheating Tips
Storing your Decadent Chocolate Peanut Butter Crunch Brownies is easy and straightforward. First, ensure they are completely cooled before wrapping them up. You can store leftover brownies in an airtight container at room temperature for up to 3–4 days. For extended freshness, you can place them in the refrigerator where they will last up to a week.
If you want to enjoy these brownies at a later date, freezing is an excellent option. Cut the brownies into squares and wrap each piece tightly in plastic wrap, followed by aluminum foil to prevent freezer burn. They can be frozen for up to 3 months. When you’re ready to enjoy them, simply let them thaw in the refrigerator overnight or at room temperature for a few hours.
Reheating the brownies is a simple task as well. You can pop them in the microwave for about 10-15 seconds for a warm, gooey treat. Alternatively, place them in an oven set at 350°F (175°C) for about 5-10 minutes to warm them through while maintaining their texture.
When stored and handled properly, these brownies can be a delightful treat ready to enjoy whenever you like!
Frequently Asked Questions
Can I make these brownies dairy-free? Yes, you can easily make dairy-free brownies by substituting butter with coconut oil or vegan butter. Additionally, make sure to choose **dairy-free chocolate** when melting. This way, you can still enjoy rich brownies without dairy.
What can I use instead of eggs? If you need an egg substitute, you can use flaxseed meal or unsweetened applesauce. For each egg you want to replace, mix 1 tablespoon of flaxseed meal with 2.5 tablespoons of water and let it sit until it becomes gel-like. Alternatively, 1/4 cup of applesauce works well as one egg in many baking recipes, including brownies.
How can I make my brownies less sweet? If you prefer a less sweet brownie, consider reducing the amount of granulated sugar or using dark chocolate with a higher cacao content. You can also incorporate unsweetened cocoa powder for depth without adding sugar. Taste the batter before baking, and adjust accordingly.
Why did my brownies come out cakey instead of fudgy? The texture of brownies is primarily determined by the mixing method and baking time. If your brownies are cakey, you may have overmixed the batter or baked them for too long. Ensure that you mix just until combined and keep a close watch on the baking time.
Can I add nuts or other mix-ins to the recipe? Absolutely! Feel free to enhance your brownies by adding chopped walnuts, pecans, or any favorite sweets like chocolate chips or candies. Just remember to adjust the sugar levels based on what you include to maintain balanced sweetness.
Conclusion:
Decadent Chocolate Peanut Butter Crunch Brownies embody the essence of comfort food, packed with flavor and soul. Their rich, fudgy consistency complements the delightful crunch of peanut butter, making each bite a memorable experience. Whether you make them for a cozy family gathering or a fun potluck, they’re bound to impress. Don’t hesitate to customize them to your liking or get creative with flavors. Friends and family will appreciate your effort, and who knows, this may become a regular recipe in your baking repertoire. So go ahead, indulge in these brownies, share them with loved ones, and embrace the joy they bring. Happy baking!


