Prep time: 15 minutes
Cook time: 60 minutes
Total time: 1 hour 15 minutes
Servings: 8-10
There’s something inherently comforting about the aroma of **Classic Date Nut Bread** wafting through your home. Perhaps it conjures memories of family gatherings, cheerful holiday celebrations, or cozy evenings next to the fireplace. This particular recipe has been cherished for generations, often shared from one home cook to another, delighting busy families during the holiday season. It’s a delightful blend of **sweet, sticky dates** and crunchy nuts, all enveloped in a moist, tender loaf that invites you back for seconds—maybe even thirds.
This recipe promises not only ease of preparation but also **incredible taste** that is sure to impress both friends and family alike. Throughout this article, you’ll learn about the history behind this delectable treat, why it’s so beloved, and how to master the art of baking it yourself. Additionally, I’ll provide **tips, variations**, and answers to frequently asked questions, ensuring that you feel confident in your baking endeavors.
What Is Classic Date Nut Bread | Old-Fashioned Holiday Loaf Recipe?
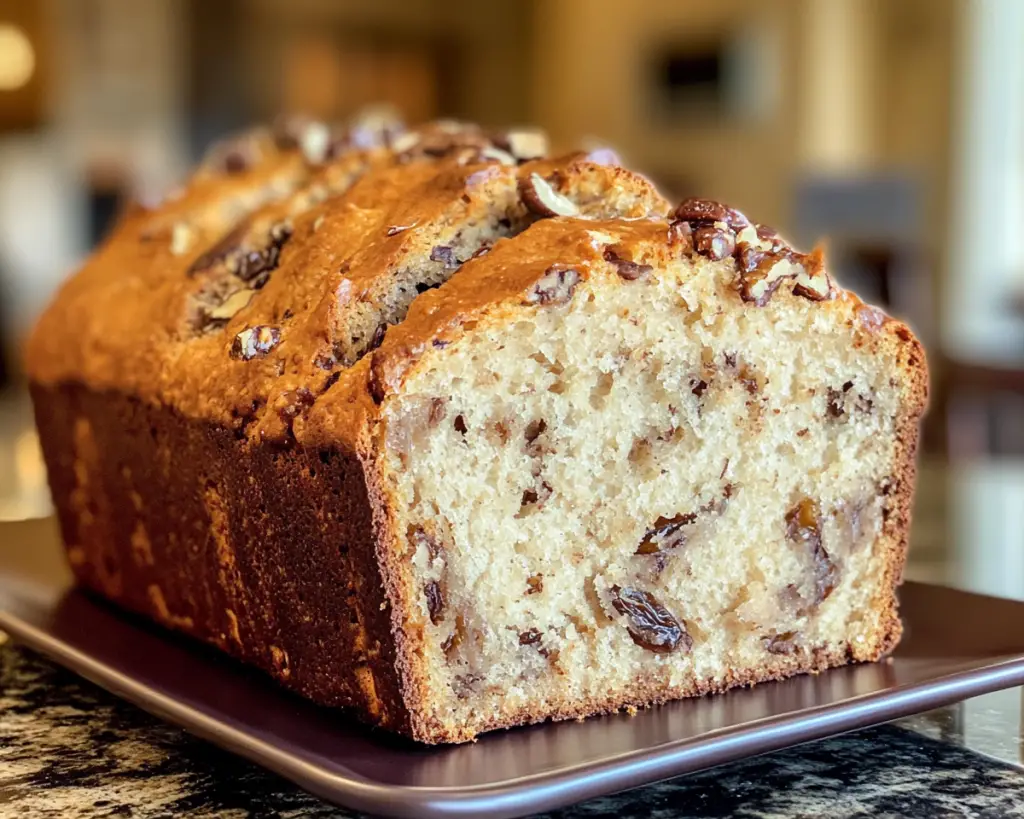
Classic Date Nut Bread traces its roots back to many American kitchens in the early 20th century. Simple yet rich in flavor, this loaf captures the essence of holiday baking with its warm, sweet notes. The primary ingredients include **dates**, which lend a natural sweetness and chewiness, and **nuts**, typically walnuts, that provide a wonderful crunch and additional depth of flavor.
This bread is characterized by a dense yet tender crumb and a golden-brown crust, offering a delightful contrast when enjoyed warm with a pat of butter. Each slice reveals dark speckles of dates and pieces of nuts, promising a **perfect balance of textures and tastes**. It’s wonderful served as part of brunch, as a snack, or toasted for breakfast. Whether slathered with cream cheese or eaten plain, Classic Date Nut Bread should hold a special place in your heart (and kitchen).
Why You’ll Love This
You will adore this recipe for several reasons. First off, the **taste** is unmatched: the combination of sweet dates and nutty flavors meld together beautifully, creating a loaf that is both satisfying and indulgent. Not only is the flavor profile incredible, but it is also straightforward and forgiving, making it the ideal choice for beginner bakers. You can whip it up quickly, and the ingredients are typically affordable and easy to find.
Another benefit is its **versatility**—perfect for the holidays but just as delightful any day of the year. Many **bakers mistake** it for something overly complicated or time-consuming when, in fact, it requires minimal tools and effort. It’s a no-fuss recipe that even busy parents can master in their spare time, making it a great choice for meal prep or a sweet snack after a hectic day.
This bread can also be adjusted for dietary preferences, giving it even more appeal. You can swap in different nuts or even add spices like cinnamon to customize the flavor, making this recipe your own while still retaining that classic essence.
Ingredients You’ll Need
- Dates: Use pitted dates (Medjool are preferred for their softness) for sweetness and texture.
- Walnuts: Chopped walnuts add a nutty crunch. You may substitute with pecans if desired.
- All-purpose flour: Provides the structure of the bread. For a gluten-free option, try using a gluten-free all-purpose blend.
- Baking soda: This is essential for leavening, providing lift and ultimate tenderness.
- Salt: A pinch enhances the overall flavor of the loaf.
- Eggs: Acts as a binder and adds moisture to the loaf.
- Sugar: Granulated sugar contributes to the sweetness and moisture; you can reduce it if you prefer less sweet bread.
- Vegetable oil: Keeps the loaf moist; you can use melted coconut oil as a **substitution** for a different flavor.
- Vanilla extract: Adds a lovely aroma and enhances the sweetness.
- Milk: Helps to bring the batter together and adds moisture; use almond or oat milk for a dairy-free version.
Each of these ingredients plays a crucial role, forming a harmonious blend that results in a rich, flavorful bread. When preparing your ingredients, always measure carefully to ensure a consistent outcome.
How to Make
- Preheat your oven: Preheat the oven to 350°F (175°C). While it heats, you’ll be getting your ingredients and pans organized. A properly preheated oven ensures even baking, helping your bread rise correctly.
- Prepare your baking pan: Grease a 9×5-inch loaf pan with cooking spray or butter. For added insurance against sticking, you may sprinkle a light layer of flour. This simple step ensures ease when you’re ready to remove the loaf.
- Mix the dry ingredients: In a large bowl, combine the flour, baking soda, and salt. Whisk them together thoroughly to ensure that the leavening agent is evenly distributed in the flour. An even mixture of these components will assure a well-risen loaf.
- Prepare the dates: If your dates are not already pitted and chopped, do so now. Dice them into small pieces to ensure they blend well throughout the loaf. If desired, you can soak the dates in hot water for about 10 minutes to soften them further, but this step is optional.
- Prepare the wet mixture: In a separate bowl, whisk together the eggs, sugar, vegetable oil, vanilla extract, and milk. Mix until combined. This wet mixture helps introduce moisture and richness into the bread. You want to achieve a homogeneous batter that combines all flavors seamlessly.
- Combine dry and wet ingredients: Pour the wet ingredients into the bowl of dry ingredients. Gently fold the mixture until just combined; be careful not to overmix, as this can result in a tough texture. At this point, it’s essential to have a gentle touch: let the batter come together without stirring too much.
- Add in the walnuts and dates: Fold the chopped dates and walnuts into the batter. Make sure they are evenly distributed but do not overmix. You will want to see bits of dates peeking through your mixture for visual appeal and tasting pleasure.
- Transfer to the baking pan: Pour your batter into the prepared loaf pan, smoothing the top with a spatula. This ensures an even rise and a beautiful presentation when baked.
- Bake: Place the loaf in the preheated oven and bake for 60 minutes or until a toothpick inserted into the center comes out clean. Your kitchen will fill with an enticing aroma as it bakes.
- Cooling: Once baked, carefully remove the bread from the oven and let it cool in the pan for about 10 minutes before transferring it to a wire rack. Cooling in the pan allows it to firm up slightly before moving. Allow it to cool completely before slicing, which allows the flavors to develop further.
Following these steps diligently will yield a beautifully baked classic date nut bread that is both delicious and visually appealing.
Variations & Substitutions
Gluten-Free Classic Date Nut Bread: For those who follow a gluten-free diet, you can easily make this recipe gluten-free by using a gluten-free all-purpose flour blend. Be sure to use a blend that contains xanthan gum, as it helps provide elasticity and makes up for the lack of gluten, ensuring a nice texture and rise.
Chocolate Chip Date Nut Bread: Elevate your traditional recipe with the addition of chocolate chips! Mix in ½ cup of semi-sweet or dark chocolate chips along with the dates and walnuts for a decadent twist. The combination of sweet dates and rich chocolate will captivate anyone who takes a bite.
Maple Pecan Variation: Instead of using walnuts, try substituting them with pecans for a slightly sweeter, buttery flavor. You can also replace the granulated sugar with pure maple syrup in equal proportions. This swap will add a beautiful depth of flavor while keeping the loaf moist.
Spicy Date Nut Bread: For a warm spice kick, try adding a teaspoon of ground cinnamon and a dash of nutmeg to the dry ingredients. You can also consider adding ¼ teaspoon of ground ginger or cardamom to spice it up even further. These aromatic spices will give your bread an extra layer of warmth and comfort, perfect for winter baking.
Fruit and Nut Fusion: Adding other dried fruits like **raisins** or **cranberries** can add new flavor dimensions. Simply substitute a portion of the dates with an equal weight of dried fruit. This mixture creates a lovely contrast with the dates and adds bursts of tartness.
Common Mistakes to Avoid
One common mistake when baking Classic Date Nut Bread is overmixing the batter. Remember, mixing just until the ingredients combine is crucial; overmixing can lead to a tough, dense texture instead of a **fluffy** crumb. Always use a gentle folding motion when adding your nuts and dates.
Another mistake is using old dates. Fresh **Medjool dates** are soft and sweet, making them perfect for this bread. If your dates are hard or very dry, consider soaking them in hot water for about 10 minutes before chopping and adding them to the batter. This will help in creating a moist loaf.
Sometimes, the bread may not rise properly due to expired baking soda. Check the expiration date regularly; if the soda is old, it may not provide the necessary lift, resulting in a dense loaf. Always measure accurately and check freshness before starting to ensure optimum results.
Storage, Freezing & Reheating Tips
Classic Date Nut Bread is wonderfully adaptable when it comes to storage. Once cooled, wrap it tightly in plastic wrap or aluminum foil. For best results, store it at room temperature for up to 3 days. You can also refrigerate it for about one week without significant loss of quality.
For longer-term storage, consider freezing the loaf. Wrap it tightly in plastic wrap, then in foil or a freezer-safe bag. It can last in the freezer for up to 3 months. When you’re ready to enjoy, simply thaw at room temperature, or pop slices in the toaster for a deliciously warm treat.
When reheating, be cautious not to overdo it, as bread can become dry. A quick 30 seconds in the microwave or toasting it lightly can refresh the bread nicely, bringing back its original tenderness and flavor without compromising its texture.
Frequently Asked Questions
Can I substitute different types of nuts in this recipe? Yes, absolutely! While walnuts are traditional, you can use pecans, almonds, or even a mixture of your favorite nuts. Each will impart a unique flavor and texture to the bread. Just remember to chop them into small pieces for even distribution.
How do I know when my bread is done baking? A toothpick inserted into the center is the best test; it should come out clean or with a few moist crumbs attached, not wet batter. Additionally, the bread should have a golden-brown exterior and feel firm to the touch.
Can I use other types of flour instead of all-purpose flour? Yes, though using different flours may change the texture. Whole wheat flour adds a nuttier flavor but may make the bread denser. If you opt for gluten-free flour, ensure it has xanthan gum for the best final texture.
Is Classic Date Nut Bread healthy? It’s relatively healthy compared to many desserts. The dates provide natural sweetness and fiber, and the nuts add healthy fats and protein. However, keep in mind the sugar and oil content, and consider modifying them to suit your dietary needs or preferences.
Can I make this bread ahead of time? Yes! In fact, it often tastes even better the next day as the flavors have time to meld. You can bake it ahead of time and store it properly as outlined in storage tips, making it a perfect option for holiday gatherings or busy weeks ahead.
Conclusion:
Classic Date Nut Bread is a treasure trove of flavor and nostalgia. Its **sweetness, versatility**, and ease of preparation make it a favorite during the holidays and beyond. I encourage you to try your hand at this delightful recipe, customizing it to suit your taste, and sharing it with your loved ones. Whether you serve it fresh from the oven or toast it for breakfast, it’s bound to warm hearts. Don’t hesitate—get baking today, and enjoy every last bite!