Prep time: 20 minutes
Cook time: 12-15 minutes
Total time: 35 minutes
Servings: 12 cookies
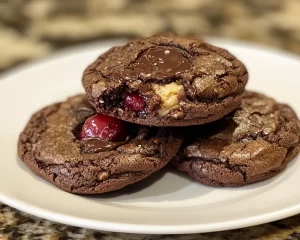
Imagine walking through the kitchen, the sweet aroma of freshly baked cookies wafting through the air. As you take a bite, the rich, velvety taste of red velvet mingled with the creamy, decadent surprise of cheesecake fills your mouth. Cheesecake stuffed red velvet cookies are not just another dessert; they are an experience, a delightful fusion that combines two beloved treats into one heavenly bite. These cookies are perfect for special occasions like birthdays or holidays, but they’re also simple enough to whip up on a cozy weekend. In this article, you’ll discover how to create these delicious cookies from scratch, explore their rich history, and learn invaluable tips to make them your own.
Not only will you learn about the taste and texture of cheesecake stuffed red velvet cookies, but you’ll also find useful variations. Whether you are a baking novice or an experienced home cook, the information shared here will be intuitive and straightforward. You’ll appreciate how to mix and match the ingredients while adhering to key cooking techniques that guarantee delicious outcomes each time.
What Is Cheesecake Stuffed Red Velvet Cookies – Easy Creamy Surprise Recipe?
Cheesecake stuffed red velvet cookies, as the name suggests, combine the classic texture and flavors of red velvet cake with the creamy filling of cheesecake. The cookie itself is soft, slightly chewy on the outside, and delightfully tender on the inside, making every bite a delicious experience. Originating from the Southern United States, red velvet cake is known for its characteristic deep red color, often contrasted with bright white icing or cream cheese. The addition of cheesecake elevates this classic, creating layers of flavor and texture that is simply irresistible.
When you take your first bite, the initial sweetness of the red velvet exterior is met with the lusciousness of the cheesecake filling, creating a perfect harmony that astonishes the palate. Not only are these cookies visually stunning, with their vibrant red color and white filling, but they also pack a flavor punch. Cheesecake stuffed red velvet cookies are versatile enough to suit various occasions and interests.
Imagine serving these delectable cookies at a gathering; they are sure to be the star of the dessert table. You will likely find them disappearing faster than you can say “cheesecake.” This recipe isn’t just another cookie; it’s an adventure that brings smiles and satisfaction to everyone lucky enough to indulge.
Why You’ll Love This
There are numerous reasons to fall in love with cheesecake stuffed red velvet cookies. First, their taste is an irresistible combination of flavors: the slightly tangy cheesecake cut by the sweet richness of red velvet. This flavor is not only unique but leaves you craving more. They are also relatively easy to create, making them perfect for both beginners and seasoned bakers.
Cost consideration is another reason to appreciate this recipe. The ingredients are simple and affordable, meaning you can create something impressive without breaking the bank. Additionally, these cookies can be made in bulk and stored for later, making them ideal for meal prep or parties.
Many individuals may feel intimidated by baking with red velvet due to its unique qualities, but with this easy-to-follow recipe, you’ll learn that there’s nothing to worry about. One common misconception is that the red color primarily comes from food coloring; however, it’s often a blend of cocoa powder and buttermilk that creates the essential flavors. The presence of buttermilk also adds moisture to the cookie dough, providing that delectable gooey crumb.
So, go ahead and surprise your family or friends with this delightful cookie. They’re guaranteed to be a hit!
Ingredients You’ll Need
- Flour: All-purpose flour serves as the base for the cookies, giving them structure. You can substitute gluten-free flour for a gluten-free version.
- Cocoa powder: A key ingredient that contributes to both the rich color and flavor. Opt for high-quality cocoa powder for optimal taste.
- Sugar: Granulated sugar adds sweetness and helps create the cookie’s crispy edge and chewy interior. Brown sugar can add moisture.
- Butter: Unsalted butter is preferred for control over salt levels; it adds tenderness and flavor. Make sure it’s softened to room temperature.
- Eggs: Necessary for binding ingredients together, eggs help give structure and moisture to the cookies. Room temperature eggs work better.
- Red food coloring: This not only enhances the color but also adds a sense of festivity to the cookies. Use gel color for a more vibrant result.
- Vanilla extract: Adds a warm, sweet flavor that complements the other ingredients. Always choose pure vanilla over imitation for best results.
- Cheese filling: Cream cheese, powdered sugar, and vanilla extract come together to create a rich, tangy filling that completes the cookies. Soften the cream cheese for easy mixing.
- Salt: A small pinch balances the sweetness, enhancing the overall flavor profile of the cookies.
These ingredients might seem straightforward, but they each play a vital role in creating the delectable cheesecake stuffed red velvet cookie experience. Make sure to gather all your ingredients before starting your baking adventure for a seamless process.
How to Make
Follow these step-by-step instructions for perfect cheesecake stuffed red velvet cookies:
- Preheat the oven: Start by preheating your oven to 350°F (175°C). This is essential for an even baking environment. While the oven heats, you can prepare your dough without worrying about timing later.
- Make the cheesecake filling: In a mixing bowl, blend 8 oz of softened cream cheese, 1 cup of powdered sugar, and 1 tsp of vanilla extract until smooth. Make sure there are no lumps. Once done, set this mixture aside and refrigerate it to firm up. This will prevent it from leaking out after baking, ensuring that wonderful surprise when you bite into the cookie.
- Mix the dry ingredients: In a separate bowl, whisk together 2 cups of all-purpose flour, ¼ cup of cocoa powder, and a pinch of salt. Mixing these dry ingredients first allows for an even distribution when combined with the wet ingredients.
- Cream the butter and sugar: In a large mixing bowl, beat together ½ cup of softened unsalted butter and 1 cup of granulated sugar until it’s light and fluffy. This can take about 2-3 minutes. The creaming process is vital as it introduces air into the batter, ensuring your cookies remain light and airy.
- Add the eggs and food coloring: Crack in 1 large egg and continue to beat until well incorporated. Add in the red food coloring and 1 tsp of vanilla extract. Mix until the color is fully distributed. Don’t worry about over-beating; this mixture should be rich and vibrant!
- Combine dry ingredients: Gradually add the dry mixture to your wet ingredients, mixing until just combined. Overmixing can lead to tough cookies, so stop once you don’t see any flour streaks.
- Chill the dough: For even better results, refrigerate the dough for about 30 minutes. Chilling helps the flavors meld together and prevents the cookies from spreading too much during baking.
- Scoop the dough: Using a cookie scoop, take a portion of the dough and flatten it in your hand. Place about a teaspoon of the chilled cheesecake filling in the center, then encase it with the dough, rolling it back into a ball. This must be done gently to keep that creamy filling intact!
- Bake the cookies: Place the stuffed cookie dough balls on a parchment-lined baking sheet, spacing them out to allow room for expansion. Bake for 12-15 minutes, or until the edges begin to firm up. They’ll continue to cook slightly once removed from the oven, so avoid overbaking.
- Cooling: Remove the cookies from the oven and let them cool on the baking sheet for about 5 minutes before transferring them to a wire rack. This cooling phase ensures they set properly and maintain their shape.
- Enjoy: After allowing them to cool fully, your cheesecake stuffed red velvet cookies are ready to be devoured. You can serve them plain or dusted with extra powdered sugar for a flourish!
Baking can be an adventure, and following these steps will ensure your cookies are both beautiful and delicious. Don’t rush through any of the processes; allowing time for mixing, chilling, and baking is critical for success!
Variations & Substitutions
Chocolate Chip Variation: For a delightful twist, consider adding chocolate chips to your cookie dough. These can enhance the flavor with bursts of chocolate in every bite. Use semi-sweet or milk chocolate chips depending on your preference. Just fold in about ½ cup of chocolate chips after combining the wet and dry ingredients, and then proceed with the recipe as usual.
Red Velvet Brownies: If you want to take this recipe in an entirely different direction, transform it into red velvet brownies. Alter the ingredients slightly by introducing eggs and reducing the flour, making a denser, fudgier texture. The cheesecake could still be incorporated, topping it before you bake it. This variation is perfect for those who adore brownies and enjoy the rich flavor without the cookie texture.
Gluten-Free Variation: If you’re working with gluten sensitivities, don’t worry! Simply substitute the all-purpose flour for a gluten-free blend, ensuring that it contains xanthan gum for structural integrity. Adjust hydration as needed, as some gluten-free flour blends absorb moisture differently. The flavor will remain just as delightful!
Nutty Red Velvet: For an exciting crunch, try incorporating nuts like chopped walnuts or pecans into the cookie dough. This adds a new layer of flavor and texture that complements the soft cookie and creamy filling beautifully. Just fold in about ½ cup of chopped nuts before baking.
Fruit-Inspired Cheesecake: To introduce a fruity aspect, you can blend in crushed raspberries or strawberries into the cheesecake filling. This imparts a delightful tartness that balances the sweetness of the cookie. Just make sure you drain the fruit properly to prevent any excess moisture that could affect the cookie dough’s texture.
Each of these variations offers unique flavors and opportunities for customization, appealing to diverse tastes and dietary needs.
Common Mistakes to Avoid
One common mistake is overmixing the cookie dough. While mixing is essential, it’s crucial to stop once the ingredients are just combined. Overmixing leads to tough cookies, which detracts from the desired texture.
Another frequent issue occurs with improperly measuring flour. Ensure you spoon the flour into the measuring cup rather than scooping, which can compact the flour and result in using too much.
Also, watch your baking times closely. Cookies can go from perfectly baked to overdone in a matter of seconds. Always set a timer and check the cookies a couple of minutes before the stated time.
Lastly, be careful with cheesecake filling. To prevent it from leaking out, ensure that it’s chilled before being placed in the cookie dough. If it’s too soft, it will spill during baking, sabotaging your efforts.
By mindfully avoiding these mistakes, you can ensure that your cheesecake stuffed red velvet cookies turn out perfectly every time.
Storage, Freezing & Reheating Tips
Once you’ve baked a batch of these delicious cookies, you might be wondering about storing them. Allow the cookies to cool completely on a wire rack. Once cooled, you can store them in an airtight container at room temperature for up to five days. If you want to keep them fresher for longer, refrigerate them. Just ensure there’s some parchment paper between each layer to preserve their shape.
For long-term storage, you can freeze the cookie dough before baking. Freeze the individual cookie dough balls on a baking sheet until solid, then transfer them to a zip-top bag. They can be stored in the freezer for up to three months. When you’re ready to bake them, just pull them out and let them thaw for about 30 minutes before baking — no need to adjust the oven temperature, as they can bake from frozen.
If you’re dealing with leftover baked cookies, they can also be frozen. Place them in an airtight container separated by parchment paper, and they’ll maintain their quality for about two months. To reheat, simply pop them in a 350°F (175°C) oven for about 5-7 minutes to bring back that fresh-baked feeling.
Always remember to label your containers so you can easily identify each treat later on. Proper storage will help you enjoy these cookies long after they’re made!
Frequently Asked Questions
Can I use different food coloring?
Absolutely! While red food coloring is traditional for red velvet, you can experiment with other colors if you want to change it up. Keep in mind that the taste won’t be affected, but it may not have the iconic red velvet look.
Are there egg substitutes?
If you’re looking for an egg substitute due to dietary restrictions, consider using flaxseed meal or applesauce. For each egg, mix 1 tablespoon of flaxseed meal with 2.5 tablespoons of water, let it sit for a few minutes until it thickens. Alternatively, 1/4 cup of unsweetened applesauce per egg works well.
Can I make this recipe vegan?
Yes, you can make vegan cheesecake stuffed red velvet cookies by using plant-based butter, a flax egg or other egg replacement, and vegan cream cheese. The key is ensuring all ingredients align with your dietary needs while keeping the delicious flavors.
How long do these cookies last?
When stored correctly in an airtight container, these cookies can last up to five days at room temperature or even longer if refrigerated or frozen. Just ensure you keep them sealed well to maintain freshness.
Can I double the recipe?
Absolutely! Doubling the recipe is a great idea if you have a crowd to serve or want to stockpile some treats. Just make sure you have two baking sheets available, and stagger your baking times to avoid overloading your oven.
Conclusion:
In conclusion, cheesecake stuffed red velvet cookies are not just a treat but a delightful experience waiting for you in your kitchen. They easily impress friends and family, are surprisingly simple to make, and can be customized to fit your preferences. With straightforward steps and a bit of creativity, you’ll find yourself mastering this delightful recipe in no time. Don’t hesitate; try making these cookies today, and let the joy of baking fill your home with warmth, sweet aromas, and satisfied smiles. Share your creations and spread the love!