Prep time: 10 minutes
Cook time: 15 minutes
Total time: 25 minutes
Servings: 12 cookies
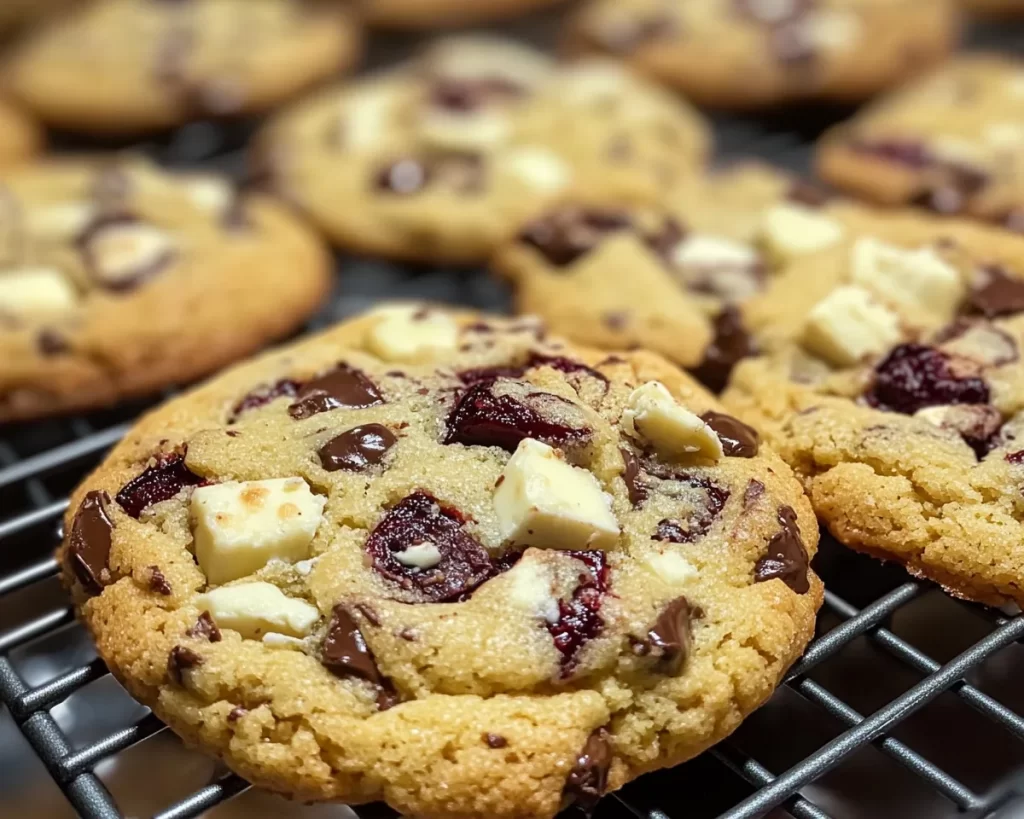
Indulging in cookies that combine rich chocolate with the tart flavors of cherries is a delight for the senses. Today, we’re embarking on a delicious journey with the **Black Forest Cookie: White Chocolate Black Cherry Chunk Cookies in 25 Minutes**. This recipe gives you the satisfaction of enjoying a luxurious dessert without spending hours in the kitchen. With a few simple ingredients and straightforward steps, you can create a batch of cookies that is both stunning and scrumptious. Whether you’re hosting a gathering, surprising your kids with a treat after school, or just craving something sweet, these cookies are sure to be a hit!
What Is Black Forest Cookie: White Chocolate Black Cherry Chunk Cookies in 25 Minutes?
The Black Forest cookie pays homage to the classic Black Forest cake. This cookie version features **juicy black cherries** and **creamy white chocolate chunks**, creating a delightful combination of flavors and textures. The buttery base holds the chocoholic elements together, resulting in a soft and chewy cookie that has a crunchy edge. These cookies are perfect for every occasion—whether you’re looking to impress guests or satisfy your sweet tooth. The best part? They come together in just **25 minutes**, making them a fantastic last-minute dessert option.
Why You’ll Love This
There are countless reasons to fall in love with the Black Forest cookie. Firstly, the sweet and tart flavor combination delivers a well-balanced treat. The **creamy white chocolate chunks** melt gloriously in the oven, adding a luxurious touch to each bite. Additionally, they are incredibly easy to make and require minimal cleanup—perfect for busy parents or kitchen beginners. You’ll appreciate how quickly you can whip up a batch while still delivering a bakery-quality treat that will leave your loved ones raving.
Ingredients You’ll Need
To make these delectable cookies, gather the following ingredients:
- 1 cup unsalted butter: At room temperature for easy creaming.
- 1 cup granulated sugar: Provides sweetness and structure to the cookies.
- 1 cup brown sugar: Adds moisture and a hint of caramel flavor.
- 2 large eggs: Acts as a binder, giving the cookies richness.
- 1 teaspoon vanilla extract: Enhances the overall flavor profile.
- 2 cups all-purpose flour: The base of the cookies, giving them structure.
- 1 teaspoon baking soda: Helps cookies rise and become fluffy.
- 1 teaspoon salt: Balances the sweetness and enhances flavors.
- 1 cup white chocolate chunks: Melts beautifully and adds sweetness.
- 1 cup dried black cherries: Provides a burst of tart flavor with every bite.
How to Make
1. **Preheat the oven** to 350°F (175°C). Prepare a baking sheet by lining it with parchment paper. This will prevent your cookies from sticking and make for easier cleanup.
2. **Cream the butters and sugars** together in a large mixing bowl. Using a hand mixer or stand mixer, combine 1 cup of unsalted butter with 1 cup granulated sugar and 1 cup brown sugar until the mixture is light and fluffy. This step is crucial as it incorporates air into the batter, ensuring the cookies are nice and chewy.
3. **Add the eggs and vanilla** to the butter mixture. Crack in 2 large eggs and pour in 1 teaspoon of vanilla extract. Mix until everything is combined. The dough should be smooth and slightly thick at this point.
4. **Mix the dry ingredients** in a separate bowl. In a medium bowl, whisk together 2 cups of all-purpose flour, 1 teaspoon baking soda, and 1 teaspoon salt. Gradually incorporate this dry mixture into the wet ingredients until you see no signs of flour.
5. **Fold in the chocolate chunks and cherries**. Gently stir in 1 cup of white chocolate chunks and 1 cup of dried black cherries. Make sure they are evenly distributed throughout the dough—each cookie should have a bit of both ingredients for balanced flavor.
6. **Scoop and bake**. Using a cookie scoop or heaping tablespoon, drop the dough onto your prepared baking sheet, leaving some space between each cookie to allow for spreading. Bake for about 10-12 minutes, or until the edges are lightly golden but the center appears slightly underbaked. This will help achieve that wonderful chewy texture.
7. **Cool the cookies** on the baking sheet for 5 minutes before transferring them to a wire rack to cool completely. This step allows them to set properly without becoming too hard.
Variations & Substitutions
Dairy-Free Option: To make these cookies dairy-free, you can use a dairy-free butter substitute and dairy-free white chocolate. There are many brands available that will not affect the overall flavor and texture dramatically.
Gluten-Free Version: For a gluten-free option, substitute the all-purpose flour with a 1:1 gluten-free flour blend. Ensure that the baking soda is also gluten-free to maintain a safe and delicious batch.
Add Nuts: If you’re fond of nuts, adding chopped pecans or walnuts to the batter can provide a delightful crunch and depth of flavor. Aim for about ½ cup, mixing them in when you incorporate the cherries and chocolate.
Fresh Cherries: If you have access to fresh black cherries, feel free to use them in place of dried ones. Just make sure to pit and chop them into smaller pieces to blend well in the batter.
Adjust Sweetness: If you prefer a less sweet cookie, you can reduce the granulated sugar by ¼ cup. However, this may slightly affect the cookie’s texture, so proceed with caution.
Common Mistakes to Avoid
One common mistake is **overmixing** the dough once the flour is added. This can lead to tough cookies instead of the desired soft and chewy texture. Mix just until the flour is incorporated, then add your add-ins.
Another pitfall is **baking at too high of a temperature**. Every oven varies, and baking slightly hotter can quickly lead to cookies that are burnt on the edges but raw in the center. Always keep an eye on your first batch to find the perfect timing for your specific oven.
Lastly, be cautious with **storage methods**—allow cookies to cool completely before sealing them in an airtight container. Storing warm cookies can make them soggy and lose their delightful texture.
Storage, Freezing & Reheating Tips
To maintain freshness, store the Black Forest cookies in an airtight container at room temperature for up to a week. If you need to store them for longer, freezing is an excellent option.
To freeze, place the cooled cookies in a single layer in a freezer-safe container, separating layers with parchment paper to prevent sticking. They can be frozen for up to three months. When you’re ready to enjoy again, simply let them thaw at room temperature or pop them in the microwave for a quick 10-15 seconds to bring back their warmth.
Reheating frozen cookies can help regain their chewy texture—just be sure not to overheat them, or they might become dry.
Frequently Asked Questions
Can I use other types of chocolate instead of white chocolate?
Absolutely! While white chocolate is traditional in this recipe, you can swap it out for semi-sweet or dark chocolate if you prefer a richer flavor. Just keep in mind that this will alter the overall sweetness of the cookies.
What is the best way to prevent cookies from spreading too much during baking?
Make sure to chill the dough for at least 30 minutes before baking. This helps firm up the fat, reducing spreading and yielding thicker cookies. A well-chilled dough will create a superior texture and result in chewy cookies.
Can I substitute fresh cherries for dried ones?
Yes, you can use fresh cherries! Be sure to pit and chop them into small pieces. Keep in mind that fresh cherries contain more moisture, which may slightly affect the cookie’s texture. You may need to adjust the dry ingredients accordingly.
Why are my cookies flat?
Flat cookies may indicate that you used melted butter instead of softened butter, or that your baking soda was old. Additionally, if you don’t let the dough rest or chill before baking, the cookies can spread. Always check for proper measurements and dough temperature.
How do I keep these cookies soft after baking?
Storing cookies in an airtight container will help maintain their softness. You can also place a slice of bread in the container, as the moisture from the bread will keep the cookies soft. However, be cautious, as too much moisture can make them soggy.
Conclusion:
In just **25 minutes**, you can whip up these delightful Black Forest cookies filled with luscious **white chocolate** and tart **black cherries**. Not only do they taste fantastic, but they also fill your kitchen with an inviting aroma that will draw everyone in. Perfectly chewy and satisfying, these cookies are ideal for any occasion, making them a must-try recipe for your dessert repertoire!