Prep time: 15 minutes
Cook time: 60 minutes
Total time: 1 hour 15 minutes
Servings: 8 slices
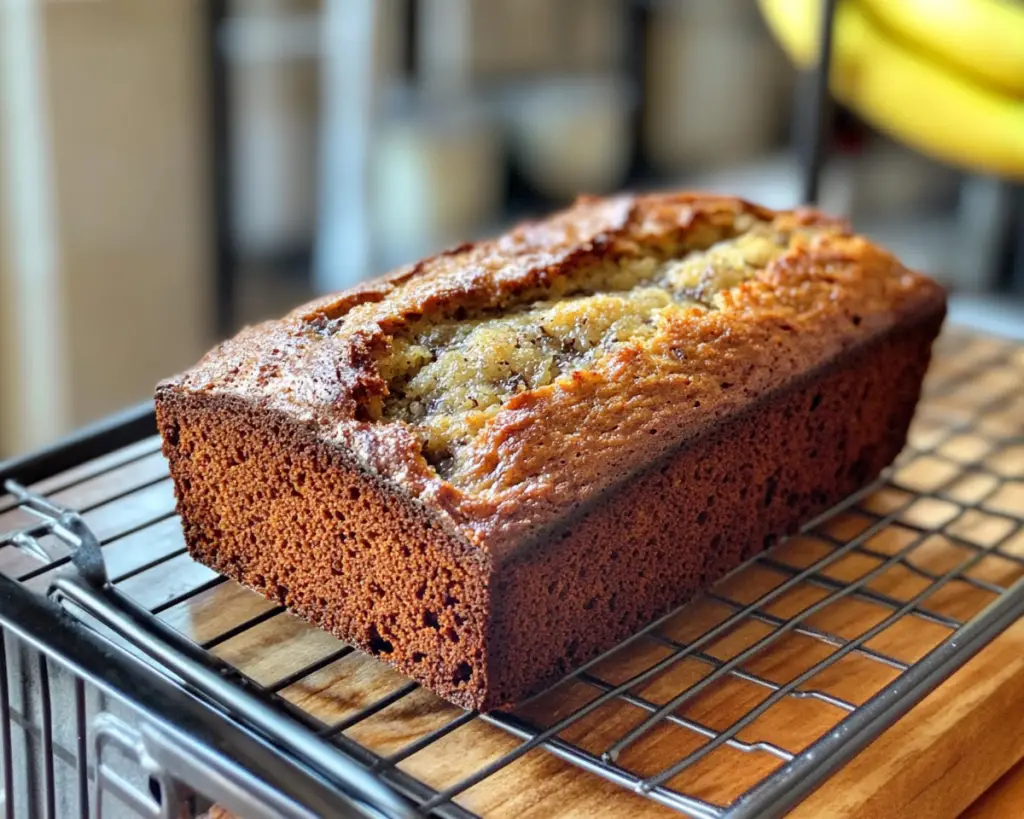
There’s nothing quite like the warm, inviting aroma of banana bread wafting through your kitchen. It’s a scent that often brings back memories of cozy afternoons spent with family or friends, perhaps with a slice in hand, topped with a bit of butter melting on the warm bread. My Best Moist Banana Bread recipe embodies all these memories, delivering a delightful treat that’s easy to make and incredibly satisfying.
This recipe is special because it uses overripe bananas—which are often overlooked—to create a moist, dense loaf that has a rich, sweet flavor. You’ll learn how simple ingredients come together to produce an indulgent banana bread that’s perfect for breakfast, an afternoon snack, or dessert. You’ll also pick up various tips, substitutions, and storage techniques to make the most out of this delightful dish.
What Is Best Moist Banana Bread?
Banana bread is a type of quick bread that has become a staple in many households around the world. This particular version is known for its moist texture, achieved by meticulously balancing the sugars and fats. Traditionally made with basic pantry staples, banana bread is incredibly versatile and can be customized with various ingredients and flavors.
The origins of banana bread date back to the 1930s during the Great Depression when baking soda and baking powder became widely available, allowing people to bake moist breads without the need for yeast. This version, however, stands out thanks to the use of perfectly ripe bananas, which infuse the bread with natural sweetness and flavor. Whether you enjoy it plain or with add-ins like nuts and chocolate, the flavor and texture of banana bread make it a beloved choice among many. Imagine biting into a thick slice that not only tastes delicious but also evokes feelings of home and comfort.
Why You’ll Love This
You are going to love this banana bread because of its unparalleled taste and texture. The combination of ripe bananas, sugar, and butter creates a sweet yet slightly savory flavor profile that is simply irresistible. If you’ve ever bitten into a dry slice of banana bread, rest assured, that will not happen here. This recipe is meticulously designed to maintain optimal moisture.
Moreover, the ease of preparing this bread means it’s perfect for busy parents or beginners who are just starting in the kitchen. With little preparation time and minimal cooking skills required, you can whip up this tasty treat in no time. Plus, it’s a budget-friendly recipe that utilizes ingredients you probably already have in your pantry, making it ideal for meal prep or healthy snacking.
A common misconception is that banana bread is a complicated dish that requires expert baking skills. In reality, this recipe proves otherwise. The simplicity of the ingredients and steps involved allows you to focus on other meals, while still being able to enjoy a homemade dessert. The wide variety of dietary accommodations and variations makes it even more appealing.
Ingredients You’ll Need
- Overripe bananas: The star of this recipe! The riper the banana, the better. Their natural sugars enhance the sweetness and flavor of the bread. Substitutes: If you don’t have overripe bananas, you can bake regular bananas in the oven for a few minutes to amplify their sweetness.
- Granulated sugar: Adds sweetness to the bread. You can adjust the amount to your preference or use brown sugar for a richer flavor.
- Butter: Provides richness and moisture to the bread. Feel free to substitute with vegetable oil or a dairy-free margarine for a vegan option.
- Eggs: Helps bind the ingredients together while adding moisture. For a vegan option, you can use flaxseed meal mixed with water.
- All-purpose flour: The foundation of any bread. Make sure to spoon it into your measuring cup to avoid packed flour, which can lead to a dense loaf.
- Baking soda: The leavening agent that helps the bread rise. Be cautious about using an expired batch, as it won’t yield the desired results.
- Salt: Enhances all flavors in the bread; don’t skip it!
- Optional add-ins: Chopped nuts, chocolate chips, or dried fruits can add extra flavor and texture. Feel free to customize according to your taste.
How to Make
- Preheat the oven: Before you start mixing, preheat your oven to 350°F (175°C). This ensures your banana bread begins cooking as soon as you place it in—allowing for a consistent bake. Prepare a 9×5-inch loaf pan by greasing it with butter or lining it with parchment paper for easy removal.
- Mash the bananas: Take your overripe bananas and place them in a medium bowl. Using a fork or a potato masher, mash the bananas until smooth. You can leave a few chunks for texture–it’s all about personal preference. The more ripe the bananas, the sweeter and smoother the batter will become.
- Mix wet ingredients: In a large mixing bowl, combine the mashed bananas with melted butter. Stir in the sugar and mix until fully combined. Add the eggs and vanilla extract, incorporating them well into the mixture. The batter will start to look rich and creamy, a sign that you’re on the right track.
- Combine dry ingredients: In a separate bowl, whisk together the flour, baking soda, and salt. Make sure there are no lumps in the flour and that the baking soda is evenly distributed. This step can help ensure that your bread rises evenly and doesn’t end up salty or flat.
- Combine wet and dry mixtures: Slowly add the dry mixture into the wet bowl, stirring gently. Be careful not to overmix, as this can lead to a dense bread. Mix until just combined; a few lumps are perfectly fine. If you’re adding nuts or chocolate chips, fold them in at this point!
- Pour into the loaf pan: Transfer the batter into the prepared loaf pan. Smooth the top with a spatula, ensuring it’s evenly distributed. You can sprinkle a few additional chocolate chips or nuts on top for an extra touch.
- Bake: Place your loaf pan in the preheated oven and bake for about 60 minutes. Check for doneness by inserting a toothpick in the center; it should come out clean or with a few moist crumbs. The aroma will fill your kitchen, making it tantalizingly hard to wait.
- Cool and serve: Once done, remove the bread from the oven and let it cool in the pan for about 10 minutes before transferring it to a wire rack. Allow it to cool completely before slicing. This step is crucial for getting clean cuts and enhancing flavor!
Variations & Substitutions
Chocolate Chip Banana Bread: If you’re a chocolate lover, consider adding semi-sweet or dark chocolate chips into the batter. This variation enhances the sweetness and adds a luxurious layer to the already moist banana bread. You could replace a quarter to half a cup of the granulated sugar with cocoa powder for a chocolatey twist. The richness of chocolate with the banana’s natural flavor results in a decadent treat, perfect for those who enjoy indulgent desserts.
Nuts & Seeds Banana Bread: For those who enjoy a crunch, adding nuts like walnuts or pecans can make a big difference. Nuts provide a delightful texture and an added source of healthy fats. You can substitute a portion of the flour with ground flaxseeds or chia seeds for a nutritional boost. This variation is excellent for vegetarian or health-conscious eaters who want to enhance their fiber intake while enjoying the rich taste of banana bread.
Vegan Banana Bread: To turn this banana bread recipe into a vegan delight, replace the eggs with a flaxseed egg (1 tablespoon of flaxseed meal mixed with 2.5 tablespoons of water). Substitute the butter with coconut oil or apple sauce. Using coconut sugar can add a nice caramel note to the flavor, making it a delightful option for those who avoid animal products while still wanting a moist slice of banana bread.
Gluten-Free Banana Bread: If gluten is a concern, using a gluten-free flour blend will work wonders for this recipe. Just make sure the blend has a good balance of gluten-free flours and is formulated for baking. Adding a pinch of xanthan gum can help with elasticity and texture. This variation allows individuals who are gluten intolerant to enjoy this beloved classic without missing out on its comforts.
Cinnamon Raisin Banana Bread: For a twist on the original, consider adding cinnamon and raisins to the batter. A teaspoon of ground cinnamon mixed with a half-cup of raisins will elevate the flavor profile, making it taste reminiscent of cozy fall days. This adds warmth to the loaf while providing natural sweetness from the raisins, altering its composition to cater to those with a sweet tooth.
Common Mistakes to Avoid
One of the most frequent mistakes is using bananas that aren’t overripe enough. If you use bananas that are still yellow or have only a few brown spots, your banana bread may end up lacking that rich flavor and moisture. Always opt for bananas with numerous brown spots or even blackened skins for solutions.
Another mistake is overmixing the batter. Minimizing mixing is essential for light and airy banana bread. When you see that the flour is just incorporated, stop mixing! Too much gluten develops from the flour, leading to a dense loaf that isn’t pleasing.
Not allowing the bread to cool properly can lead to uneven slicing and a gummy texture. It’s important to give it time on a wire rack—a step that enhances the flavor and eases the slicing process.
Using expired baking soda can also be a critical flaw. Always check your leavening agent’s expiration date before baking. An expired product won’t rise properly, and you may end up with a dense loaf instead of the fluffy banana bread you desire.
Storage, Freezing & Reheating Tips
To store your banana bread, wrap it tightly in plastic wrap or aluminum foil. Place it in an airtight container to keep it fresh for up to 3 to 5 days at room temperature. If you live in a particularly warm, humid climate, you may want to store it in the refrigerator, but know that this can dry it out a bit more quickly.
For longer storage, banana bread freezes exceptionally well. Wrap fully cooled bread in plastic wrap and then in aluminum foil, or place it in a freezer-safe bag. It can last up to three months in the freezer. When ready to eat, you can thaw it in the refrigerator overnight or let it sit on the counter for a few hours.
To reheat, you can slice it and pop it in the toaster or microwave for about 10 seconds to bring back that fresh-out-of-the-oven warmth. Just be mindful not to overheat, as that can dry it out, negating the deliciously moist texture you worked so hard to achieve.
Frequently Asked Questions
Can I use frozen bananas for banana bread?
Absolutely! Just thaw them and make sure to drain any excess liquid before adding them to your batter. This can actually help save time, especially if you often find yourself with overripe bananas in the freezer!
How can I make banana bread healthier?
You can substitute some of the granulated sugar with applesauce or honey, which provides natural sweetness. Additionally, using whole wheat flour instead of white can increase the fiber content, making your bread healthier while still tasting delicious.
What’s the best way to measure flour?
For the most accurate measurement, use the spoon-and-level method. Spoon the flour into your measuring cup without packing it, then level it off with a knife. This helps ensure you don’t end up with too much flour, which can lead to dense banana bread.
Can I make mini banana bread loaves?
Yes! Just adjust the baking time to about 25-30 minutes for mini loaves. Be sure to check for doneness with a toothpick, as they may bake faster but will still provide that amazing flavor.
What can I add to banana bread for extra flavor?
You can enhance banana bread by adding vanilla extract, spices like nutmeg or cardamom, or even citrus zest. Feel free to get adventurous with add-ins like coconut flakes or a swirl of peanut butter for a unique twist!
Conclusion:
The Best Moist Banana Bread is an irresistible treat that takes a beloved classic to new heights. The comforting flavors and moist texture make it a crowd-pleaser, whether you’re sharing it with family or savoring it solo. I encourage you to try this recipe as is or take the opportunity to customize it according to your taste. Don’t hesitate to share your creations with friends and family; this recipe can transform any moment into a special occasion. Happy baking!