Prep time: 15 minutes
Cook time: 5 minutes
Total time: 20 minutes
Servings: 8 servings
Banana pudding is a classic dessert that’s loved by many, often evoking memories of family gatherings and special occasions. This particular recipe — “Layered Magnolia Style Banana Pudding” — can be whipped up in just 20 minutes, making it perfect for busy parents or anyone looking to impress their friends and family without spending all day in the kitchen. Simple ingredients come together to create a creamy, sweet, and utterly delicious treat that everyone will adore.
What Is Banana Pudding: Layered Magnolia Style Banana Pudding in 20 Minutes?
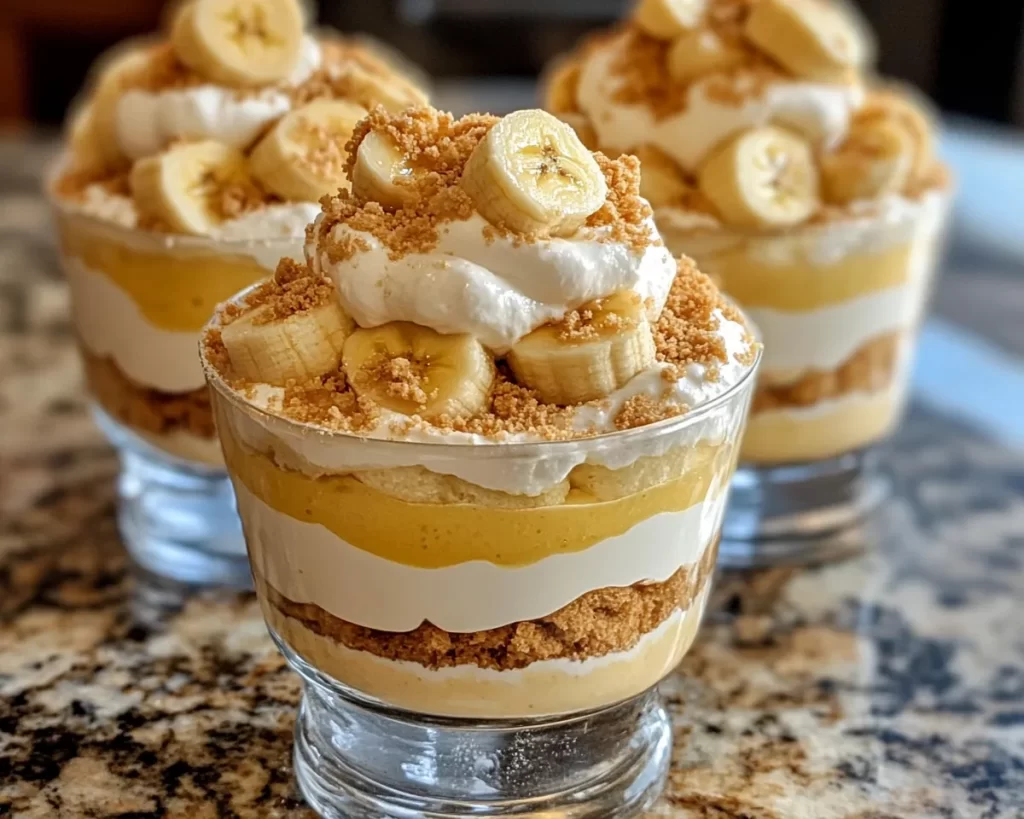
Banana pudding, especially the Magnolia Bakery version, is all about decadent layers of rich flavor and smooth texture. This dish typically consists of alternating layers of creamy vanilla pudding, fresh bananas, and crunchy vanilla wafers. The “Layered Magnolia Style” refers specifically to the way these ingredients are beautifully stacked to create a stunning visual appeal. It’s not just a dessert; it’s a feast for the eyes and the palate, and this recipe makes it accessible in just 20 minutes — no baking required! This is definitely a hands-on treat that features delightful flavors and textures, perfect for summer picnics or cozy family gatherings.
Why You’ll Love This
This recipe shines for several reasons:
- Quick & Easy: With only 20 minutes needed, you can create a dessert that looks and tastes gourmet.
- Minimal Ingredients: Most of the ingredients are pantry staples and inexpensive, making this an affordable choice for dessert.
- Customizable: You can easily modify the recipe to suit your dietary needs and preferences.
- Makes an Impression: Beautifully presented layers make it an impressive dish to serve guests.
This banana pudding is not only a delicious treat but also an easy way to spark joy and create lasting memories at the dining table.
Ingredients You’ll Need
- 1 (5-ounce) package instant vanilla pudding mix: This provides the creamy base for the pudding. Instant pudding is quick, easy, and yields a smooth texture.
- 2 cups milk: Whole milk is recommended for a creamier texture but any type of milk can work.
- 1 (14-ounce) can of sweetened condensed milk: This adds sweetness and a rich flavor, enhancing the overall decadence of the pudding.
- 12 to 14 ripe bananas: Fresh bananas add natural sweetness and a soft, creamy texture that complements the pudding perfectly.
- 1 (12-ounce) package vanilla wafers: These cookies add a delightful crunch and flavor that balances the softness of the pudding and bananas.
- Whipped cream or Cool Whip: Optional topping that adds a light and airy feel to the rich pudding layers.
How to Make
- In a large mixing bowl, whisk together the instant vanilla pudding mix and milk until the mixture is smooth and has thickened. This should take about 2 minutes. Make sure to scrape the sides of the bowl to ensure all the pudding mix is incorporated fully.
- Add the sweetened condensed milk to the pudding mixture, and continue whisking until well combined, creating an ultra-creamy texture. This extra layer of richness is what makes this pudding truly indulgent.
- Next, slice the bananas thinly, about ¼-inch thick, ensuring that you have enough to create multiple layers for the pudding.
- In a large serving dish, layer the ingredients starting with a layer of vanilla pudding at the bottom. Next, add a layer of sliced bananas, followed by a layer of vanilla wafers. Repeat these layers until you run out of your ingredients, making sure to finish with a generous layer of pudding on top.
- For an added touch, you can top the final pudding layer with whipped cream or Cool Whip. This not only enhances the flavor but also adds a beautiful finish to your dessert.
- Chill the assembled banana pudding in the refrigerator for at least 30 minutes before serving. This helps the flavors meld together beautifully and allows the wafers to soften just right.
Variations & Substitutions
Healthier Option: Opt for low-fat or almond milk and sugar-free pudding mix to create a lighter version of this dessert. You can substitute regular vanilla wafers with whole grain cookies or even gluten-free options, catering to dietary restrictions without sacrificing flavor.
Chocolate Banana Pudding: Introduce chocolate by using chocolate pudding mix instead. You can also layer chocolate syrup between the pudding layers for added richness. This variation gives a delightful twist that chocoholics will love!
Nutty Banana Pudding: Add a layer of chopped nuts such as walnuts or pecans for a crunchy texture that pairs wonderfully with the soft bananas and creamy pudding. A sprinkle of crushed nuts on top creates a beautiful finish.
Banana Pudding Parfaits: Instead of a traditional layered pudding, create individual parfaits using small glasses. This is great for parties or gatherings, allowing everyone to have their own serving and explore the layers uniquely.
Common Mistakes to Avoid
When preparing banana pudding, be wary of a few common mistakes. Ensure that your bananas are ripe but not overripe, as overly soft bananas can make the pudding mushy. Using too much milk can lead to a runny consistency, so stick to the recommended amounts for the best results. Lastly, if you assemble the pudding too far in advance, the wafers may become too soggy before serving. Aim to chill it for just enough time to meld and set, usually around 30 minutes.
Storage, Freezing & Reheating Tips
To store banana pudding, cover it tightly with plastic wrap or transfer it to an airtight container. It’s best enjoyed fresh but can last in the refrigerator for up to 3 days. If you’re planning on storing, keep the wafers separate and layer them just before serving to maintain their crunch. Unfortunately, freezing banana pudding is not recommended as it can cause the texture to become grainy upon thawing. Instead, enjoy your banana pudding fresh, storing only what you can finish within a few days for optimal taste.
Frequently Asked Questions
Can I make banana pudding ahead of time? Yes, you can prepare the pudding mixture and layer it the day before serving. However, it’s advisable to add the wafers just a few hours before serving to prevent them from getting too soggy.
What type of bananas are best for banana pudding? Ripe, yet firm bananas are ideal. Look for bananas that are yellow with a few brown spots; these will have the right sweetness without turning mushy.
Can I use different types of pudding mixes? Absolutely! You can experiment with flavors like chocolate, butterscotch, or cheese cake mixes. Each will give a unique twist to your banana pudding creation.
What can I substitute for vanilla wafers? If you can’t find vanilla wafers, you can use graham crackers or even ladyfingers. Just keep in mind that each option brings a slightly different flavor and texture.
How do I prevent bananas from browning? To keep your bananas looking fresh, consider adding a few drops of lemon juice over the sliced bananas before layering. This will inhibit browning and maintain a vibrant presentation.
Conclusion: Banana pudding is a classic dessert that delivers great satisfaction with minimal effort. This recipe, lavish yet simple, opens the door for various delightful variations, making it a wonderful addition to your back-pocket recipes. Whether it’s for a family dinner or a casual get-together, it offers warmth and comfort in every spoonful. Enjoy the process and share this delicious treat with those you care about!