Prep time: 30 minutes
Cook time: 45 minutes
Total time: 1 hour 15 minutes
Servings: 12
There’s something enchanting about the aroma of baked apples, cinnamon, and sweet syrup wafting through the air, invoking deep memories of cozy family gatherings. Have you ever craved a dessert that combines the warm flavors of apple pie with the delightful texture of baklava? This is where Apple Pie Baklava enters the scene, a beautiful fusion that will leave you and your guests in awe. Imagine flaky layers of pastry filled with tender spiced apples, all drizzled with fragrant honey syrup. This recipe not only satisfies your sweet tooth but becomes a centerpiece that’s bound to spark conversations.
In this article, you’re going to learn how to make this unique dessert delight, covering every essential detail. From perfecting the layering of phyllo dough to crafting that golden, syrupy drizzle, you’ll have all the knowledge you need to impress anyone who takes a bite. Your kitchen will be filled with enticing aromas, elevating your culinary skills and delighting all who indulge in this sweet creation.
What Is Apple Pie Baklava: A Unique Dessert Delight?
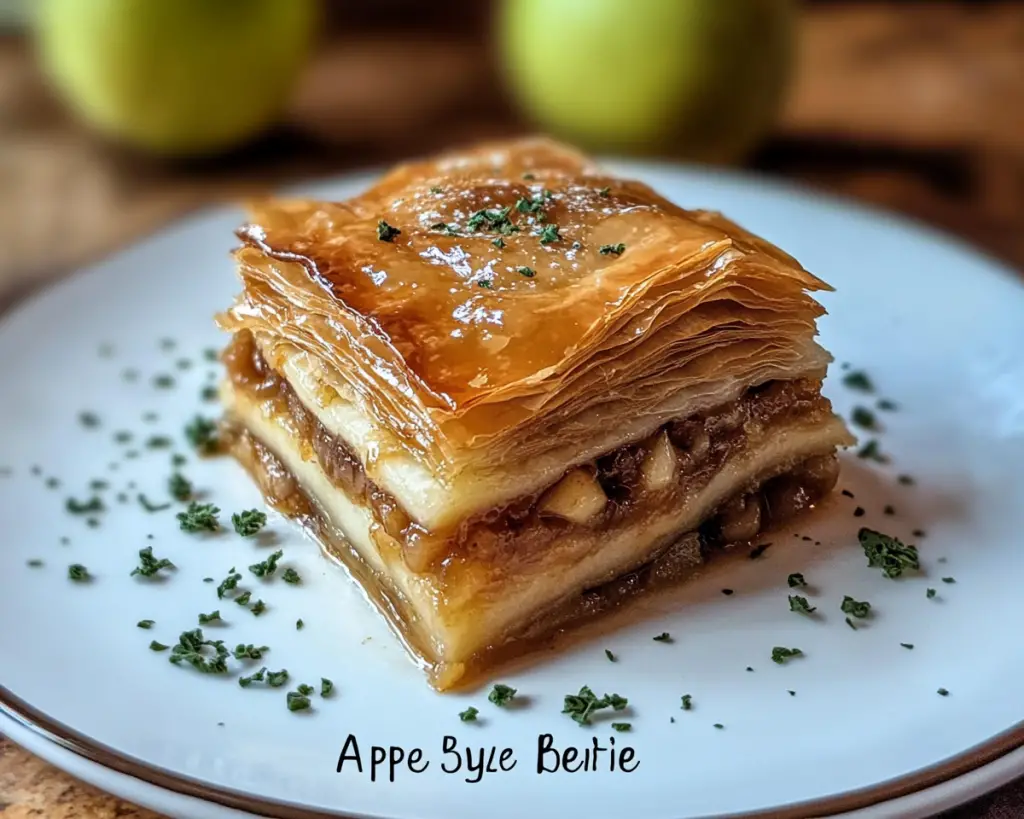
Apple Pie Baklava is an ingenious twist on the traditional Middle Eastern pastry, baklava. Originating from ancient Turkish and Greek cultures, baklava is renowned for its layers of phyllo dough, which are interspersed with nuts and sweetened with syrup. This delightful iteration incorporates spiced apples, transforming this classic into a comfort dessert. The overall texture is a captivating contrast: the crisp, flaky layers of phyllo enveloping tender, juicy apple filling create a symphony of crunch and softness.
Flavor-wise, Apple Pie Baklava captures the essence of classic apple pie while maintaining the rich complexity of traditional baklava. The apples are seasoned with warm spices such as cinnamon and nutmeg, harmonizing beautifully with the sweet, sticky syrup that seeps into the layers. Each bite is a perfect balance of sweet and tart, reminiscent of picking fresh apples in the fall. This dessert not only has a unique flavor profile but also offers visual appeal, showcasing the beautifully layered phyllo dough topped with a golden syrup glaze that glistens invitingly.
The preparation interweaves two beloved dessert traditions, creating a dish that’s both familiar and daringly different. Each layer tells a story that connects the eastern and western worlds of dessert-making, making it an excellent conversation starter at any gathering. Whether you’re serving it at a holiday feast or just a cozy family dinner, Apple Pie Baklava is a dessert that fits seamlessly into any occasion.
Why You’ll Love This
You’re bound to love Apple Pie Baklava for numerous reasons. Firstly, the extraordinary flavor profile combines the sweetness of apple pie with the rich, nutty notes typical of baklava, offering a unique combination that’s sure to impress. The preparation may appear elaborate, but this recipe is surprisingly easy, making it accessible even for beginners in the kitchen. You’ll find that the layers of phyllo are straightforward to assemble, and the end result rewards your effort with a jaw-dropping dessert.
Additionally, the cost of making this dessert is relatively low, especially when compared to the rich flavors and textures it delivers. You may already have many of the ingredients on hand, such as apples, sugar, and spices, limiting your grocery expenses. This makes it a fantastic choice for those on a budget who still want to showcase an impressive dessert.
Moreover, it caters to various dietary preferences. By swapping certain ingredients like sugar for natural sweeteners or using gluten-free phyllo dough, this dessert can accommodate various diets without compromising on taste. It’s versatile enough that you can adapt it to fit your needs, whether you’re serving a crowd or enjoying it as a personal treat.
Common misconceptions about baklava involve its complexity, leading many to believe that it’s reserved for special occasions or expert bakers. In truth, with this recipe, anyone can create a showstopper that looks and tastes like it came from a high-end bakery. Just remember, simplicity can yield stunning results, especially in the world of baking.
Ingredients You’ll Need
- Phyllo Dough: This layered pastry creates the crunchy texture essential for baklava. Look for it in the frozen aisle of your grocery store. Make sure to thaw it in the refrigerator overnight before using it.
- Apples: Granny Smith or Honeycrisp apples work wonderfully due to their tartness and crispness. If you prefer, you can substitute them with your favorite type of apple.
- Butter: Melted butter is what helps to achieve that golden crispness in the phyllo layers. Be generous when brushing it onto the layers.
- Brown Sugar: Using brown sugar gives a richer flavor compared to white sugar. It enhances the overall taste, creating a more profound and satisfying sweetness.
- Cinnamon and Nutmeg: These spices not only add warmth and depth of flavor to the apple filling but are quintessential in achieving that classic apple pie taste.
- Walnuts: Chopped walnuts add a delightful crunch and are traditional in baklava. You can also substitute or mix with pecans or almonds if desired.
- Honey: A key ingredient to sweeten the syrup, honey adds floral notes and complements the apples beautifully. You can also use agave syrup for a vegan option.
- Vanilla Extract: This will enhance the overall flavor profile, adding a subtle warmth that rounds out the sweetness.
Each ingredient plays a vital role in building the flavors and textures. Choosing quality ingredients will elevate your dish, making each bite a rewarding experience.
How to Make
1. **Preheat the oven:** Begin by preheating your oven to 350°F (175°C). This step ensures even baking, giving your baklava a beautifully golden exterior.
2. **Prepare the apple filling:** In a large bowl, peel, core, and thinly slice the apples. Add the brown sugar, cinnamon, nutmeg, vanilla extract, and chopped walnuts, mixing thoroughly to combine. Let the mixture sit for about 15-20 minutes to allow the apples to release some of their juices, which will enhance the flavor.
3. **Prepare the phyllo dough:** Carefully unroll the thawed phyllo dough on a clean, flat surface. Cover it with a damp cloth to prevent it from drying out. Take a baking dish (about 9×13 inches) and brush a thin layer of melted butter on the bottom. This initial layer serves as a non-stick base.
4. **Layer the phyllo:** Using a pastry brush, liberally brush one sheet of phyllo with melted butter and then place it into the baking dish. Repeat this process with 5-7 sheets, layering them one on top of the other. This creates a sturdy bottom layer for your baklava.
5. **Add the apple filling:** Spoon a generous layer of the apple mixture onto the phyllo. Use a spatula to spread it evenly. This is where the delicious flavors start to take shape, and the aroma will begin filling your kitchen.
6. **Continue layering:** Cover the apple filling with more layers of phyllo, repeating the buttering process as before. Aim for an additional 5-7 layers to provide a crispy top layer. Remember to keep the remaining phyllo covered to prevent it from drying out.
7. **Cut the baklava:** Using a sharp knife, cut the baklava into diamond or square shapes prior to baking. This allows the syrup to seep into all layers evenly and ensures easier serving.
8. **Bake:** Place the baklava in the preheated oven and bake for approximately 45 minutes, or until it is golden brown and crisp on top. The aroma wafting from the oven will be almost irresistible!
9. **Prepare the syrup:** While the baklava is baking, make the syrup by combining sugar, water, and honey in a saucepan. Bring to a boil, while stirring to dissolve the sugar. Reduce heat and let it simmer for about 10 minutes. Add the remaining cinnamon and lemon juice, and allow it to cool slightly.
10. **Apply the syrup:** Once the baklava is done baking, remove it from the oven and immediately pour the syrup over it while it’s still hot. Allow the syrup to soak in for at least 30 minutes before serving. This soaking is crucial, as it infuses every layer with sweetness, creating that signature baklava experience.
11. **Serve and enjoy:** Once cooled, cut through the pre-marked lines for serving. Each piece should showcase those beautiful layers, providing a stunning display as well as a delectable treat. Serve with a side of whipped cream or vanilla ice cream if desired for an extra indulgence.
Each step takes you closer to that glorious finale – a rich, sweet dessert that beautifully marries two beloved traditions.
Variations & Substitutions
Nut-Free Alternative: If you’re catering to nut allergies, you can simply omit the walnuts. The absence of nuts may alter the traditional baklava texture, but you can mimic the crunch by adding crushed animal crackers or graham crackers to the apple filling for added texture. This ensures that you won’t lose the delightful crunch, while keeping it safe for everyone to enjoy.
Vegan Version: To make your baklava vegan, you can substitute butter with coconut oil or a plant-based margarine. For the honey in the syrup, using maple syrup or agave will keep the sweetness intact while adhering to vegan principles. This version still captures that indulgent experience without the animal products, making it an inclusive treat for all dietary preferences.
Spiced Up: For those who enjoy a flavor twist, experiment with spicing. Add a bit of cardamom or ginger into the apple filling for a unique aroma and depth. This addition complements the apples wonderfully, offering an unexpected kick that can intrigue your guests.
Fruit Mix:** If you’re feeling adventurous, incorporate other fruits such as pears or cranberries into the apple filling to diversify the flavor profile. This adds complexity and can create a delightful seasonal twist, perfect for any fruit lover.
Gluten-Free Option: For those avoiding gluten, many brands offer gluten-free phyllo dough. Ensure you read labels to select a reliable product; this way, you can still enjoy the wonderful textures without any dietary concerns. Pair it with an adjusted syrup that doesn’t contain gluten, maintaining integrity in your dessert.
Each variation opens up new possibilities, allowing you to cater to various tastes and preferences, making this baklava even more versatile.
Common Mistakes to Avoid
One of the most prevalent mistakes while making baklava is not adequately brushing the phyllo layers with **melted butter**. The butter is essential for achieving that delicious crisp texture; skipping this step leads to a soggier result, so brush generously.
Another common issue is overcooking the apples. Apples should retain some firmness; if they are cooked down too much before baking, they may end up mushy and detract from the overall experience of the layered texture. Aim for a balance of soft yet not overly mushy apples to keep that inviting bite.
Additionally, it’s critical to allow the baklava to soak in the syrup for an adequate period after baking. If you dive in too soon, you risk missing out on that sweet, sticky goodness that makes this dessert so exceptional.
Lastly, ensure that your phyllo dough remains covered at all times while you work. Once exposed to air, it dries quickly, making it difficult to work with and resulting in a less enjoyable texture.
Staying vigilant about these potential mistakes will help ensure your Apple Pie Baklava turns out perfectly delicious.
Storage, Freezing & Reheating Tips
Storing baklava properly is essential to maintain its freshness. Ideally, place it in an airtight container at room temperature for up to 3 days. If you need to store it longer, refrigeration can extend its life up to a week.
For freezing, wrap individual pieces in plastic wrap, then place them in a freezer-safe container, where they’ll stay fresh for up to 3 months. When you’re ready to enjoy, simply remove the desired amount and let it thaw at room temperature.
Reheating baklava is a delicate process to prevent it from losing its crisp texture. Warm it in the oven for about 10-15 minutes at 350°F (175°C), ensuring it doesn’t lose that wonderful crunch. Avoid microwaving, as it can make the phyllo soggy, ruining the delightful layers you worked so hard to create.
When discussing food safety, be diligent about checking for any signs of spoilage (look for changes in aroma or texture) before consuming leftovers. Storing and reheating properly allows you to enjoy your baked masterpiece long after it’s been made.
Frequently Asked Questions
Can I prepare baklava the day before serving?
Absolutely! In fact, allowing the baklava to rest overnight can enhance its flavor as the syrup has more time to soak into the layers. Just be sure to cover it well to maintain its texture.
Is it difficult to work with phyllo dough?
Phyllo dough can seem daunting because it’s so delicate, but with practice, it’s manageable. The key is to keep it covered with a damp cloth while working and brush each layer liberally with butter to ensure it doesn’t dry out.
What is the best way to serve baklava?
Baklava can be served on its own, but pairing it with a scoop of vanilla ice cream or a dollop of whipped cream can elevate the dessert experience. The creamy texture of the ice cream complements the crunchiness of the baklava.
Can I customize the spices in this recipe?
Definitely! Feel free to experiment with spices like cardamom, cloves, or allspice. The traditional cinnamon and nutmeg are fantastic, but if you have a preferred lineup of spices, go ahead and customize the filling to your taste.
How can I make this recipe gluten-free?
You can use gluten-free phyllo dough, which is available in specialty grocery stores or online. This allows you to maintain the classic baklava texture without any gluten, catering to dietary restrictions.
Conclusion:
Apple Pie Baklava is not only about satisfying a sweet craving; it’s about bringing two wonderful culinary traditions together in a unique and delightful creation. Its layers of flavor, texture, and warmth are just waiting to be experienced. I encourage you to try this fabulous recipe, customize it to fit your tastes, and share it with friends and family. Embrace the joy of baking, and make this dessert a staple in your kitchen. Happy baking!


